TunerStudio Settings and Tables
Joe Angell
I thought I should go over some of my TunerStudio settings for a successful first drive. The previous posts have been a lot of trial and error and diagnosing problems, but this should provide a bit more of a guide to getting on the road, hopefully without much stalling or engine stumbling. I’d suggest checking the MegaSquirt Initial Testing and Engine Odds and Ends first, as there I outlined basic settings and setup that aren’t covered here.
Note that this is all from my novice point of view. I’d suggest checking around for other information than relying solely on this, but this is what I found worked for me. I also specifically do not supply my tune or specific tables, as it is better if you learn how to set these tables up yourself (even if you’re just hand-copying mine from images) than just loading my tune, as you do need to understand these settings to get your engine tuned.
Getting Idle Working
This is the first thing you need to do, so your settings should be set up to accomplish this goal. VE Table 1, AFR Table 1 and the Ignition Table are all auto-generated from the engine specs as mentioned in the post linked above.
Next you need to start the engine. Assuming you have fuel pressure, that the injectors have been tested and are working, and that you have spark configured correctly, you’ll need to make sure the throttle is open enough for the engine to start and stay running. There are a few ways to do this:
Manually holding the throttle open.
Using Output Test Mode - Idle Valve to open the IAC to allow air in.
Tinkering with Open Loop idle and the Idle Warm Up Duty/Steps curve.
I’d suggest using Test Mode, just to reduce the number of variables and to keep things simple for the time being. For my IAC, the open position is 0 steps, and the closed position is 200 steps, which I found using a Test Mode as outlined here. Before you do this, find the throttle screw on your engine and close it all the way. We’re going to rely entirely on the IAC to control the throttle for the moment.
While still in Test Mode, close the valve about half way by adjusting the Idle Valve Step and clicking Enable Test - Run Position. Mine uses 200 steps to home, so I set it to 100.
Ignition
Now try to start the engine. If it doesn’t start, and you’re sure you have fuel and spark, change the Idle Valve Step to let more air in, and try again.
Once the engine starts, it is probably revving pretty high. Close the IAC a bit by adjusting the Idle Valve Step until you’ve got the idle down to around 1000 RPMs or so. You want to be higher than your target idle (790 RPM here) during warm-up.
Warming Up
The immediate goal is to warm up the engine without any side effects. You can open the IAC further or pull the throttle, thus revving the engine and warming it up faster, but you might want to monitor things like the AFR and make sure the catalytic converters aren’t glowing or anything else bad is happening, so warming up a bit slower is probably a better idea.
While the engine warms up, we’re going to tweak the VE table to avoid overly rich and lean conditions, and adjust the IAC as above to bring the RPMs down to an idle range. This is all with the goal of getting the engine up to operating temperature (about 190 degrees in this case) while keeping the AFR in range. We can’t do real idle adjustments until the car is warm, and we don’t want anything to break while it’s warming up.
If you check the AFR now, you’ll likely see that it’s running really rich or really lean, because the VE table isn’t tuned at all. To fix this, open VE Table 1 and look for the blue line that’s moving on the table. This marks the current engine MAP and RPM. MegaSquirt linearly interpolates between the four cells nearest to the end of the line. I don’t think the idle will seek when set to open loop, since it’s just running fixed amounts of fuel and air into the engine, so the line should be reasonably stable. On my car, the idle cells have a MAP of around the 30-40 kPa.
The goal here is to adjust the idle part of the VE table while watching the AFR gauge, with the goal of keeping the AFR in the 10-11 range when cold, increasing it with temperature until you’re in the 14 range at 190 degrees. I’m using 14. for my lean AFR. 14.7 is the ideal stoichiometric ratio, but it seems idles tend to run lean for whatever reason. If you run too lean (closer to 20, meaning too much air), your cats and exhaust will start to glow red; if you run too rich, the you’ll be throwing unburned fuel out of the exhaust and wasting gas. Again, the goal here is just to warm up the engine without glowing the cats, and to get a feel for how editing the VE table adjusts the AFR.
As an aside, VE table units are an unsigned byte, meaning they range from 0 to 255. I found that I had to add about 20 to 30 units to get my AFR in the desired range at the target RPMs over the auto-generated table.
Ideally Adjusting the IAC When Warm
Once the engine is up to temperature, you can start tuning the idle. Start by adjusting the Idle Valve Step until the engine is running at your desired idle RPMs .
Ideally, the IAC should be completely closed when warm. This gives MegaSquirt the maximum number of steps over which to control the idle. Whatever your IAC is set to right now, it’s probably not completely closed — since we previously closed the throttle screw all the way, the IAC is the only way the engine is getting any air. If it is completely closed, you might have a vacuum leak somewhere, or your throttle isn’t closed for some reason.
Start opening the throttle screw. This will cause the engine to rev as more air is allowed in. You’ll need to adjust the Idle Valve Step to close the IAC as you go. Keep doing this until the IAC is completely closed and you are at your desired idle RPMs solely baed on the throttle screw position. This was more annoying to do with my throttle, as the screw was under the throttle arm, and the throttle needed to be opened to adjust the screw. That meant either opening the throttle all the way with the engine running, or turning the car off, adjusting the screw, and starting it again. I opted for the latter.
Setting Up Closed Loop Idle
Now you can turn the car off, because it’s time to set up the idle system. You have to choose between open loop and closed loop idle, which is set from the Idle Control window:
Open Loop: You set the IAC steps for a given coolant temperature via the Idle Warm Up Duty/Steps. This is a simple linear relationship, and doesn’t have any automatic adjustments for engine load and the like.
Closed Loop: You set an RPM target for a given coolant temperature via the Closed Loop Idle Target RPM Curve. This will automatically adjust the amount of air based on what you want the RPMs to be, and can properly account for engine load.
I’m using closed loop. It was fairly simple to set up, as most of the default values are just fine. A few important points for the Closed Loop Idle Settings window:
Set the Idle Valve Closed Steps and Idle Valve Open Steps to what you found in Test Mode. for me, it was 0 for closed and 200 when open.
Set Use Last Value or Table to Use last value for now. When the idle system needs to kick in (say, because you slowed to a stop), it will use the last IAC position as a starting point for idling. This is fine for getting things set up, but I found that the car would stall (or the RPMs would drop very low if I didn’t) when decelerating. I’ll go over using a table later, which completely solved this problem for me.
You probably don’t need to mess with the other settings in this window at this point, or possibly at all.
The Closed Loop Idle Target RPM Curve is a set of values that sets the RPMs given a coolant temperature . The closed loop system then adjusted the IAC to hit the desired RPMs. You’ll want the ending to run at somewhat higher RPMs when cold for reasons. I have mine set fairly linearly, with the high being 1000 RPM at or below 70 degrees, and down to 790 RPM at 140 degrees. While 3.0L engine’s operating temperature is 190 degrees, it seemed to be fine at 140 degrees, so I left it at that. If you find the RPMs dropping too much when driving while cold, you can raise the RPMs a bit at that temperature to compensate, but you won’t be worrying about that until you do some test drives.
If you start the engine now (it should still be hot), the engine will rev, then should settle down to the the RPMs you set for that temperature.
You will also likely want to adjust the Closed-Loop Gain slider in the Closed-Loop Idle Settings. This slider determines how aggressively the ECU tries to get back to idle RPMs. If you set it too high, the engine will seek. Set it too low, and it will just take longer than expected to get back to idle RPMs. For examples after putting my car in park with the default value of 500, the engine would drop into the 600 RPM range and would take 5-10 seconds to get back up to the 790 idle target. As the tooltip suggests, I increased it until my car started seeking, pausing a few seconds between each change for the engine to settle, then brought it down again until it stopped seeking, settling at around 2500. Later the seeking came back and I lowered it further to around 2100. My idle now returns to 790 RPM much faster than it did before.
My settings for the closed loop idle targets. The last column is the hot idle, which here is 810 RPM, but which I later set to 790 RPM.
Cranking Adjustments
You might notice that your RPMs shoot up quite high on ignition, then settle down towards your idle. You can control the IAC steps on startup through the Idle Cranking Duty/Steps window. Given a coolant temperature, this will set the IAC steps. The IAC should be more open when CLT is colder. If the idle is too high, adjust the number of steps and restart the car and see if it’s more reasonable.
My IAC steps during cranking. I lowered it from the initial 150 when cold to 100 to keep the RPMs from revving to 2000 on start, although with more testing I will likely reduce it even further
Post-Idle, Pre-Drive VE Table
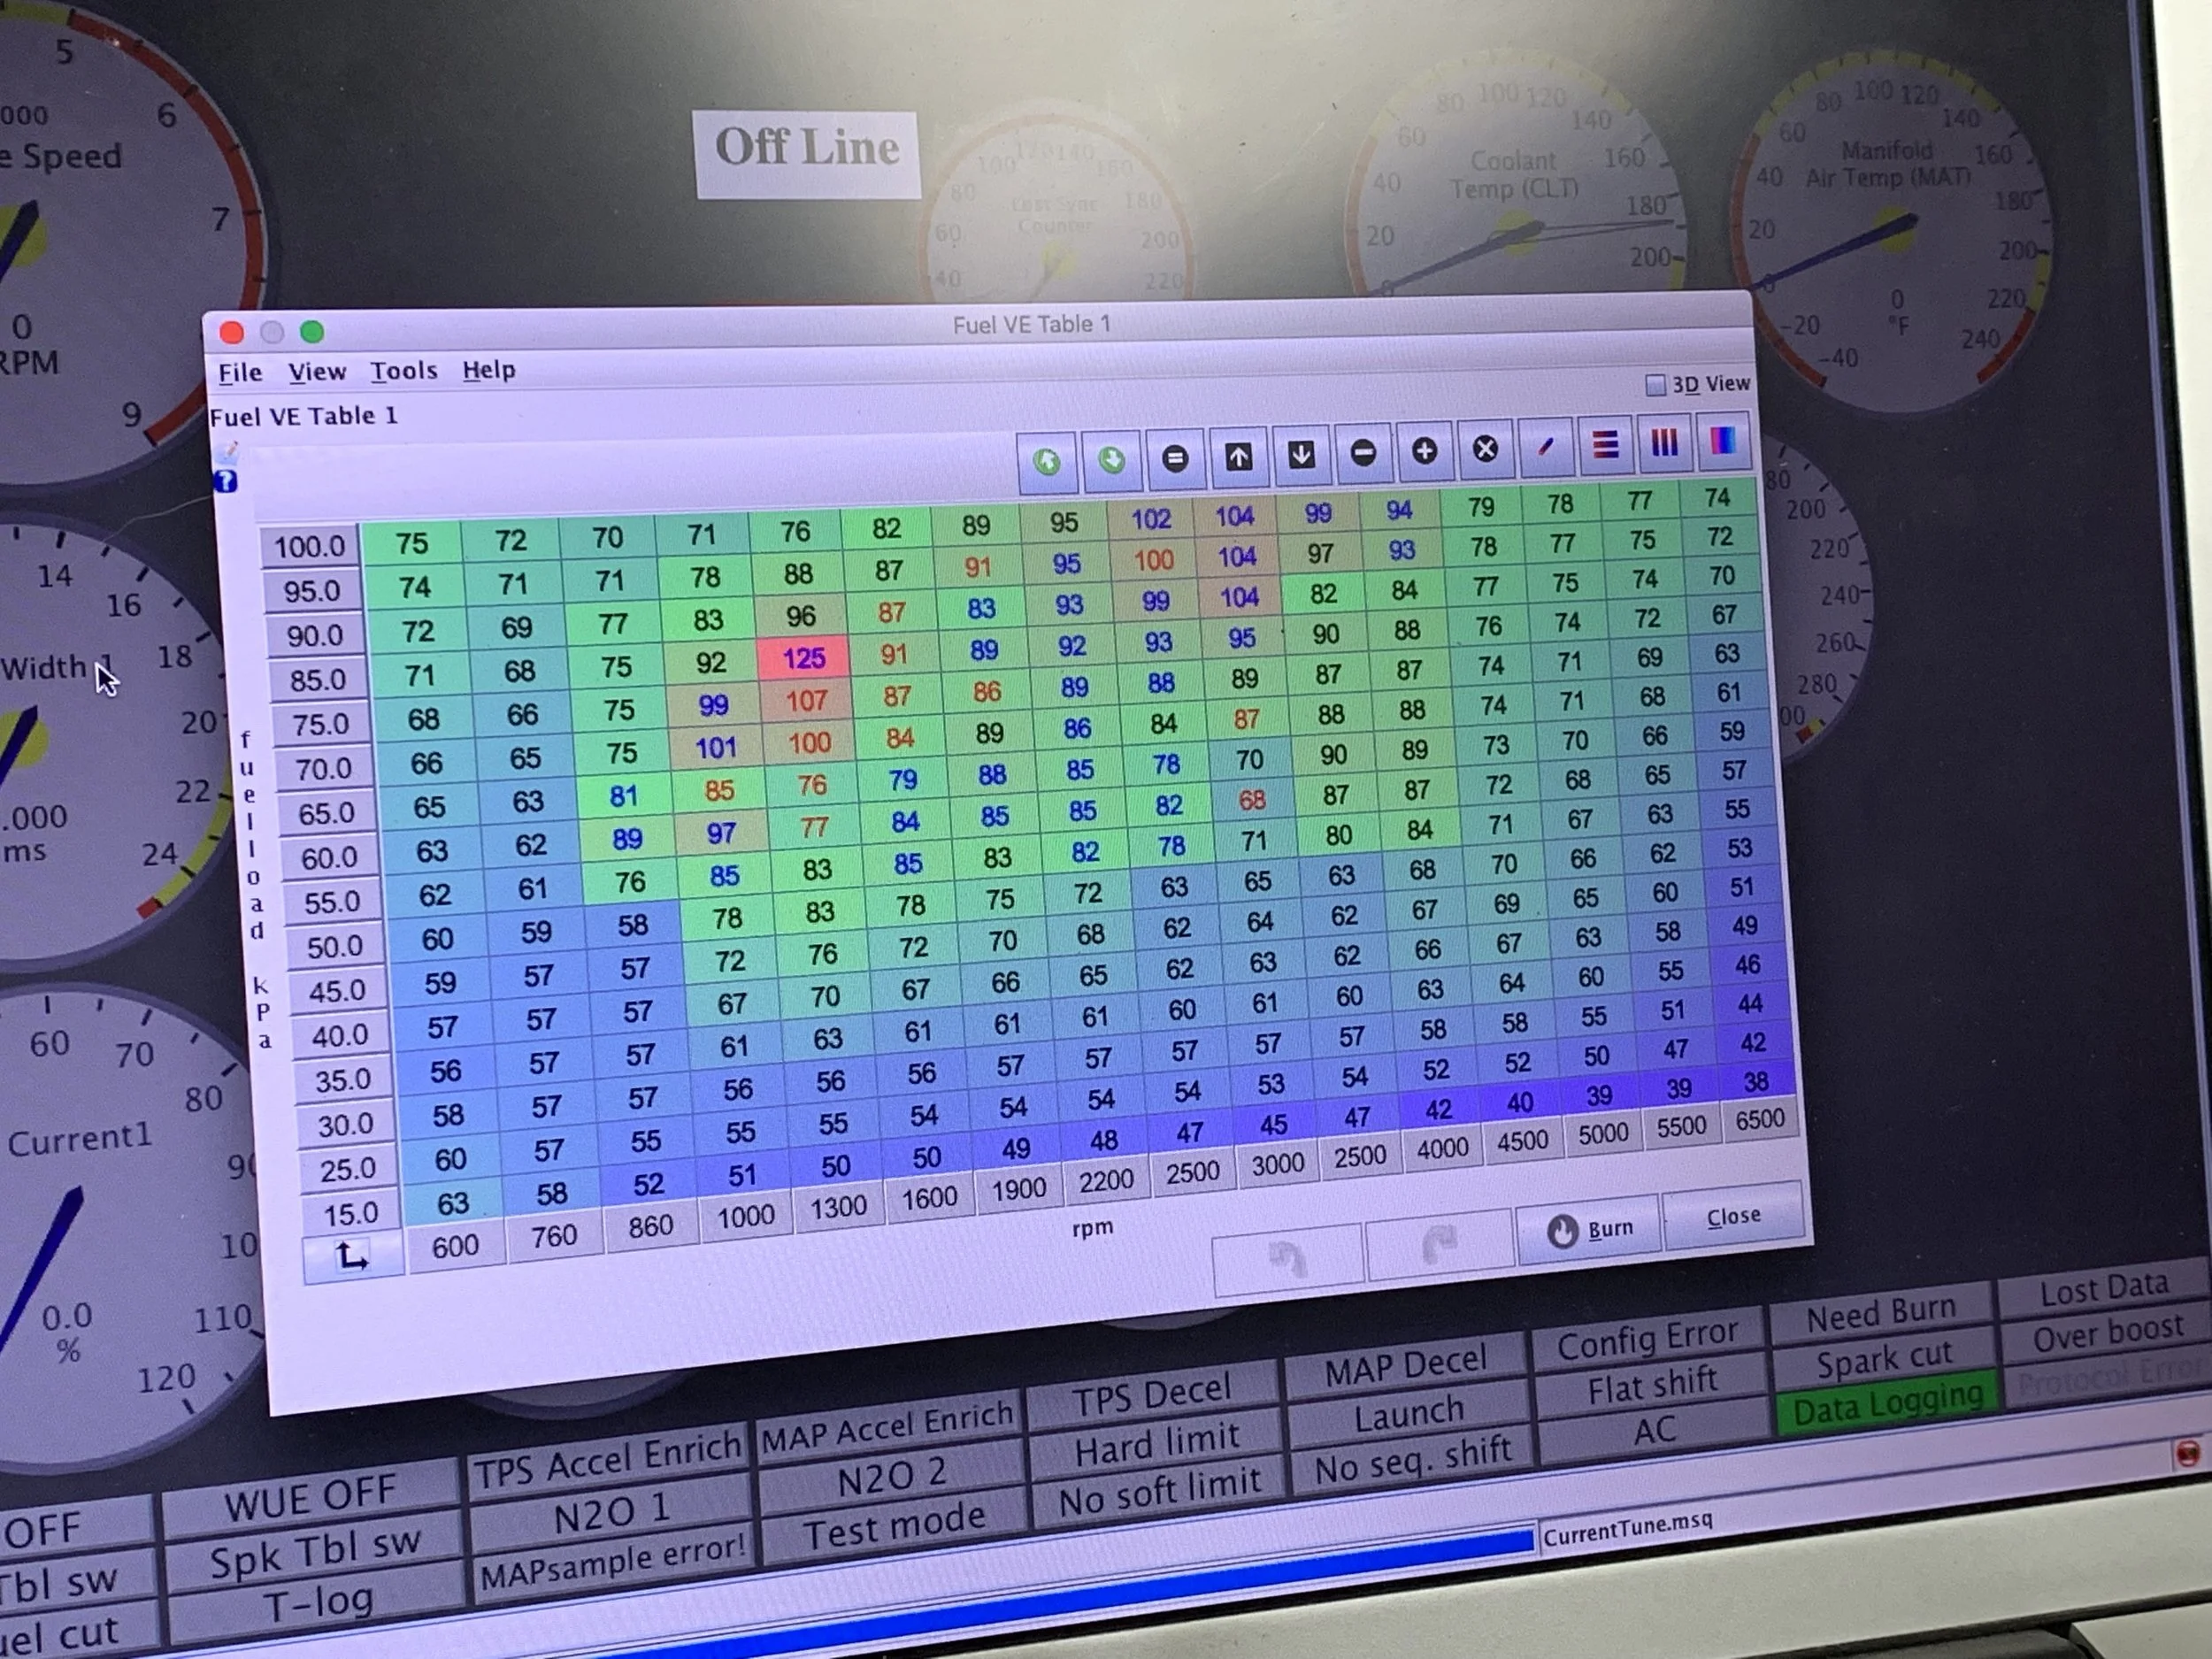
After getting my idle to work, I updated the VE table account for it. You don’t want large jumps in your VE table, so I found my idle block and interpolated all the cells above, below, left and right to that. Note that the table has lower values in the far right columns so you’ll want to interpolate a column or two earlier than that. The table should be fairly smooth now.
I also re-defined a few of the RPM columns. If you click the arrows in the lower-left corner of the graph, you will open the re-binning tool. With this you can change the values of the columns, adding more specific cells around your idle, which may make it easier to provide consistent fuel there. I redefined the first column as 600 RPM for the low end, with the second column set to 740 and the third to 840. My idle sits right in the middle of those cells at 790 RPM.
My “clean” VE table, after setting up the idle cells between 740 and 840 RPM and 35-45 kPa. The rest of the table is interpolated from those values to the edges of the table.
Post-Idle, Pre-Drive Ignition Table
You can use the ignition table to keep the car from stalling by increasing the advance on the low end of the table. This is described under “Correct Timing” in this article. I also re-binned the cells to give me more idle columns on the left side, with 500, 650, 790 and 950 on the left, although I can probably get rid of the 500 one. I made best guesses to evenly space the remaining columns. 790 RPM is my idle speed, with the idle cells in the 30-40 kPa range set to 14.0 degrees. The 500 and 600 columns were then to about 18 degrees. The ideal here is that if the engine speed does too low, the advance will increase and cause the RPMs to rise back into the idle range.
The ignition table with a the idle set to 790, with the leftmost columns set to a higher advance to help recover from low RPM situations.
Testing the Initial Tune
There are two more things left to deal with: acceleration and deceleration. Then we can go for a drive.
With the engine switched on, try tapping the gas, or revving quickly and then releasing the gas. You’ll probably notice starvation when revving, possibly including stalling or at least stuttering before it stabilizes at the new RPM. You may also experience stalling or very low RPMs when releasing the gas. You’ll want to get these resolved before you go for a drive, unless you want to block the road while you start your car again.
Fixing Deceleration Stalling: Switching Closed Loop Idle to use the Initial Value Table
To fix stalling when releasing the gas, I had to switch the closed loop idle’s Use Last Value or Table setting to Use initial value table. With Use last value, the idle tries to use whatever the last IAC position was before it left idle as the new starting position when entering idle (such as from when decelerating), but it seems this was usually wrong and would cause unacceptably low RPMs when the throttle closed on deceleration. Switching to Use initial value table causes the engine to look up an IAC position for the current RPM and temperature (CLT or MAT) from the Closed-Loop Idle Initial Values . Setting up this table fixed my low idle and stalling issues when decelerating.
You’ll want to set the Use CLT or MAT in Table Lookup is set to MAT if you have a manifold air temperature sensor; otherwise, use CLT. MAT is better since the air temperature affects the air density, which affects the air/fuel ratio, and thus will give you better results.
For the table, this article provides information about how to find good initial values using IAC test mode as your engine warms up. For whatever reason I didn’t seem to get good results here, so what I did instead was just start the car, look at where the “current value” squiggle was, and revved the engine while watching the RPMs as I let go of the throttle. If they went too low, I increased the number of steps for that cell. Eventually I got it to not drop too much below my idle RPMs. This doesn’t help with tuning for when the car enters idle with higher RPMs (such as slowing down with the throttle closed), but where I’ve simply entered best guess values. It’s likely that I’ll have to adjust the other cells by looking at logs, or with a passenger managing the laptop while I drive.
Note that MAT is often higher than ambient temperature, which is why my table goes up to 150 degrees. It’s not clear to me if I should go even higher than that.
I think you need to burn the table after making changes here. This is safe to do while the car is on, but probably shouldn’t be done while actually driving, as it will cause a half second or so of “burn stumble” on MegaSquirt II while the data is written to the controller.
My initial closed loop initial values table
Fixing Acceleration Stalling: Initial Acceleration Enrichment Settings
I had to give up on TPS-based enrichment due to a binding TPS, and use MAT instead. TPS has quicker response, but this is a naturally aspirated car with a low compression engine — MAT is just fine.
For these initial settings, you’ll want Wall Wetting AE (EAE) to be off. EAE requires a perfectly set up VE table, and models the amount of fuel collecting in the cylinders between ignition events. Once properly configured, it gives factory levels of acceleration enrichment at all RPMs and MAPs, but you shouldn’t worry about that until you much later in the tuning process.
For simple acceleration enrichment, the Time-Based Accel Enrichment window is used to set up a curve that maps how much extra fuel is added (in milliseconds of injector pulse width, in MegaSquirt II; this is different in MS III) given how quickly the MAP is changing (MAPdot). For whatever reason my MATdot table was empty, so I just copied the one from he TPS side of the window to the MAP side, and dragged the slider all the way to the MAP side. I then revved the engine, and if it stumbled I increased the first cell in the Added row. Once the engine revved well, I increased the other cells by the same amount. This is just to give me some initial values; final values will rely on logs.
Make sure your TPSdot or MAPdot is always higher than idle. For my car, this seemed to be around 100 for MAPdot. I tried setting it to 60 once, and the ECU would try to do acceleration enrichment simply when I was idling. This caused the car to run badly and stall at one point, and once it restarted it ran very badly and coughed out black soot and partially unburned fuel. Later it had trouble accelerating from idle at all, running very slowly before finally correcting itself when I released the gas. After I set MAPdot up to 100, it worked fine again.
Also note that some of the settings are recommended to be set to specific values according to the tooltips in TunerStudio. I found that tweaking these to higher values worked much better for my car. At this point you just want the car not to stall, so just try to get
My initial acceleration enrichment table. Most of the values are at their defaults, with the MAP based AE curve adjust so that the car didn’t stall or stumble when revving in Park.
Logging
Before you go for any drive, choose Start Logging from the Data Logging menu. You’ll want logs to analyze after your drive, and you never know which drive will be important. A single log can span multiple engine shut-offs and ignitions, so don’t forget to stop logging once you’re done for with your drive.
Go Drive
At this point we have:
Stable closed-loop idle
No stalling/stumbling on deceleration
No stalling/stumbling on acceleration
We’re ready to go for a drive. The car should operate reasonably well, but you still have an untuned VE table. You probably can’t do much with the ignition table without a dyne, so I simply didn’t touch that at all for my tune. But for the VE table, you can make use of auto-tuning.
There are two immediately useful features here:
Warmup Enrichment 1
This will automatically set the Warmup Enrichment (WUE) curve for you. WUE adds more fuel when the engine is cold to compensate for the increased density of the cold air in the intake. Since you can really only play with this once a day due to how long it takes the engine to cool down again, using auto-tune for this is very useful.
Fuel VE Table 1
This is where you just set it and go for a drive. It will update the VE table while you drive based on the AFR Target table, automatically applying changes as you go. I’m using the auto-generated AFR table for a naturally aspirated engine with no changes, which should be fine.
You can set how easily cells are adjusted with the Cell Change Resistance. It seems that you start with Very Easy for your first drive to get some basic values filled in, then change it to Easy, and then Normal as the table gets more and more stable. Further tweaking can be done with Hard and Very Hard, where only very out-of-compliance cells will be adjusted.
Before you turn on auto-tuning, select your idle cells, right click, and choose Lock Selected Cells. You don’t want your idle to be tuned, and locking those cells keeps auto-tune for touching them at all.
I would also recommend saving the VE table as a separate file before you start auto-tuning. This way if you want to start over, you don’t have to manually re-create your table — you can just load it. Or you can use a restore point, if you prefer.
Lambda Delay Table
At this point you may have gone for some drives, but auto-tuning is probably not doing what you want it to do. This is because the default Lambda Delay table is not set up properly for your engine, and the wrong cells are being tuned. The default table is almost certainly wrong for your engine.
Like the AFR table, the Lambda Delay table is used exclusively for auto-tuning. As mentioned above, the AFR table tells the the auto-tuner what the AFR should be for a particular cell, and TunerStudio adjusts the VE table until to get to that AFR.
The catch is that a change to the fuel amount (injector pulse width) does not reach the oxygen sensor instantly. I takes time for the fuel to get into the cylinder, burn, and be ejected out the exhaust port and past the sensor. How long this takes depends on the current engine MAP and RPMs. The Lambda Delay table is a map of the time in milliseconds between a pulse width change and an oxygen sensor reading at a given MAP and RPM. If this table isn’t set up correctly, TunerStudio will try to adjust the wrong cells, especially during rapid MAP and RPM changes like during acceleration. This will result in a bad tune.
To make a Lambda Delay table, you’ll first want to change the extents of the table itself. The default is 0 to 100 kPa for MAP, and 600-6000 RPM. I idle at 40 kPa, so I was unlikely to hit cells below that when driving and auto-tuning, The minimum fuel load defaults to a higher value than my deceleration cells, so it’s not going to tune those anyway. I changed the MAP axis to 100, 75 and 50. For RPMs, I set it to 1000 on the low end (a high idle) and 3750 on the high end, which is the peak torque for the 3.0L engine, but also a range I don’t usually get to unless I drop a gear on the automatic transmission.
To populate the table, you need to go over your logs and find rapid changes in injector pulse width (PW), and correlate them to rapid changes in AFR. The easiest way to do this is to set up a graph in MegaLogViewer that shows AFR, PW and Time, and another with RPM and MAP. When you find a candidate transition event, position the cursor at the start of the pulse width change, then drag (or shift-click) to the right in the graph to the start of the AFR change. The time graph will tell you how long that took in seconds. Enter the value as milliseconds (so, 0.067 seconds is 67 milliseconds) into the Lambda Delay table for that MAP and RPM.
To make it easier to find these events, you can create a new temporary VE table with “shelfs” of very rich areas. For example, increasing the fuel in the 100, 75 and 50 MAP rows by at least 50 would make transitions in those cells stand out more. I found 50 was still causing ambiguous transitions in my logs, and increasing by 75 or 100 might work better. You may also want to turn off acceleration enrichment (set MAPdot and TPSdot to 100000 or some other absurd number that you’ll never reach), but be aware that you’ll likely stall out trying to accelerate too quickly in the meantime.
Now go for a drive, and try to hit the rich VE table cells that match your table (ie: 75 MAP at 1000, 2200 and 3750 RPM). If you set the entire row to rich, you visually mark the cells you want to hit by setting them as locked in Tune Analyze Live!’s VE table (right click and choose Lock Selected Cells), and watching that table as you’d rive. You won’t be auto-tuning during this, and locking the cells adds black borders that make the cells stand out more. You’ll likely have to drop into lower gears to hit the higher RPM and higher MAP cells. Each time you hit a cell, tap the space bar on your laptop. This creates a mark in the log, which shows up as a red line in MegaLogViewer, and can help you more easily find the transition events later. When you’re done, it’s look through the log and add time delays between the pulse width change and the AFR change to your delay table.
I was getting about 67 ms resolution between logged records. You can reduce what data is written to the log to increase the number of records per second via the Logging Profiles in the Data Logging menu. However, I didn’t notice any change in resolution when I did this. 67 ms (about 15 records per second) is probably good enough for the Lambda Delay table.
Once the delay table is set up, unlock the cells you locked in the auto-tuner VE table, reload your original VE table, turn back on acceleration enrichment, and you should be able to start properly auto-tuning.
Auto-generated AFR table I used for auto-tuning.
VE table in VE Analyze Live! after a quick drive around the block with auto-tuning to “very easy”, but after cleaning up some peaks with interpolation and the Smooth Cells feature.
Post-Drive Analysis
At a minimum, you’ll want to look at the VE table and smooth out any sharp transitions between cells. You can either interpolate cells or use the Smooth Cells button to remove these sudden changes from your table, or you can hand-tweak individual cells. You want it to be fairly smooth with no big changes. For example, I hit cases where I had sharp transitions of 30 or more, and the ECU couldn’t find a good value in between to run the engine at, so it would seek a little between the two cells. This caused a mild bucking while holding the gas pedal at a constant position.
Remember, auto-tuning can only tune cells that you’ve actually driven, so be sure to drive at various speeds with various loads to cover as much of the VE table as you can. Do rapid starts and hard stops, as well as slow starts and slow stops. And be sure to check the VE table when you’re done to smooth out any abrupt transitions.
Generally speaking, VE table values should increase from the bottom to the top. They should also increase from left to right until hey hit peak RPM (3750 on the 3.0L engine), then drop down a little after that. In normal driving I don’t even hit 3750, so the entire right side of my table is basically untuned, and I just interpolate from the tuned cells rightward.
I also found that the bottom of the table was too rich. Auto-tuning is usually set to not tune below 40 or 50 MAP, and the AFR was pretty high on deceleration. I manually lowered those cells to get the AFR into a more reasonable range and not waste as much gas.