Boxes of EFI Parts
Joe Angell
The core of the engine was finally assembled, and it was time to start really looking at the EFI and spark control systems. Right about this time (around September 2014), Josh on DMCTalk decided to upgrade his 3.0L-equiped DeLorean to an LS4 engine, and put all his old 3.0L hardware up for sale.
A few weeks later, and the first of two boxes arrived from Canada containing some of the key parts for the conversion.
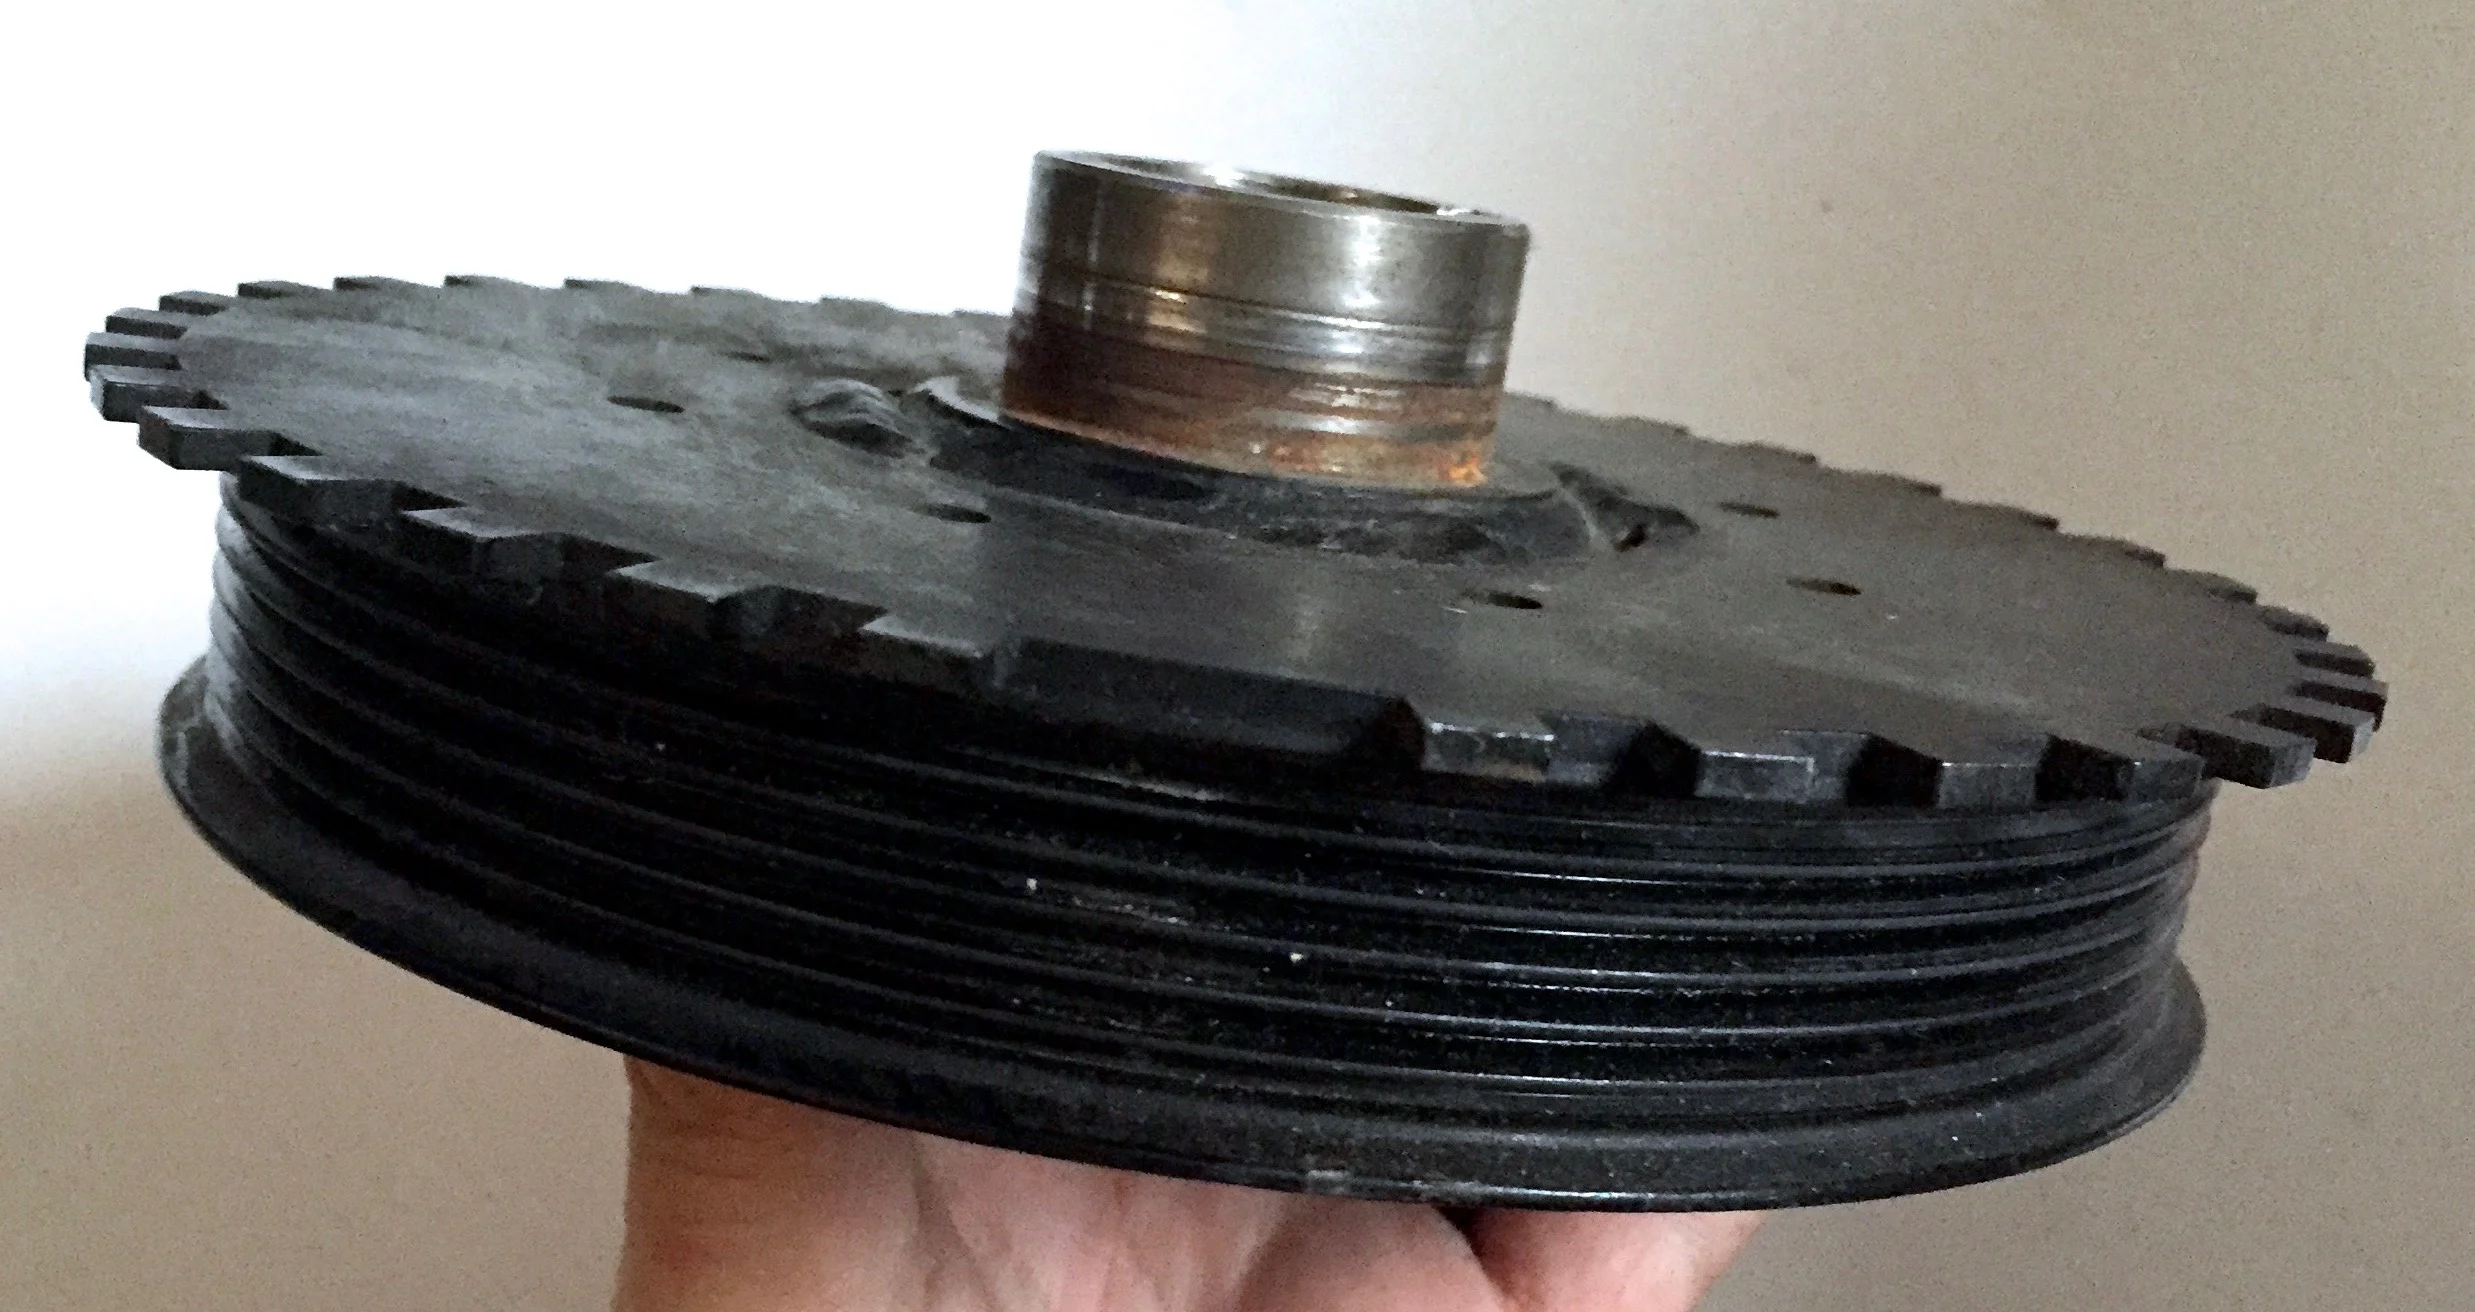
Main Pulley with Missing Tooth Gear
MegaSquirt figures out when to fire the injectors and spark plugs based on the crank position. The trick is getting that position. For these kind of aftermarket solutions it is common to use a missing tooth gear on the main pulley, usually a 36-1 (36 teeth total, with one of the 36 teeth missing). A variable reluctance (VR) sensor generates an alternating current as each tooth passes, with the missing tooth (and thus the longer AC pulse) being used to calibrate the system.
This is annoyingly difficult on a PRV. For most engines the pulley is flat, so you can just bolt or weld it onto the back (or front, if the crank threads stick out far enough) of the pulley and be done with it. The PRV pulley is bowl-shaped, making it difficult to mount to the back, and the threads crank threads aren't long enough to mount to the front.
The only way to really do it is to fix the pulley to a lathe and machine away enough material from the back that the gear will sit flush with the widest part of the pulley. Josh had had this done professionally, and then had the gear tack-welded in place instead of simply bolted on, ensuring that it won't ever come loose.
Front of the pulley with the missing tooth gear welded onto the pack. The missing tooth can be seen on the left side.
The back of the pulley, with the gear tack-welded in four places. The missing tooth is visible near the top of the image.
The back of the original pulley (left) and modified pulley (right)
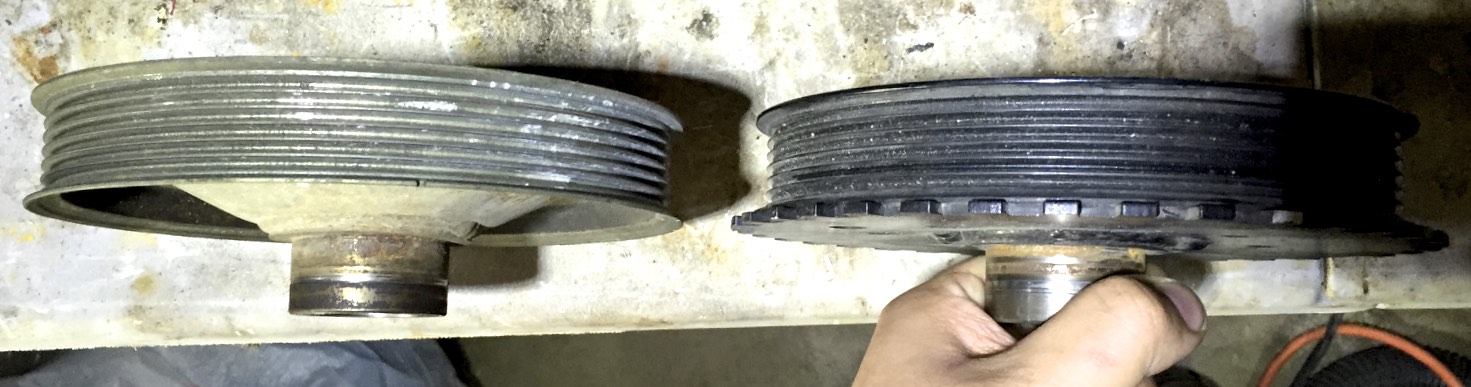
The original (left) and modified (right) pulleys. Notice that the bowl-like shape was machined away so that the gear could sit flush with the widest part of the pulley.
Alternator and Bracket
Another part that needs modification is the alternator bracket. I had planned on getting a new one anyway, as I needed one with a serpentine pulley instead of the DeLorean's standard V-belt pulley. Josh was selling his old one with the modified bracket.
I admit that I'm not entirely clear on why the bracket has to be modified, instead of modifying the spacer on the alternator itself, which seems easier. I imagine that if you just use a DeLorean alternator and replace the pulley that you could get away without modifying the bracket at all.
I wound up replacing the M8 bolt on the engine side of the bracket with an M7 one, as the M8 was too thick and would make tensioning difficult. I kept the spacers, as they fit fine through the holt in the block, but I don't think they're necessary. I also used a shorter M10 bolt on the alternator side.
Josh says that alternator itself is from a 93-95 Camero/Firebird. The only difference to the DeLorean alternator is the pulley. Note that the original Monaco/Premier alternator won't work, as the hole where the adjustment bracket would mount is in the wrong place and too small, and the post for the battery connection is too short. If you make your own bracket, or swap the front of the 2.8L alternator and this one, and modify the battery cables to have a single connector you can use it, but that's a lot of work when you can just buy a properly-sized one for under $80.
The new alternator with the mounting and adjustment brackets.
The mounting bracket is slightly modified, with 9mm removed from the part where the long bolt goes through the alternator.
The adjustment bracket has a long bolt with spacers on it. I expect these are necessary to mount it properly. The bolt seems slightly too larger, and doesn't slide along the bracket.
The original (left) and modified (right) brackets. If you look carefully you can see that where the long bolt goes through the bracket from the alternator is shorter on the modified one.
This more clearly shows the 9mm that were cut off of the modified bracket (bottom) versus the original bracket (top).
Wiring Harness
Josh also included his entire wiring harness for the MegaSquirt, including the bulkhead connectors. This contains everything from the spark plug and injector wires to the crank sensor to the MegaSquirt wiring to the Ford EDIS6 unit for ignition control.
Josh's 3.0L EFI wiring harness with EDIS6 ignition control.
Josh's wiring diagram for the harness.
I was curious about the removed relays and breakers, so I asked Josh whey he choose to do that:
All those circuits I removed to allow room for the [MegaSquirt] relays. I integrated them into the relay compartment (I put them separate in the diagram for clarity) and I wanted to re-use the sockets. Here is my individual reasoning to eliminate each one:
Breaker and door lock module
Installed an aftermarket keyless entry system.Defrost relay
Don't drive the car in the winter.A/C resistor
Useless, just dims the four lights in the controls a little. They are getting full power now. If you have LEDs you would need to remove this anyway.
I also have an aftermarket door keyless entry system, but I never thought to remove the breaker. I do drive in the winter, so I'll keep the defrost relay. As for the A/C resistor, if that's all it does I'll remove that as well. My relay compartment is a mess, so I should probably clean that up while I'm in there.
The Lost Box of Parts
I'd actually bought quite a few other parts from Josh -- his intake manifold, throttles, VR sensor and mount, coil packs, MegaSquirt, and a few other things. Josh shipped them in two boxes in mid-October 2014. By the first of November, I'd received the parts detailed above. After another few weeks, Josh opened a case with Canada Post and I opened one with the US Postal Service in the hopes that they can find the lost packages. Tracking information showed that it had made it to Nashua, NH, about an hour and a half form my house.
A representation of the Nashua distribution center told me that the the package had been "shipped with an exception" from he Nashua facility, which he said usually means that there was a problem with the package or label, and that ti was likely returned to sender. By the first week of February 2015, though we had still seen nothing. Canada Post finally contacted Josh and told him that it was irrevocably lost.
UPDATE: In early-October 2015, almost exactly one year from when they were shipped, the missing box of parts unceremoniously arrived. Apparently the postal service finally found the box. At least I have a lot of spares now.
Some Months Later... The Rest of the Parts
Josh, being an incredibly good sport about all this, built me a new VR sensor mount from his CAD designs as well as a new set of coil packs, and sent me them along with a VR sensor, fuel injectors, oil filters, wideband O2 sensor, and his MegaSquirt tune file. I only had to buy the MegaSquirt itself.
Fuel Injectors
These are XRSE-C5B injectors commonly used in Ford Mustangs and Lincoln Continentals from the late 1990s and early 2000s. They are EV-6 style injectors, which I learned during my research into a 2.8L conversion, while I believe the original injectors were EV-1-style. They have USCAR style electrical connectors. I had trouble finding flow rate information based on the model number, but I'm guessing they're in the 19 lb/hr range, as that is what is recommended for an engine of this size.
Six fuel injectors with their connector pigtails, plus a seventh spare connector.
Coil-on-Plug
Josh went with a coil-on-plug setup for the ignition system, which happens to be exactly what I wanted to do, but I wasn't sure how to do it. No spark plug wires, no central coil, no distributor -- each plug has its own independent coil. These coils are Motorcraft units marked with EE03A (the manufacturer code), and XS2U-12A366-AA. This seems to match the Motorcraft DG-508, and are commonly used on Fords. In fact, Josh said that he got them off a newer Ford Focus at a junkyard.
The coils are attached to the boots from the original 3.0L engine spark plug wires. These should neatly fit into the spark plug holes in the cylinder heads, and are wired to the Ford EDIS6 and MegaSquirt. To provide an electrical connection, a spring-like conductor runs inside the boot and into the end of the coil. Josh says these conductor tubes were from the same Ford Focus that the coils came from (in fact, if you buy a coil it comes with the conductor), He also said that he had to cut them down for the 3.0L engine's boots, but I found they were too short and had to stretch them to reach the plugs when installed in the cylinder heads.
Josh also included a spare Ford EDIS6 unit. This is easily controlled by MegaSquirt to fire the spark plugs as needed.
Six coils mounted onto the 3.0L engine's original spark plug wire heads.
A close up of the back of the coil.
Four spare coils and two spare heads. This helps illustrate how the heads fit onto the coils. The conductive spring is not shown.
The EDIS6 that drives the spark plugs.
The coil (left), conductor spring (center), boot (top) and a spark plug (right).
Throttle, Throttle Position Sensor, Idle Motor and Cold Air Temperature Sensor
Josh included throttles from a 4.0L Jeep (which I thought was a Mustang for some reason, but it’s really from a Jeep with an inline six), with a custom aluminum adaptor plate to mate it the 3.0L throttle elbow. The Jeep throttle is larger and allows for more airflow into the engine, and thus should provide a bit more power.
The throttle cable attaches to the arm by running through a plastic clip. There are also facilities for ball and socket connects, although as best I can tell this is meant more for solid linkages than cables, as well as pushing instead of pulling the arm. I would need to figure out how to hook up the automatic transmission kick-down cable to it as well.
The cable sheath is secured through a bracket Josh built for this purpose. I don't quite know how the slotted thumbscrew installed in it is intended to be used; I understand that it lets you adjust the throttle cable, but I have no idea how it mounts. I will also have to drill a second hole in the bracket for the automatic transmission kick-down cable.
The idle motor is a Jeep brand (part 53007562), from a mid-1990s 4.0L Cherokee. It is the same as the one used with the DIY Autotune adaptor block, and is easily controlled by MegaSquirt. Josh had already mounted it to the throttle body for me.
Also installed is the cold air temperature sensor and the throttle position sensor. I believe the TPS is the original Jeep one, while the temperature sensor is a new GM one from a late ‘90s Saturn that is compatible with MegaSquirt using the GM preset in TunerStudio, although you can manually enter values from a chart if you prefer. The same sensor is used for the coolant temperature on top of the water pump, and matches the Four Season 36462, according to Josh.
The 3.0L elbow has two vacuum taps, a large one and a smaller one. You really only need the smaller one, but I didn't realize this and thought the cap was temporary and discarded it. I did decide to use it in my setup, hooking it up to the brake booster while running everything else to the smaller tap. There is also a small vacuum tap on the back of the Jeep throttle, which is perfect for connecting the MegaSquirt's MAP line.
The throttle and installed components mounted on the elbow.
The nail of the throttle showing the small vacuum tap and highlighting the adaptor plate that connects the Jeep throttle to the 3.0L elbow.
VR sensor
The crank position is read via a combination of the missing tooth gear on the main crank fully and a variable reluctance (VR) sensor. This is basically a magnetic pickup; when a steel gear tooth passes the magnet, it generates a small alternating electrical current. This is read by the MegaSquirt. The missing tooth is detected simply by a longer than expected lack of signal from the VR sensor.
Josh provided a VR sensor, as well as a bracket to mount it to the engine. The bracket's slot-shaped holes make it easy to adjust the position of the sensor relative to the gear, as it will need a bit of tweaking to ensure an accurate reading.
The VR sensor and its mounting bracket. The shiny disc is the magnet that sits near the missing tooth gear on the main crank pulley.
Wideband O2 Sensor
The wideband O2 sensor provides enhanced support for tuning vs. the narrowband sensor provided by the factory. My DPI SPEC I exhaust supports two O2 sensors, but I'm going to use just the one wideband for now, and plug the other with an unconnected narrowband. oxygen sensor.
The sensor is an LC-2 from Innovate, and is commonly available from DIY Autotune. It also includes the programming cable for initial setup, although I expect Josh had already done that for when it was in his car.
Innovate LC-2 wideband oxygen sensor.
Cold Air Intake
Josh also built some new air intake parts for me. This consisted of two metal pipes with bends in them, plus a 90 degree rubber bend to attach one pipe to the intake, and a rubber joiner to make the two pipes to each other. There was also a metal plate that replaces the vacuum canister cover on the passenger side pontoon. I wound up not using the black plastic piece, which I believe was intended to attach the air filter to the pipe, attaching it directly to the pipe. Also included were some large hose clamps to secure the rubber adaptors and filter to the pipes.
Air intake piping and filter.
Aluminum cover for the air intake that replaces the vacuum canister cover in the pontoon.
Exhaust Bracket and Distributor End Cap
Another useful piece that Josh included is an exhaust bracket. The 3.0L engine's exhaust mounting point is a bit different from the 2.8L, so this ensures that everything mounts up properly.
Josh also made an aluminum cap to cover the hole where the distributor attaches to the cylinder head. The latter is also available from DeLorean Performance Industries as 3.0 Distributor Block Off Plate.
Exhaust braket for the 3.0L engine.
Cover for hole in the cylinder head where the distributor was mounted.
Beyond that, there were a few spare injectors, throttle position sensor, temperature sensor, coils, and a some other extra bits in case I needed them. Now everything just needs to be installed into the car.