Engine cutting out, and a broken trailing arm mount bolt
Joe Angell
On the way to the first North East Regional DeLorean Tech Day, my engine started randomly cutting out. It was just for an instant, and then everything came back. A moment later, it happened again and the car stalled. I pulled over, and it started up again, but soon after the power loss happened again.
At one point I could hear relays rapidly clicking behind the passenger seat. This implied some kind of loose connection. I couldn’t find it, and settled for randomly jostling the wires in the relay compartment and behind the driver’s seat where I had installed MegaSquirt. This seemed to fix it, and I made the one hour drive up to the tech day and back.
Everything was fine for about a month, and the momentary cut-outs started again. This was accompanied with the battery light coming on for a second.
I couldn’t find anything loose behind the seats, so I decided to check the grounds.
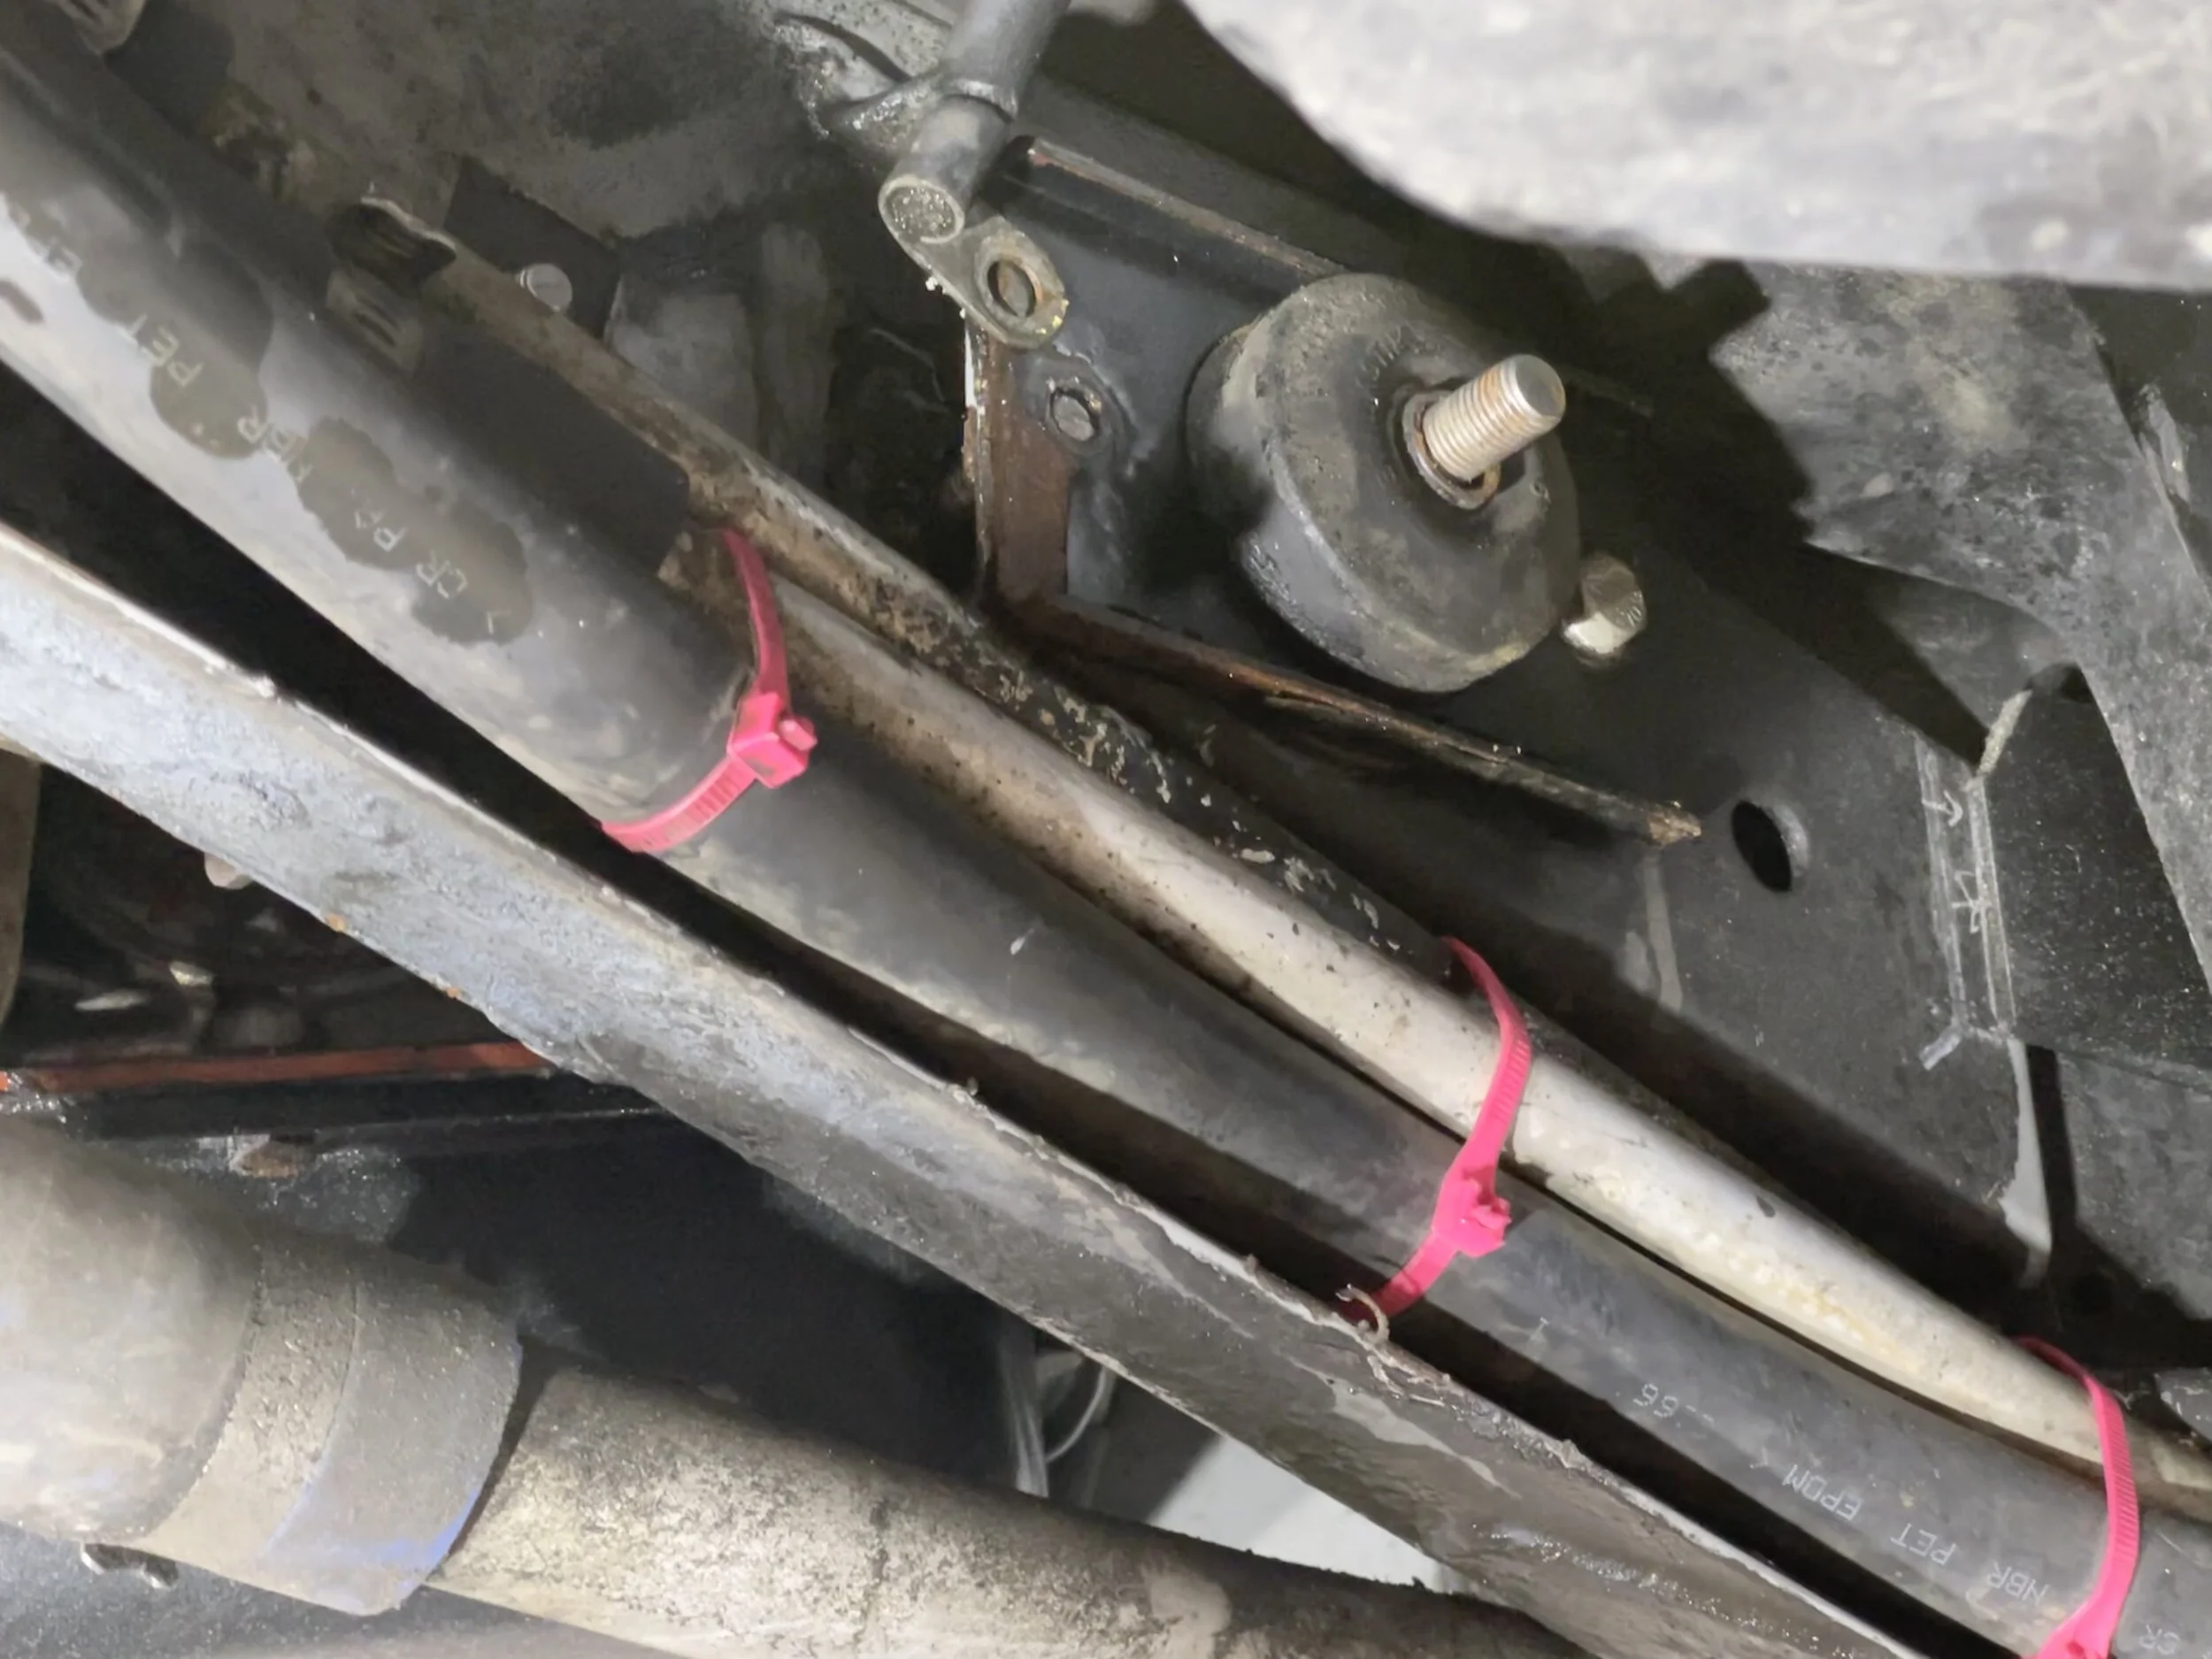
Engine Mount Ground
I started with the large ground on the engine mount. I used a pair of wrenches, one to keep the bolt from spinning while the other removed the nut. I cleaned off the ground and reattached it to the car. I didn’t go through the trouble of taking the other end off; I was going for the easy wins for the moment. I did check to make sure my mounts were good, while I was there, and they were, which was no surprise since they were only about two years old.
Trailing Arm Mount Ground
The battery cable attaches to the frame at the passenger side trailing arm mount. I figured I’d just spin out the bolt and take a look.
So it turns out there’s a jam nut on the back of the bolt, in addition to the welded-on nut. I didn’t check the manual at the time, but had I bothered I would not have found mention of the nut. It is mentioned on the DeLorean site, and in various forum posts, but I hadn’t looked there yet.
Long story short, if I spun the head off the bolt.
Since the trailing arm is a critical part of the suspension, and since the battery itself connects to this bolt, the car was now undrivable. I had to get that bolt out.
But first, I had to get the jam nut off. This is a huge pain. I had some offset wrenches, but they had a sharp 70 degree angle to them, which was too steep to fit behind the mount. I bought some shallower offset wrenches (more like 45 degree), and I could reach the nut. I broke it free with that, and then switched to a conventional box wrench to get it off the rest of the way.
Now the bolt. I tried vice grips, but I couldn’t get a good grip on it from the back, and the head was sheered off clean, so there was nothing to clear.
After breaking the jam nut free with an offset wrench, I used a box wrench to slowly spin the nut off the bolt. A ratcheting box wrench would be much easier, but the ones I had were to thick to fit between the bolt and the frame.
The jam nut has been successfully removed from the bolt.
Taking off the Trailing Arm
I finally relented and pulled off the trailing arm itself. I tried to do this without disconnecting the brake line first. I started with the trailing arm bolt itself, also known as the TAB. I had replaced mine with Toby Tabs years ago, and they were still in excellent shape. A 19mm 12 point box wrench fit through a hole in the frame next to the transmission to hold the bolt in place, while an 18mm wrench took off the nut. There isn’t enough room to fit a socket on there, so you have to do a slow series of turns to get the two nuts off.
With the nuts off, I carefully tapped the bolt towards the transmission. The automatic transmission is in the way of it coming out completely, but it moves it enough. to make it possible to take the arm off. But not yet.
The other end of the arm has to be disconnected from the hub carrier. I started by taking off the tire, then unmounted the brake caliper so I had a bit more room to get the wrench in, although that isn’t strictly necessary. I removed the two bolts holding the arm in place, then tapped it with a mallet until it came free, and pulled it of the TAB as well.
I had hoped that I could just hang it out of the way with the brake line still attached, but there wasn’t enough slack, and no place to put it. I had it resting on an underhoist support but that only gets you so far. I gave up and disconnected the brake line. As this was now the lowest part of the system, it pretty much completely drained it. It was also a pain to do, since the arm was free and wasn’t providing a surface against which to hold the line as I turned the wrenches.
At this point the tab was out of the car and on the ground, and my brake system needed to be refilled and bled. But I still had to remove the bolt.
I briefly tried welding a nut onto the bolt, but I couldn’t get good enough contact for my welder to actually kick in. I even tried an oxyacetylene torch briefly, thinking I could melt the bolt, but there was way too much waste heat and I would have destroyed the bushing, so that attempt only lasted a few seconds.
The trailing arm bolt is visible through a hole in the frame near the transmission. A 12 point 19mm box wrench is used to hold it while removing the nuts.

The hub carrier after removing the trailing arm.
The trailing arm completely removed, along with its large washer and shim (I had one shim; some cars may have more than one).
The trailing arm out of the car, partially painted with POR-15 after chipping off any flaking epoxy.
Drilling out the Bolt
If I could take off the trailing arm mount, I might have been able to grip the remains of the bolt. However, the automatic transmission makes it pretty much impossible to get a wrench on the jam nut without removing the transmission itself, and that wasn’t going to happen. That left me with drilling it out.
I went to Home Depot and bought a 90 degree cordless drill and a series of cobalt drill bits in successively larger sizes. The idea here is to drill a small hole, then progressively larger holes until the bolt spins out our the bolt no longer exists.
The first hole went quite well, even if it was a little off straight (maybe 10 degrees or so). I added drops of cutting fluid as I went to help keep the part cool and improve the drilling process. It took a few minutes to punch through the end of the bolt.
I then made the mistake of trying an EZ Out. I’d hoped the bolt just needed to be spun out, but it was stuck fast, and the EZ Out simply snapped off in the hole.
Removing the EZ Out
EZ Outs are made of hardened steel. This makes them more brittle, but also stronger. The problem is, they’re stronger than drill bits. I tried to drill near the broken extractor, hoping I could loosen it, but I made little to no progress after ten minutes of work.
I switched to a Dremel with a grinding bit. This actually worked. It took about 20 or 30 minutes, but I eventually ground the extractor to dust, and revealed the hole I had drilled earlier.
Back to Drilling
I switched back to the drill and used successively larger bits. As my fourth bit exited the rear of the bolt, the entire bolt spun — it had finally broken free. I reversed the drill and pulled it out a little, but not enough. I tried to grab with vice grips, but I still couldn’t do it.
I tempted fate and used a second extractor. This one also snapped off, but not before pulling the bolt most of the way out. I was able to use my fingers to pull it the rest of the way out.
Finally. All told, it took about a day and a half of removing pieces, buying tools, and so on, not to mention the few days I wanted for other tools to come in the mail. But the bolt was out.
After drilling, then breaking the first EZ Out, then grinding that out to reveal the hole from drilling again.
After some more drilling, the bolt spun, but not enough to actually get it out.
My attempt at using vice grips, which couldn’t get enough of a grip to spin the bolt out.
The various drills, hammers and Dremel bits I used to finally get the bolt out.
An unused Dremel grinding bit, the cobalt drill bits, the snapped bolt, and the broken extractor.
The empty hole, ready for a new bolt. Finally. Also, I had already sanded the mount for better electrical connect with the ground wire.
Reinstalling the Trailing Arm
First, I cleaned the ground. It was already quite clean, so this entire thing was kind of pointless, but at this point I wasn’t going to not clean it. I also sanded the surface of the mount where the ground would sit.
I slipped the ground onto a brand new grade 10.9 bolt M8 and threaded it through the hole and into the welded nut. Specifically, it is an 30mm long M8 bolt with a 1.25 thread. It is made of grade 10.9 steel, not the softer steel that most bolts are made of. This is important as it is a critical suspension component and you want stronger bolts here. Tthese are readily available from McMaster-Carr.
Right when the bolt started poking out the back of the welded nut, I grabbed a new grade 10 M8 x 1.25 nut and placed it on the end of the bolt,, holding it in place as I spun the bolt the rest of the way in. There isn’t enough room to put the nut on after you get the bolt all the way in, so you have to do it this way. Once the bolt was properly torqued, I spun the nut tight by hand and did a final crank down with my box wrench to ensure it would stay put.
While I had the arm off, I scraped off any flaking epoxy and painted the surface with POR-15 to protect it from rust. The arm was in good shape overall. I made sure not to cover the flat surfaces the bolt heads would press against, just to be sure that everything torqued down correctly when reinstalled.
Next I put the trailing arm on the TAB, followed by the two nuts.
Once the arm was back on the bolt, I had to get it on the hub carrier. It fits pretty snuggly, and the suspension is partially loaded by the spring. I got it mostly lined up and supported with an underhoist support then tapped it into place with a mallet. The bolt holes were still slightly out of alignment, so I stuck a punch in one end of the hole and used it as a lever to shift the arm until I could get the bolt through the other end. I repeated this process for the second bolt, and torqued everything down as per the workshop manual.
At this point I realized that I forgot to put but the big washer and the shim on before mounting the trailing arm onto the TAB. I took it all apart again, pulled off the arm, and installed the missing hardware. I was able to leave the arm on the hub carrier, at least.
Finally, I mounted the brake caliper and reconnected the brake line. Unfortunately, the captive nut int he trailing arm had worn away, and once I got the brake line mostly tightened it started to spin freely. With a bit of work I was able to get the brakes line tight with no leaks.
The newly installed bolt and its jam nut.
The trailing arm held in place on the underhoist support. It is already on the TAB, but the nuts aren’t on yet. I also forgot the large washer and shim.
The trailing arm properly installed, with the washers, shim and both nuts.
Another view of the trailing arm on the hub carrier, with the bottom bolt installed.
Another view of the one bolt installed. The rotor is shifted out of the way to make it easier to get a socket on.
The tables full of tools I used while figuring out how to get that broken bolt out.
Refilling the Brake System
I’d drained more than half of the brake reservoir out though the brake line. The seal on my Power Bleeder had gone missing, so Zoe sat in the driver’s seat and pumped the brake while I opened the bleeder screws. I’ve gone through this process previously in another post, so I won’t detail it again here.
I got something slightly wrong, though, since a test drive found the pedal too soft. We did another bleed and found a bit of air in the rear passenger caliper (although we bled everything, just to be sure). After that bleed, the brakes worked perfectly.
This is also when I learned that you can use a pry bar to push the pistons apart so you can get the calipers back on the rotors (the rear rotors have to come off when bleeding the Big Brakes system, but not for the stock system). I then past I’d tried force them on, and the never worked properly. Prying takes a lot of force and it can seem like the piston is barely moving, but it does work. Once the pistons are retracted, the caliper easily slips onto the rotor with room to spare.
Test Drive
At this point I decided I was done cleaning grounds and did a quick test drive. Besides the need to re-bleed the brakes mentioned above, everything seemed good. But after about half a mile I got the momentary loss of engine power and the relay noise.
I actually made it half way up my driveway before the relays started rapidly clicking and the car stalled and wouldn’t start again. After a bit of tinkering I’d drained the battery too much to get it into the garage, so we hooked it up to the winch we had installed specifically for this purpose. Mind you, I had expected the car to be dropped off by the garage door and not half way down the driveway, so we had to use a long chain and a couple ratchet straps to winch it in in stages, but we finally got it inside.
The Electrical Problem
While the battery recharged, I did what I should have done in the first place: read the wiring diagrams. I looked at both the ignition circuit and my own EFI diagram. Since I now knew which relays were clicking, more or less, I could figure out what was driving them. Most of the important ones were connected to always-on power via the brown wire, and switched with a white wire. That white wire led to the ignition switch.
I turned the key to the “run” position, reached under the dash, and started jostling wires. At one point, the relays clicked behind the seats.
A quick inspection found that the culprit was likely the five pin connector to the steering wheel. This carries the signal from the ignition key to the white wire that drives the relays. In all likelihood, I simply didn’t push it together tightly enough when I reinstalled the steering column a month and a half earlier. I also found that there was an 8” or so extension installed, for reasons that I couldn’t understand. I removed it and plugged the two connectors into each other directly.
The car has been working perfectly fine ever since. All those engine cut-out issues, diagnosis, broken bolt, everything, all because a connector was slightly loose, and not at all in the locations I was looking in.