Oil Changes, Sender Leak and Transmission Cable Bracket
Joe Angell
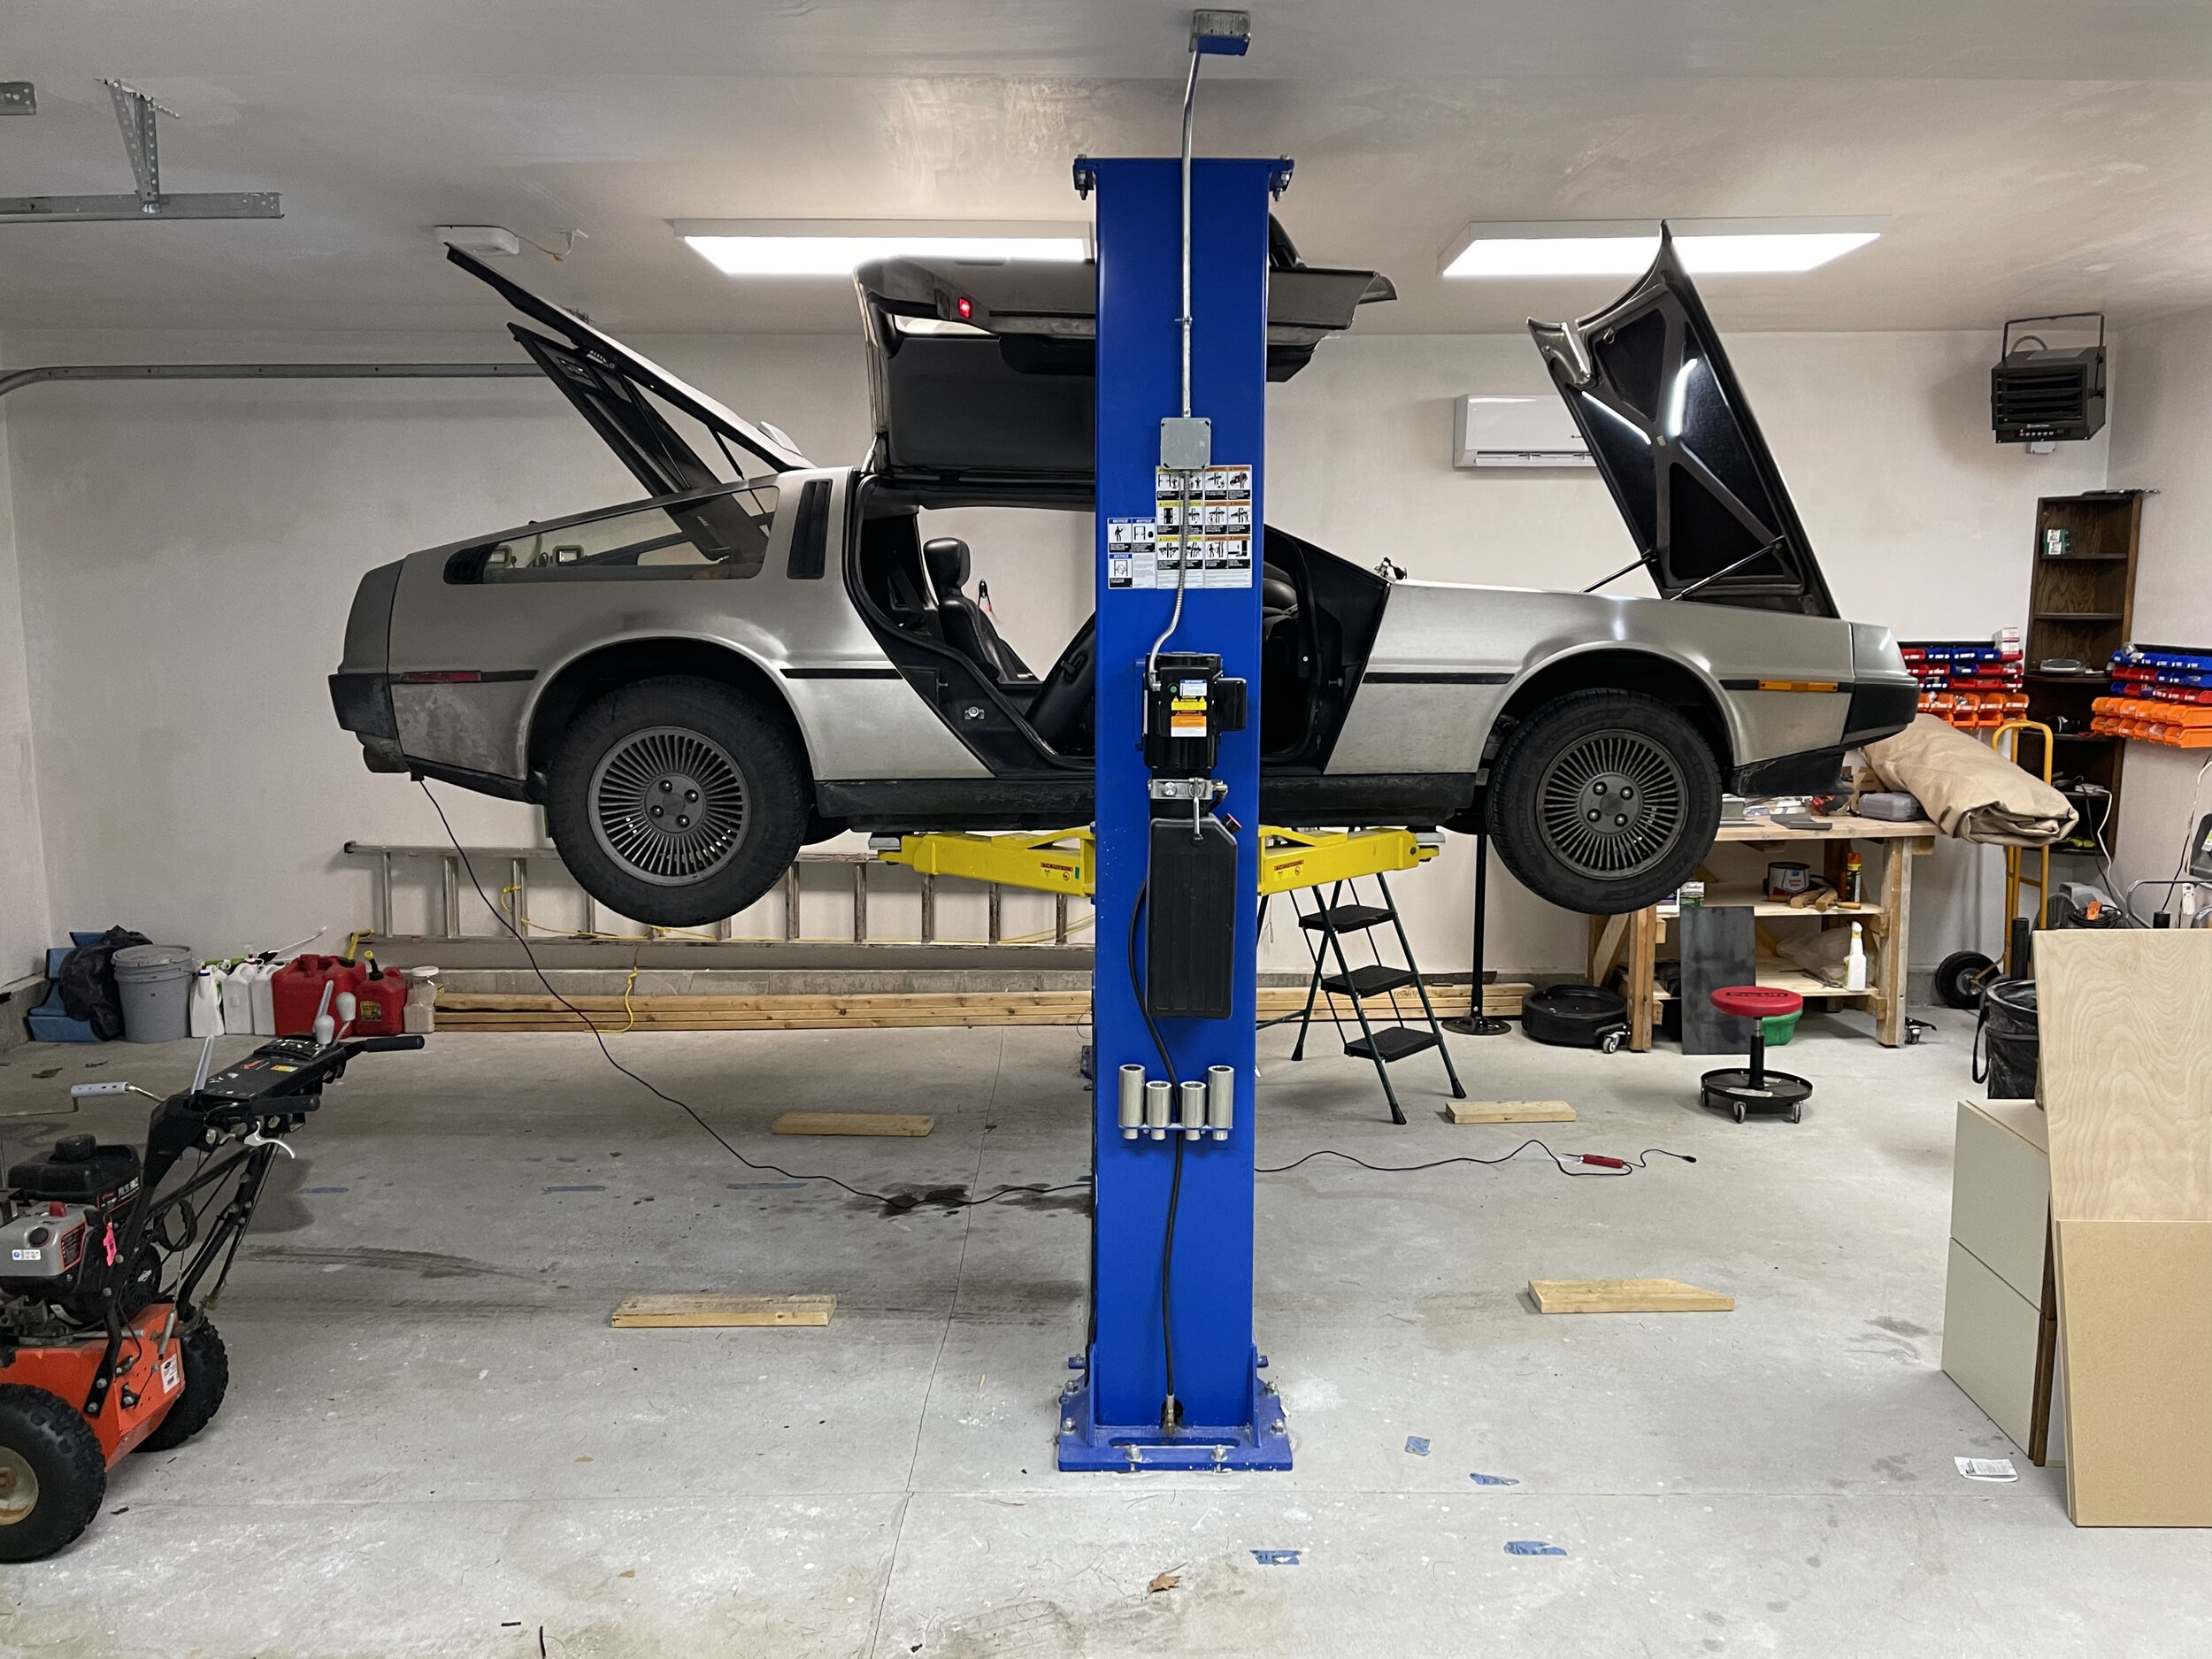
After months of waiting, December arrived and I finally got the electrical hooked up to my new service lift. Over the winter break I spent time doing long-overdue maintenance on my DeLorean. The lift made this a lot easier.
The Lift
First, I should mention that lifts are surprisingly affordable, and I highly recommend one if you have a garage that can support it. I had some specific requirements that required a slightly more expensive lift, and it still wasn’t that bad — a total of $4000 including installation (but not including electrical — you need a 220v line to power it). I bought it from Gary Bloom Sales (now Shamrock Lift Solutions) and had them do the installation. They’re based in Massachusetts but operate throughout New England. If you’re industrious, you can find used lifts and install them yourself for half that, but I felt like this was the kind of thing I wanted a professional to install..
My requirements were:
Fits under a 10’ ceiling.
Two-post service lift for unobstructed access to the bottom of the car.
I was looking for something like a Bendpak BP9. Gary Bloom Sales had a similar model from Forward in stock, so I went with that. Both are reputable lift manufacturers. These lifts support 9000 pounds, more than enough for anything I’ll be putting on it.
The Kinds of Lifts
Two-post lifts are what they sound like: they have two posts, with each having a pair of arms. You slide the arms under lift points near the wheels of the car, and hold a button on the lift to raise it. Mine is a symmetrical lift, meaning the arms are centered on the posts, as opposed to an asymmetrical lift, where the posts are more forwards and the arms point backward. The latter makes it easier to open the doors, which isn’t a problem with the DeLorean’s gullwing design.
The other kind of lift is four-post, where you drive the car onto two rails and lift it up. These are less expensive, have casters so you can roll them around, and are better for car storage, exhaust work, and so on. They also take up more space than a two-post lift. The biggest limitation is that since the car is still resting on its wheels while in the air, you can't take off the tires without another mini-lift on the main lift (thus adding to the cost), and some of the other lift structures can interfere with access to the bottom of the car.
To fit in the garage, my options were a four-post lift, or a floor plate two-post lift. Since I wanted to be able to take off the wheels, I went with the two-post design. A “normal” two-post lift is completely open between the posts on the ground, and has a bar running along the top that the hydraulics run through. Since I didn’t have the ceiling height for that, I needed a floor plate lift, which runs the hydraulics under a plate on the ground (like the name implies). These can fit in garages as low as 10’ tall.
Note that in addition to having a tall enough ceiling, you also need a garage floor that can support the weight. Mine was brand new, and reinforced with rebar and a slightly thicker slab than normal, so I had no problems here. An older garage may require new footings to be poured to provide enough strength to handle the lift.
If you can swing the garage requirements and do a lot of work on your cars, I can’t recommend a lift enough — you should definitely get one.
Using the Lift with a DeLorean
The lifts have safety locks, which you hear clunk into place every few inches. These just make sure that if the hydraulics fail or someone hits the release lever by mistake that the car doesn’t sink down unexpectedly. Once you have the lift to the height you want it at, you release pressure with the lever (the only other control on the lift) and it settles on the locks. To lower the lift, you raise it slightly until it’s off the locks, pull down release cables at each post to disengage the locks, and then lower the car.
With the DeLorean on the lift, I can raise it just about to the ceiling and easily walk under the car without crouching. With the doors, trunk or engine cover open, I have t keep it a bit lower, but I have a rolling stool that makes it easy to work under the car without having to crouch the whole time.
To make it easier to get into the car while on the lift, I bought a four-step ladder. It is really just a tall step ladder with more stair-like steps than ladder rungs, which is more comfortable to use and gets me to the right height to get in the car while it’s up in the air with the door open.
I addition to the ladder, I bought a lift drain, which is a fancy way of saying “standing oil drain pan”, so I could change the oil while the car is in the air without making a mess. I also got an under-hoist support, which is like a tall jack stand that you can use to support parts of the car while you unbolt them, such as the muffler.
Storing the DeLorean on the lift with Zoe’s Charger parked underneath. This let us get our practical car (a Subaru Outback) into the other stall during a winter storm; normally the Outback live s outside.
Raising the Car
My lift is pretty low profile, but the DeLorean is still too low for it. Pulling in forwards gives me slightly more ground clearance due to the slope of the garage, but I still can’t quite fit the lift pads under the body. Worse, the lift pads are designed to lift from the frame, not the body, meaning the “U” shaped metal would have punched right through the fiberglass.
The fix was simple enough: drive onto some planks of wood to get the car up a little higher, then place some wood scraps on the lift pads so that the metal “U” doesn’t contact the fiberglass. Apparently, hockey pucks are pretty common instead of scrap wood, but the wood worked fine for me in the moment, but I switched to hockey pucks soon after.
The other issue I had with the lift was that the whole thing would slightly shake when lowering the car, with the shake getting worse the longer I let it lower uninterrupted. Some googling noted that this was probably air in the hydraulic system. My lift is bled by simply raising it unloaded to max height, then lowering it again. Once I did that, the lift operated perfectly with no shaking or vibration.
Oil Change
Thinking that I was going to have power for the lift any day now, by the time I finally did the oil change I was a few months overdue. I bought a standing oil drain pan (aka “oil lift drain”) so that it would be easier to drain the car while raised without making a mess. The main problem I had was getting the drain plug out. I’d replaced it with a hex head style plug last time so that I didn’t have to use the socket adaptor, and I wound up rounding the head pretty badly while trying to get it off this time. I finally had to just about hammer a slightly smaller wrench on, then use a cheater to break it free, but it did finally come free. After draining the oil I replaced the plug with a new one.
I’m using Shell Rotella T4 15w-40 diesel oil, which I chose based on recommendations from posts on DMCTalk.org.
Draining the oil into my standing lift pan.
Oil Sender Leak
I knew I had a slightly leaking valve cover gasket, but I’d been ignoring it until I had time to look at it properly. With the car up on the lift, my friend Dave noticed that oil on my pan wasn’t coming from the valve cover, but rather the oil sender on the left side of the engine.
We pulled the sender with an adjustable wrench and cleaned everything up. I put on a new O-ring, but we decided to put it back in properly by getting a Lisle 13250 Oil Pressure Switch Socket. It was under $10 and ensured that the sender was properly re-inserted into the engine and torqued correctly.
Transmission Linkage Bracket Replacement
Now that I had a lift, I did a more proper fix for the lost transmission linkage bracket. This is located in the dead center of the car near the fuel filter, and is a massive pain to get to without a lift.
When I last fixed this, I had only gotten the bottom bolt in last time, using my 3D-printed nut carrier to more easily align the bolts. I reprinted the carrier with heat inserts in place of the nuts, which were far more secure and easier to use.
To actually get the bolts in is slightly tricky due to the angle you’re looking at everything from. What might look lined up from below isn’t actually lined up at all. I found that loosely getting the top bolt in first without any of the spacers or bracket in place made it a lot easier than installing the bottom bolt through the bracket and spacers. I then removed the top bolt, lined up the bracket and spacers, and inserted the bolt through the stack and into the carrier on the other side of the frame.
After torquing everything down, the transmission linkage worked as designed and I could properly shift into 1 and 2 without it springing back to drive.
My old printed carrier. The nuts were loose and had to be reinforced with tap, but they still popped out.
The new design using heat inserts. They’re cheap, easy to install with a soldering iron, and much more secure than captive nuts.
The carrier installed between the body and the frame. I had to shave off one of the corners to avoid a bend in the frame.
The final install, with my 3D printed spacer blocks and both bolts properly going through the frame and into the carrier.