Engine Compression Test
Joe Angell
I wanted to make sure that the engine didn't have any mechanical problems before I installed it in the car. The main thing I was worried about was weak compression, which would imply problems with the rings. I definitely didn't want to completely dismantle the entire engine and start figuring out how to replace cylinder rings and reseat liners properly. That meant a compression test.
Getting Set Up
To do a compression test, you need be able to turn over the engine. Simply cranking it by hand with a wrench isn't nearly quick enough to test the compression -- you need to use the starter. Since the starter attaches to be transmission bell housing, that means mating the engine and transmission as well as installing the flex plate.
I was initially worried that the starting torque would be enough to knock the engine over, but it turns out this isn't even slightly an issue -- the engine stays still on the floor during cranking, and is in no risk of moving anywhere. There is no need to have it in the car or otherwise secured to do the tests.
Flex Plate
The starter engages the ring gear on the flex plate (or flywheel, if you have a manual transmission), so that has to be reattached to the crank.
Re-installing the flex plate isn't hard, but it is annoying. The plate is held in place with seven short bolts. There are two metal rings that the flex plate is sandwiched between, with the bolts passing through the first ring, then the flex plate, then the second ring before bolting into the crank itself.
The annoying part is that the bolt holes in these parts aren't evenly spaced. I found the best approach to be to place one of the rings on the crank, rotating it until I was sure that all of the bolt holes lined up. If I couldn't find one that worked, I flipped the plate over and repeated it until they finally lined up. Next I placed the ring on the flex plate (the two protrusions on the edge flex plate should point away from the engine), rotating it until it lined up with the holes, then the other ring on the other side of the flex plate. Finally, I could run a bolt through one of the holes, and put the hole thing on the crank and bolt it down.
I really don't know why the holes aren't evenly spaced. It would be so much easier, and I can't see any reason not to, but then I'm not a mechanical engineer either.
The flex plate mostly mounted to the crank. It seems I need to order another bolt, but for this test it'll be fine.
Mating the Engine and Transmission
The starter attaches to the transmission bell housing. This means that the engine and transmission must be matted solely so that you have somewhere to mount the starter.
I'd done this once before when trying to remove the main pulley nut with a flywheel locking tool that mounted on the transmission. The process was pretty much the same as before, but for some reason the transmission seem to sit a bit too low, making it difficult to line up. I wound up snaking a chain under the bell housing and lifting it with the engine hoist, then resting it on a 2x4 to angle it upward slightly. I was then able to use the hoist to position the engine correctly, line up the pins and bolt holes, and mate the two together.
I only bothered to install the top two bolts and the one near the starter with a 17mm socket, since I was only concerned with turning over the engine. I also found that I didn't need to attach the torque converter to the flex plate; it seems that they clear each other just fine, with no bad scraping sounds when turning the engine.
Swinging the engine around on the hoist to get mate it with the transmission.
The two marked holes need to line up with each other. My transmission was sitting low, so I had to put a board under it to get them to align.
Boards under the engine and transmission to get them aligned.
The first bolt installed after finally getting the alignment right.
The alignment pin on the transmission fits in the recess in the block.
Filling the Engine with Oil
The pistons are going to be moving fast enough that you really need oil in the engine to avoid damaging them. The 3.0L takes six quarts of oil according to the Monaco/Eagle Service Manual. I used store brand 10w30, as I planned on replacing it after a few months anyway.
Before filling it, I re-installed the original oil filter to keep everything from pouring out on the floor. I also raised the engine with the hoist to make sure the oil pan bolt was tight.. I was going to use a new one, but it turns out the 2.8L filter I had has slightly smaller threads than the 3.0L model would wouldn't fit at all.
Since I didn't connect the flex plate to the torque converter, there as no need to fill the transmission, as it wouldn't be turning anyway.
The first of six quarts of oil being power into the engine.
Starter Installation
The starter installs with three bolts below the engine. My aftermarket high-torque starter from British Starters has the solenoid wire inconveniently located between the block and the starter, which I only realized after half installing the bolts. I took it off, attached a short piece of wire to the solenoid post, and remounted its bolts with a 13mm socket. Don't forget to use the metal shield between the transmission and the engine, since that also acts as a spacer that keeps the starter from grinding against the flex plate when it disengages. Being aftermarket, my starter actually requires three plates to ensure that there is enough space.
Wiring
I didn't have to worry about things like disabling the fuel and ignition systems, as my engine wasn't even in the car. I did need a way to run the starter, though. I used jumper cables to connect the car battery's ground to the cylinder head, and the battery positive to the heavy nut on the starter. This is somewhat tricky with jumper cables -- every other part of the starter is ground, and if you touch the jumper to that it will short and the battery will get very hot very fast, so you need to be careful to ensure that the clamp doesn't touch anything it's not supposed to. It's probably safer to use a heavy-gauge wire if you have one, such as the one that runs from the starter to the battery when the engine is installed in the car, but I didn't really feel like removing mine.
To run the starter, I used my Power Probe. I hooked it leads up to the battery, touched the probe to the solenoid wire, and applied 12v with the probe's switch to energize it and the crank the engine. I just tapped the switch for a second to make sure that everything was working properly.
The car battery's is connected to the engine with jumper cables, with ground running to the block and positive carefully attached to the post on the starter. A wire running from the starter solenoid is energized with a PowerProbe.
Getting ready to crank the engine with the Power Probe.
Spark Plug Removal
The compression test kit attaches through the spark plug holes, testing each cylinder one at a time. All of the spark plugs should be removed so that you have consistent compression, plus the engine will turn faster and crank easier as the air in the cylinders you aren't testing can escape though the spark plug hole. The intake manifold doesn't need to be installed, as the valves will be closed at the time of the compression test.
The spark plugs come out easily with a standard 5/8" spark plug removal wrench. I used a piece of pipe as a cheater bar on the end of my wrench, as I hate it when I apply a lot of force, break the plug free, and then whack my hand on another part of the engine.
What you're supposed to do is loosen each plug a little, then use compressed air to blow out any debris from the hole before removing the plugs the rest of the way. This keeps anything from falling into the heads and possibly damaging the walls when the piston moves. I, of course, forgot to do this, and simply removed the plugs entirely.
Loosening a spark plug by using a pipe as a cheater bar on the end of my wrench.
Disabling Fuel and Spark
I didn't need to worry about this, but if your engine is in your car and connected, you'll probably want to disable the fuel pump to keep from flooding the engine, and and ignition system to random sparks from firing from the plugs.
For the fuel pump, you have two easy options:
- Pull up the plunger on the inertia switch, located near the gas pedal.
- Remove the RPM relay from its socket in the relay compartment behind the passenger seat.
For the ignition system, you again have two optoins:
- Pull the wire off the top of the coil.
- Remove fuse #1 from the fuse box in the relay compartment behind the passenger seat.
A thread on dmctalk.org has more tips and tricks from more experienced owners.
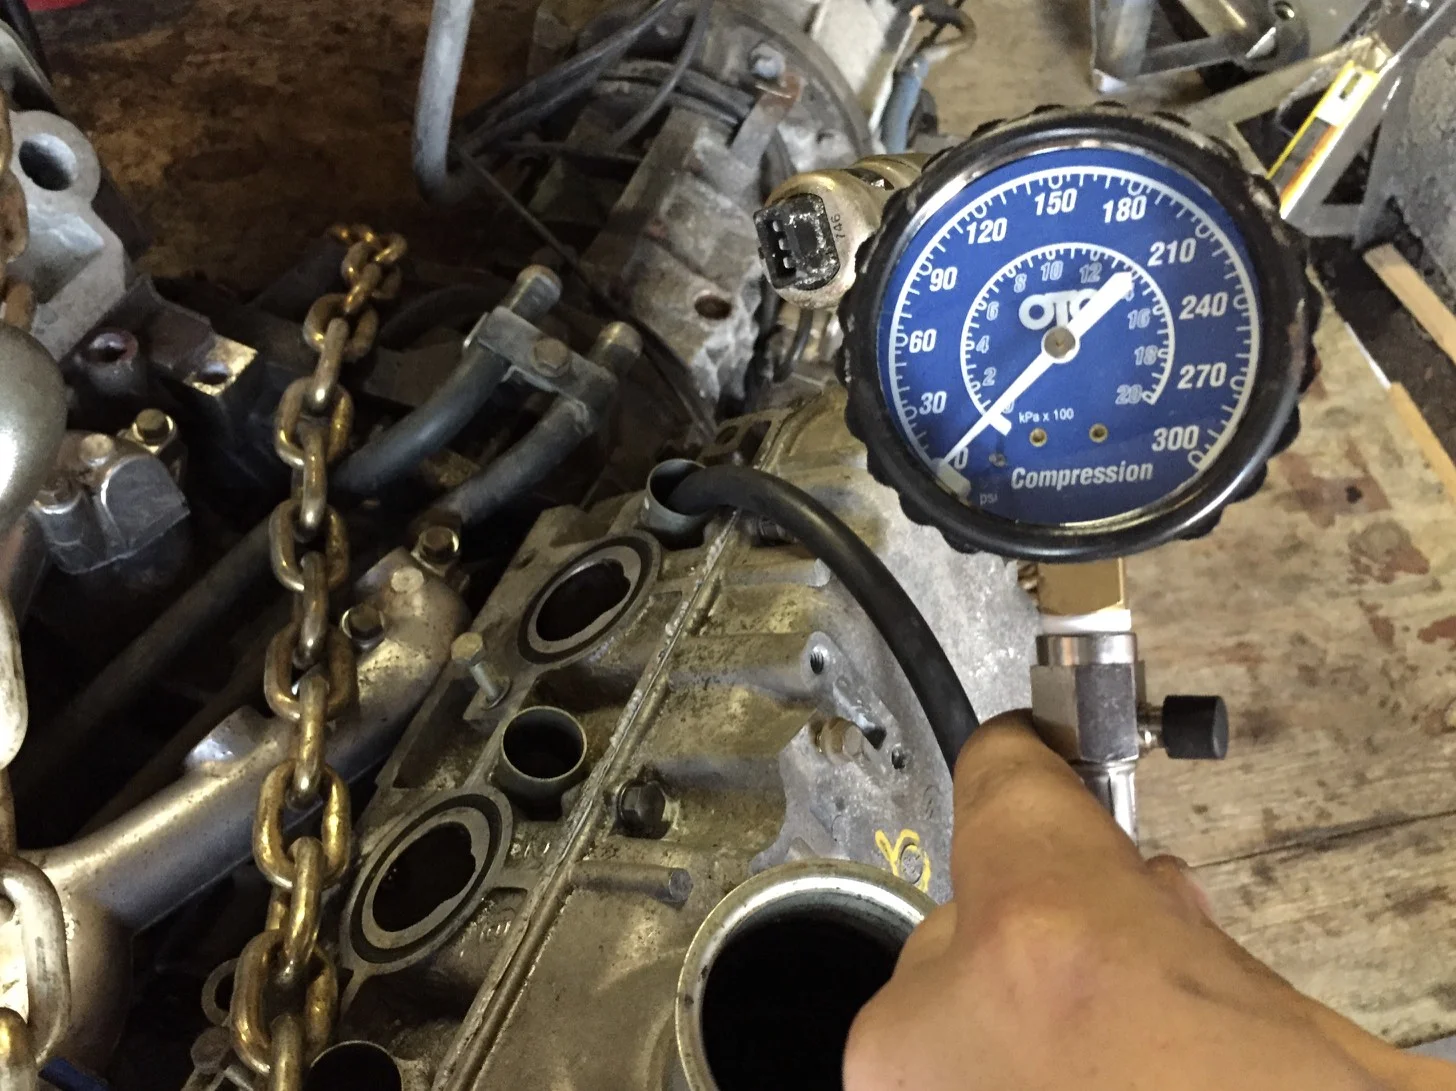
Using the Kit
I'd bought an OTC 5606 compression test kit from Amazon years ago, but never got around to using it until now. It's pretty simple, basically a gauge and attached to a hose with a thread on the end. The kit came with two threaded ends, so I used the one that matched the depth and threading of my spark plugs.
The threaded end has a spring-loaded pin that responds to pressure, moving the gauge as the compression increases. Cylinders are tested one at a time by first threading the end of the hose into one of the holes, hand-tightening it until it is snug.
Once in place, you crank the engine with the starter. Exactly how many times you crank it seems to be up for debate. The Monaco/Premier Service Manual suggests three times; the kit's suggests 5 times or until the value on the gauge stabilizes. Googling suggested a range of numbers, but it seems the idea is that you crank until the gauge pretty much stops moving, which shouldn't be all that many cranks.
It is important that you have a fully charged battery when you do this. Mine hadn't been charged in over a year, so I decided to let it charge and try the next weekend.
I found this rather detailed article on how to do a compression test. Many of the instructions I found mention that the engine should be warmed up first, but that obviously wasn't going to happen here. They mostly suggests this because the specs in the manuals assume the engine is warm, but that's only important if you want to compare against a known PSI. I actually couldn't find the compression PSI spec in my Premier/Monaco manuals, and would only be comparing the cylinders against each other.
As you crank the engine and you'll see the PSI spike up on the gauge as that cylinder moves up on its compression stroke. The aforementioned article calls this the "first puff", and suggests writing it down (other instructions I found didn't mention this at all). Then you crank the engine a few more times until the gauge stabilizes, and write that number down. The gauge holds the highest value, with the button on the side releasing the pressure when you're done. You then move the gauge to the next cylinder and repeat the process, making sure your battery doesn't get too low as you go (a slower crank will affect your results, making the compression seem lower than it really is).
Between "puffs" you might see gauge bounce slightly. Although the gauge is holding the high pressure, the exhaust and intake valves open as the engine cranks. For this reason, you don't want to stop cranking half way through, since if either is open you'll lose all the compression you built up from the last stroke. I think that after recording the "first puff", you'll want to hit the release button and then do multiple fresh cranks to test the fully compressed state.
The goal of this test is for the compression readings for all cylinders to be with a certain percentage of each other. Less than 100 PSI is very bad, and suggests that pressure is leaking past the piston rings. If two adjacent pistons read low, it could be a bad head gasket causing pressure to leak between the two cylinders. Other than that, it seems that each cylinder should be no more than 10% to 20% away from any other cylinder. That percentage seems to be hard to nail down -- the kit suggest 10%, while Googling found 15% and the article above suggested no more than 20%.
If you do have a significant amount of difference or a very low cylinder, it's time to do a leak down test. I didn't need to do this, so I'm not quite sure how you go about it, so I'm going to focus on just compression testing here.

The gauge installed in the #1 cylinder, ready for the engine to be cranked.
My Results
With a freshly-charged battery, I recorded the "first puff", released the pressure, and then recorded it again at three cranks. I used exactly three cranks for each cylinder to ensure consistent results.
Cylinder
1
2
3
4
5
6
First Puff (PSI)
95
95
95
95
88
91
3 Cranks (PSI)
155
152
152
154
137
140 - 145
Overall, not bad, although the number 5 cylinder was about 17 PSI (12%) lower than the highest cylinder, and Number 6 was a bit lower than the others as well. Two adjacent low cylinders can mean a bad head gasket, but we know for a fact that mine is brand new. Since the engine hasn't been run at operating temperature yet, the sealant integrated into it the gasket hasn't had a chance to bond, so it may get better once I can warm it up properly.
Since the high and low values are within 12% of each other, I'm not too terribly worried about it. In the bar chart the difference between the cylinders looks a lot less significant.
First Puff
3 Cranks
Even so, I asked a friend about it and he was actually more surprised that the first three cylinders were so close, and that if it were his engine he wouldn't even think twice about it. So it looks like I'm going.