Horrible Squeaking Sound
Joe Angell
At this point these posts get a bit out of order. Future posts will cover some other tasks I've done, such as:
Converting the entire A/C system over to R134
Re-installing the interior and trim
Installing a double-DIN head unit
Initial ignition and idle tests
Basically, I started re-installing the interior, then decided to do an A/C system overhaul with an R134a conversion. While I was I had the center stack out, I decided this would be a good time to install a new radio and redirect the center vents. I had also begun doing ignition and idle tests on the engine.
I'm still working on the radio bit, but decided to get the engine running first. My initial tests a few months ago had the engine running but idling very rough. After the A/C conversion, cranking the engine made a horribly, loud squeaking sound.
To be clear, nothing in the A/C conversion touched the engine. I didn't even crank it. All I did was mount the compressor to it. The car was raised and lowered a few times, but that's it.
This squeaky sound is completely new. I have no idea how it could have started. Here's what it sounds like. I quickly ruled out the belt by removing it (the alternator squeaks a little, but a brand new one was $80, so I replaced it). The initial guess was the flex plate or torque converter bolts scraping against something.
Unfortunately, that wasn't it. While looking through the inspection hole in the transmission while cranking, we (myself and my friend Dave, an actual mechanic) noticed this.
The flex plate appears to be wobbling. This is bad. I don't recall it doing that before, but I didn't look specifically for that either.
We needed to inspect the flex plate. And that meant pulling the engine.
Leaving the Transmission in the Car
Dave suggested we leave the transmission in the car. If I was on my own, I would have removed it, but he was confident that it wouldn't be too hard to get back in. Removing the transmission would have required detaching:
Shifter linkage
Handbrake cable to passenger side rear wheel, which means taking off the rear wheel and some other brake parts, if I remember correctly
Transaxles
Mounting bolts (which we did loosen to simplify raising just the engine)
Transmission cooler lines
More of the coolant hoses
The catch is that it's trickier to mate the engine and transmission again, since you have to do it from an engine hoist. It's possible, though, so we're going to try it.
Pulling the Engine
I've already covered removing the engine in detail previously, so I'll just outline it here:
Remove the engine cover, which is two nuts on each hinge and two bolts in the center.
Remove the louvers, which is two nuts on each hinge and popping off the lift pistons. I also had to unplug my high-center stop light.
Remove the rear fascia and wiring. This also required adding connectors to some new wires I'd run. In my haste, I accidentally cut the video wire to the newly-installed backup camera, but luckily it's a detachable cable the tis easily replaceable. The amplified antenna was a bit more annoying, in that the connector wasn't nearby, so we left it plugged in, with enough slack that we could rest the fascia over the driver's side door. The backup sensor wiring and taillight harness were disconnected as well.
Disconnect the vacuum lines from the vacuum canister to the engine, from the engine to the transmission, and from the engine to the climate controls.
Disconnect the MAP vacuum line. We managed to damage this while removing the engine, so I have to re-run it, but that's pretty easy.
Disconnect the throttle cables. These simply clip in place on the Jeep throttles I have, and the brackets are held on with two bolts, so that wasn't problem.
Disconnect the engine harness, which is four of the bulkhead connectors and a headphone-style cable for the RPM output.
Drain the engine of coolant, which this time we did from the drain plugs on either side of the block, just above the oil filter.
Disconnect the coolant hoses from the water pump
Unbolt the A/C compressor and hang it away from the engine. The A/C system is at vacuum, so I didn't want to open it to air and ruin the accumulator before I'd even filled it.
Disconnect my ground bus from the engine.
Disconnect the kick automatic transmission kick-down switch.
Disconnect the heater hoses from the back of the engine
Remove the starter
Disconnect power from the alternator. We actually removed the alternator, since I needed to replace it anyway.
Disconnect the fuel feed and return lines.
Now for the new bits.
Since we were going to separate the engine and transmission while still in the car, we removed the motor mounts themselves at the subframe, rather than loosening the engine itself from the mounts. This gave us the front-to-back play we needed to get the engine and transmission apart. Each mount is held to the subframe with two bolts, and a ground wire is on the passenger side mount.
From behind the car, we used a very long socket extension to remove each of the three torque converter bolts. We had to hand rotate the engine to get access to each bolt.
From under the car, we undid the bottom two transmission mating bolts with a 17mm socket.
At this point we attached the engine hoist and leveler. Most of the engine's weight is behind subframe, so removing those last two bolts might well cause it to fall. This engine still only has three lift rings, so we just used three chains for now. We found that the chain from the forward driver's side of the engine interfered with the fuel fitting on the feed side of the fuel rails, so we removed that fitting as well. We then put tension on the hoist until were sure the engine wouldn't fall.
With the engine lifted, we placed a floor jack under the transmission to keep it from dropping after it was disconnected it from the engine. From above, we removed the final two mating bolts, leaning over the car from the passenger side to reach them.
Although no longer bolted together, the torque converter was firmly attached to the flex plate via the center hub. We careful separated them with a pry bar. The torque converter came forward a bit more than we wanted, but the engine and transmission separated cleanly. Later, when we had the engine clear of the car, we were able to push the torque converter back in place without leaking too much transmission fluid onto the floor.
Hoisting the engine out, after disconnecting it from the transmission.
The separated transmission resting against the edge of the engine subframe.
The engine resting on some blocks on the bumper while we removed the flex plate and checked it.
The new rear main seal around the transmission take-off on the back of the engine.
Checking the Flex Plate
At this point we realized that we didn't extend the engine hoist's arm enough, and we couldn't actually lift the engine out of the car by a matter of inches. We could turn the engine around and remove the flex plate, though. All the seven bolts were seated properly, and the retaining plates seemed to be in good condition, and flat to the plate.
We needed to see if the flex plate itself was flat. We laid it down on the piece of sheet metal I use to protect my wooden workbench while welding, and found that it sat flat, which meant the ring gear wasn't damaged. It was possible that the center of the plate was warped, so we used calipers to measuring the height of the central rim relative to the table. Again, there was no visible deviation from flat.
At this point we tried rotating the engine again by hand, and it made continued to make the squeaking sound. It was also very, very hard to turn, much harder than it should be (I don't have intuition for this, but Dave does, since he works on a cars for a living). I'm fairly sure this was harder than it was in the past -- there's always a point where it's a little tough to turn, but that's due to the cylinders compressing the air under the cylinder head, not a problem with the engine. This was different, and of course had the squeaking sound associated with it.
We re-installed the flex plate, and looked at the engine edge-on. We now noticed a very, very slight tilt to the plate, consistent with what we saw from the inspection hole while lying under the car.
We wanted to measure that deflection at the engine take-off. The rubber seal made it heard to measure directly, so we bolted a wide fender washer onto transmission take-off on the engine. The idea here was that we could rotate the engine and measure the deviation between the washer and the block with calipers.
Along with the loud squeaking as the engine turned, we found a roughly 0.26mm deflection on the crank. It should be basically perfectly vertical. This was a problem.
Notice the cap between the top pair of arrows and the bottom. This is the title of the flex plate we were seeing.
So, what is it?
The best guesses at this point were:
Bent crankshaft. This seems highly unlikely due to the sheer mass of the steel involved, and the high temperatures needed to soften it. It might have happened if the car had been overheated enough by the previous owner to soften the metal, but this was still extremely unlikely.
A spun bearing towards the rear of the engine.
There is something scraping inside the engine, but it is otherwise fine and the both flex plates are actually bent.
A new engine is $250 plus another $250 in shipping, a $300 gasket kit, and probably 200 to rent a pickup truck to get it to my garage -- so, around $1000. Any decisions to repair it are in light of this cost.
If it's the crank, we're just replacing the engine.
If it's the bearings, we might be able to repair it., if we can find some bearings for it, but this is moot if the block or crank were damaged by the failed bearings. Since the engine was only cracked a few dozen times, we might be OK, but we won't know until we disassemble it.
Getting the Engine All The Way Out
To completely remove the engine, I needed to extend the hoist or lower the car. We went with the second one.
First we lowered the engine back onto the subframe. Dave held the engine back while I took the weight off the hoist and slid the arm forwards to the 1 Ton position, then took the weight back on it. We were now able to lift the engine completely clear of the body. The only problem I had then was that I kept forgetting about the garage door and raised the hoist into it a few times.
The car was sitting in roughly the middle of the garage, and we need a place to put the engine down, which meant pushing the car all the way to the back of the garage. This required getting the car down off the pallets I use to raise it up. This is somewhat tricky, since I can't easily get the jack to the passenger side of the garage (there's a wall there), and the engine hoist is in the way of jacking it from the subframe.
We did eventually roll the jack under the side of the car, rolling it back until it was positioned between the legs of the hoist. We were then able to jack the car from the subframe, remove the pallets, and lower it to the ground. We then lifted the jack out (it wouldn't fit under the frame anymore) so that we could slide it under the front of the car. After removing the forward pallets, we were able to easily roll the car right up to the front wall and chock the wheels. This also gave us a lot of room to work behind the car, and, if necessary, to maneuver a second engine in with a pickup truck.
The engine fully removed from he car, temporarily resting on some pallets while we get the engine stand set up.
Lower Crankcase Disassembly
With the engine clear, we mounted it on the engine stand and prepared for disassembly. This started with draining the oil, which was just a matter of loosening the drain plug on the bottom of the oil pan. While the 2.8L pan normally requires a square drive to remove the plug, mine had been updated to a more common hex head plug.
Next we flipped the engine over, and remembered that it only has four mounting holes for the engine stand -- the same four used for the transmission. The issue here is that two of those are on the lower crankcase, and we were taking that out. We unbolted those, leaving just two bolts holding the engine up. Dave was a bit wary of this, so we wedged a block of wood under the engine to reduce the load on the remaining two bolts.
Next we took off all of the stuff I took off when I did my original swap:
Oil pan: 22 bolts ringing the pan. Once removed, Dave was able to shock the pan free from the gasket, which looks pristine and likely can be reused.
Oil pickup and spacer: Just a few bolts here. The spacer is from the 2.8L, and is important to re-install it when using the 2.8L oil pan, or the pickup may not reach the oil. The 3.0L does not have a spacer for its shallower pan.
Lower Crankcase: a series of large nuts have to be removed, and then a tap with a mallet to break the seal to the upper crankcase. There are also two smaller nuts on the rear main seal carrier that need to be removed. While the timing cover overlaps it a bit, we didn't want to remove it yet and were able to work around it.
The Source of the Squeak
With the lower crankcase off, we immediately saw the problem -- the engine was bone dry. Now, we drained all of the oil from the engine, so there was definitely oil in it. It appeared that none of that oil was making it's way to the rest of the engine. This implied a failure of the oil pump.
Dave removed the main bearing carriers (caps) and inspected the bearings for damage. While they did have some minor scratches, the crank appeared to be intact. This likely meant that we could replace the bearings and save the engine.
Dave added some oil between the bearings, re-assembled the carriers and bolted back on the lower crankcase. He also sprayed some WD40 into the oil filler area to lubricate the cams a bit. We then turned the engine by hand and found that it rotated far easier than before, and with no squeaking.
The oil pan, oil baffle and oil pickup removed, revealing the lower crankcase and the crank behind it.
Without the lower crankcase, it's clear to see that the engine is completely dry. This easily explains the loud squeaking -- there was no lubrication.
The sparkles in the oil suggest metal shavings, which appear to be from the bearings.
The baffle and pan soaked with oil, proving that there was oil in the engine -- it just wasn't moving out of the pan.
All of the oil removed from the engine.
Why the Oil Pump?
So that was it -- the oil pump wasn't working properly. Of course, the pump is basically unobtainable without getting a new engine, but luckily dn010 on DMCTalk had a spare. Repairing the pump requires removing the timing cover, which means main crank nut, the pulley, the A/C belt guide wheels, and the valve covers so that we can finally get the timing cover free.
dn010 noted that the 2.8L oil pump is not compatible with the 3.0L engine. I had forgotten that I'd broken a bolt in the 3.0L pump and used the 2.8L one instead -- this was likely my problem. The only obvious difference between the two pumps is that the gear on the 2.8L pump is a bit shorter than the one in the 3.0L. I'm surprised that this would make a difference, but at this point I can't think of anything else that would have caused the issue.
Replacing the Oil Pump
To get to the oil pump, we had to take off the timing cover, which means taking off the main crank pulley. I'd used blue Locktite when I assembled it last time, so the pulley nut wasn't nearly as impossible to get off as it was before. We avoided removing the valve covers, but did have to remove the two bolts on the ends, since they screw into the cover. With all of the bolts out, a shock with a rubber mallet cleanly separated the timing cover without damaging the valve cover gaskets. This likely only worked because these gaskets were brand new.
I bought a NOS 3.0L gasket set from eBay. It was an HS33440 head gasket set, which is a third party set made for this engine, and was only $30 from the seller. Full gasket sets are also available from DPI, and most of the gaskets can also be found at RockAuto. In the end I only needed the timing cover gasket, but having the others wasn’t a bad thing.
Three bolts hold the oil pump in place; they were easily removed. I had to swap the spring, piston and cap from my 2.8L oil pump to the 3.0L one, since dn010 had removed his bad spring previously. Luckily, those parts are cross-compatible. We just needed a new cotter pin to hold the swapped parts in place.
We did some more work with the engine bearings (detailed below), but before mounting the pump Dave packed the cavity behind it with Vaseline to create a seal to ensure that would create some extra suction and actually pick up some oil, just to be sure. We then bolted back on the sprocket and chain, and were good to go.
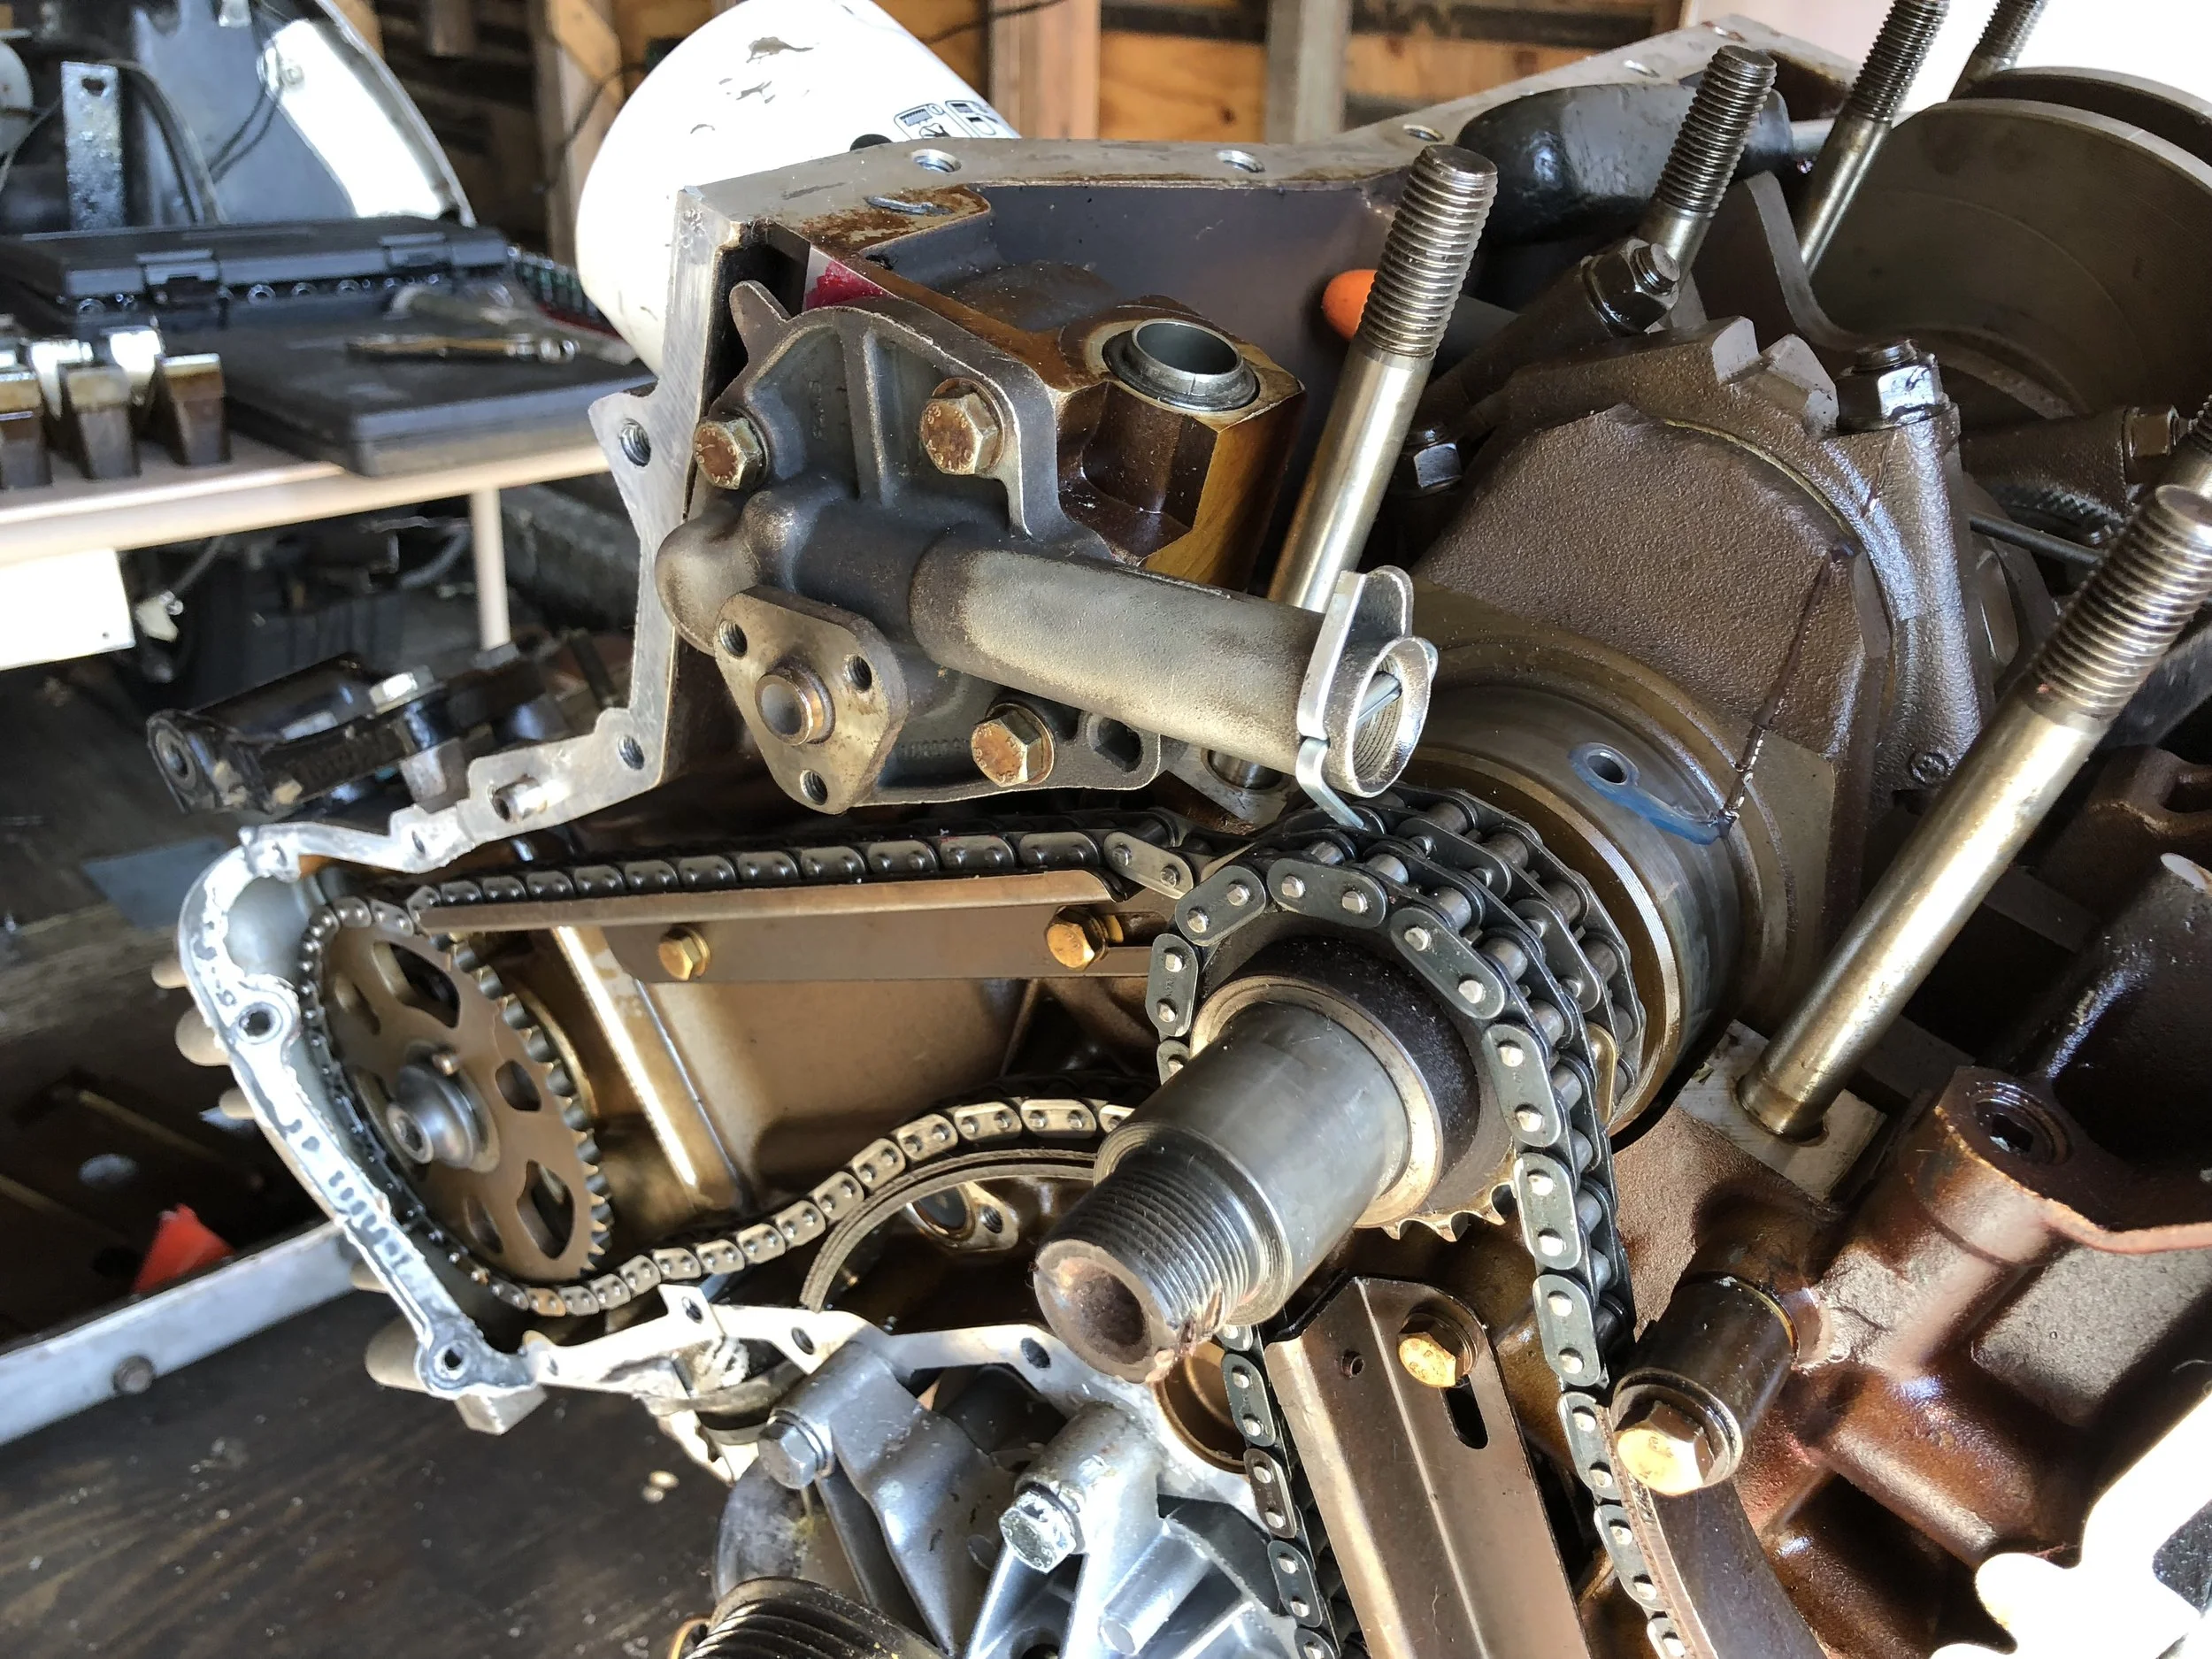
The upside down engine with the timing cover removed. The oil pump is still mounted behind its sprocket.
The disassembled oil pump. The spring, piston and cap where transferred from the 2.8L pump tot he 3.0L pump, and a new cotter pin was used to hold it all together.
This shows the 2.8L pump and the 3.0L gear that is in the engine. The 3.0L pump's gear is about the same size. It's a small difference in length, but apparently an important difference.
The length of the 2.8L gear, about 1 3/16".
The length of the 3.0L gear, about 1 7/16" (photo by dn010).
Checking the Bearings
The bad squeaking sound was coming from the crank coming in contact with the bearings. Normally there's a thin layer of oil between them, but without a working oil pump the oil drained away and the metal parts came in contact with each other. We needed to know how bad the damage was.
There are two sets of bearings we're worried about: the main crankshaft bearings and the connecting rod bearings. Both come in two halves, with the most accessible half mounted in the bearing caps. The nuts for the crank bearing caps were already removed -- these are the same nuts that secure the lower crankcase to the reset of the engine. These caps slidi upwards without too much trouble. The connecting rod caps require removing two more bolts each to get to them.
The crank bearings were indeed scratched, although not badly. They didn't pass the "fingernail test", though, which is where you drag your fingernail along the surface and see if it catches. If it doesn't, you're probably good. I probably could have reused mine, but if I could get replacements, I would.
Which was the current problem — some searching online found that no one carried these parts. None of the local auto parts stores had them either.
I had exactly one 2.8L main crankshaft bearing cap left, with the bearing intact. I decided to test them against the 3.0L bearings, and it turns out they were a perfect match. I was able to insert a 2.8L bearing into a 3.0L cap, and it fit exactly. The DeLorean vendors stock main bearings, so I could just order a set from them.
The connecting rod bearings are another story. This seems to be due to how the 3.0L engine is even fire, while the 2.8L is odd fire. Normally, a V6 has 120 degree offsets to be even fire, but the PRV was intended to be a V8, and is only 90 degrees offset. When the fuel crisis hit in the late 1970s, they changed the design by removing two cylinders.
To make the engine even fire again, the 3.0L uses split journals. The relevant journals here are the shiny bits where the connecting rods mate to the crankshaft (as opposed to the shiny bits where the crank is held in place in the block by the main bearings). By splitting the journals, the firing of the engine can be offset as though this was a 120 degree engine design, resuliting in an even fire engine. These pictures show the two cranks.
A 2.8L crank. Notice the journals are uniform (photo from the store.delorean.com).
A 3.0L crank. Notice that he journals are split, thus allowing for even firing (photo from eBay).
It might even be possible to make a 2.8L engine even fire by replacing the crank and connecting rods, but I doubt anyone has tried that before.
While DeLorean vendors carry the 2.8L connecting rod bearings, no one carries the 3.0L ones. I did get a set of 2.8L to try, along with main bearings from PJ Grady, but the connecting rod bearings of the 2.8L were too small and wouldn’t fit Luckily, the connecting bearings weren’t as scratched as the main bearings and we were able to reuse them.
Dave carefully removed the timing chains from the crank without dropping them from the cam sprockets, since we really didn’t want to retime the engine. Removing the tensioners wound up being the easiest way to do this. We also had to search a bit for the crankshaft key, which fell out when we were playing with the sprockets on the end of the crank.
With the crankshaft free, Dave used pry bars on each end to raise the it just an inch or so. He was then able to use picks to slide the main bearings out of the engine block and insert the new ones. He applied assembly lube before re-installing the bearings.
Dave also checked all the connecting rod bearings for completeness. About half of them were easily accessible, but the engine had to be rotated for the other half. This meant lowering the crank back into the engine, bolting on the lower crankcase, rotating the engine, and then taking it all off again. After lubricating the connecting rod bearings, he re-assembled them again.
The rearmost carrier removed. Marks can be seen on the bearing being held on the right of the frame, but the crank itself looks good.
A look at another one of the bearings, showing scratches from running without lubrication.
Reassembling the Engine
The engine went back together as before: The timing chains were re-mounted, and the tensioners re-installed. As before, as small screwdriver was used to unlock the tensioner via its screw so that it would move freely for installation. After that, a bead of anaerobic sealer was applied to the lower crankcase mating surface, and the lower crankcase was mounted and torqued down to 22 ft lbs plus 75 degrees. New O-rings (three total) were installed on the oil pickup, and it and its baffle were bolted down. We then scrapped off any residue from the lower crankcase before re-mounting the oil pan with the original gasket (since it was in perfect condition) to the bottom of the engine.
The next piece was the time timing cover. The mating surfaces were cleaned with razor blades, then a a bead of Permatex The Right Stuff (black this time; I couldn’t find any grey) was applied to both, the gaskets put in place, and the cover bolted on. We were careful to align the top of the cover to the value cover gasket to avoid damaging it, since we didn’t want to take the covers off if we didn’t have to.
Finally, the main crank pulley was re-installed (with blue LockTite), along with the idler pulleys for the A/C compressor. We used two bolts in the flex plate mounting holes and a pry bar to hold the engine for the main crank pulley. The idler pulleys easily bolted back onto the timing cover.
That was that. Now it just had to go back in the car.
Diagnosing the Flex Plate Wobble
By this time, we had figured out why the flex plate was wobbling. We started by measuring it for deflection on and off the engine. We did a lot of this before replacing the bearings, since we needed to know if it was the engine that needed to be replaced or the plate.
Measuring Flex Plate Tilt
We had already confirmed that the flex plate was flat, so we decided to re-measure the transmission take-off hub. We first removed the Allen bolts holding the rear main seal in place. This gave us a way to rest the calipers against the block while measuring the surface of the hub.
Eyeballing Test: Marked Stick
To measure, we simply marked the calipers with a sharpie at the height of the hub, then rotated the engine. While holding the calipers in place, I watched to see if there was any deviation from the line. This is a crude eyeballing test, but it showed no deflection of any kind.
We did a second test higher up, and again found no offset.
Eyeballing Test: Flex Plate Deviation
We knew the flex plate wasn't vertical, so we mounted it a second time and ran spun the engine. It was very clearly tilted relative to vertical. We marked the high point and the low point, and were surprised that they were not opposite each other. If the high point was at noon, the low point was reached at 3 o'clock, and stayed low until about 9 o'clock.
I have a second flex plate that I bent when trying to remove the main crank nut. There's a small warp around one of the holes where I had inserted a screwdriver to lock it against the engine, but otherwise it was in good shape. Since the flex plate can only mount in one orientation due to the uneven spacing of the seven bolt holes, we decided to mount it on the engine and do the test again. The idea is that if the deflection is in the same place, it's likely that the neither flex plate is warped.
We found the exact same deflection -- low from 3 o'clock to 9 o'clock, with a high point at noon.
We couldn't figure out why we saw this deviation at the flex plate but not the hub. It was very strange. We decided we needed to do some more accurate tests.
Dial Indicator Test
This caliper test is crude and wasn't telling us anything, so we came back with a dial indicator and repeated the test. There was a deviation of about 1/10000th of an inch. The engine was good -- it was definitely the plate.
Getting a New Flex Plate
Dave tested both plates on a tire balancer, and found that both were indeed bent. Rob Grady was got me a bit of a deal on a NOS flex plate that was actually straight. It was just a matter of mounting it.
Dial indicator test to ensure that the end of the crank is indeed flat.
Replacing a Core Plug
When I got the engine, it had a bad core plug. I couldn't find a replacement (they were all too small or too large), so I used one of those rubber ones. I never liked this idea, so we decided to do something more proper.
I had a bench grinder now, so we took one of the oversized core plugs and carefully ground it down, almost letting the grinder rotate it around. This wound up working perfectly -- the final plug was just the right size. We used a socket as a striking surface to hammer the plug into place, then tapped around the edges until it was flush with the block. A bit of Indian Head gasket shellac ensured a good seal.
Grinding the slightly oversized plug down to fit the block.
The edges of the ground plug.
Hammering the plug in place with a socket as a striking surface.
The final installed plug.
Re-installing the Engine
This is pretty well defined, but with the complication that the transmission was already in the car. First, we got the engine on the hoist (again using only three of the four mounting points, as one of my rings was missing), then lowered it onto a wooden pallet before re-mounting the flex plate, just to get easier access. The flex plate went on fairly easily, once we remembered which was was "out" and got the spacers aligned. I used new flex plate bolts to replace the one I had previously damaged, plus blue LockTite for good measure.
Next we jacked up the back of the car, and partially closed the garage door so that he engine hoist would clear it. Dave covered the hub of the torque converter with anti-seize so that it wouldn't bind if we ever had to separate the engine and transmission again. We also slide a jack under the side of the car and under the transmission, jacking it up slightly for alignment with the engine. After raising the engine back in the air, we carefully lowered it into position in the engine bay.
Dave didn't have much trouble lining the engine up. We lowered the engine and then the transmission until they were pretty much lined up, then I pushed the engine forward to tilt it up a bit while Dave screwed in the top bolts. He was able to get in one of the bottom bolts, but the other one was damaged. I ordered two replacements from McMaster Carr, a 50mm long M10 x 1.5. Steel, not stainless -- I wanted the extra strength here more than the corrosion resistance. A 17mm socket tighten the bolts.
With a bit of work on the engine hoist, Dave was able to get the engine mounts re-installed to the subframe, and the engine was secured to the car. We then just tightened down the transmission mounts and we were good to go.
With the bell housing mated to the block, Dave rotated the engine until a flex plate bolt hole lined up with the access, then rotated the torque converter with a screw driver through the hole until it lined up with the plate. After installing the first bolt, he rotated the engine to the next position. Unfortunately, he hit a problem I had -- if the bolts aren't all the way flush, they'll snag on the engine as they rotate. After some fiddling and reaching with a wrench, he get them all seated and the engine and transmission turned freely.
We did have a minor incident. I had left the battery connected from my work with the radio, and had forgotten to disconnect it. At one point the engine pinched the main wire to the starter motor and arced to the block, melting the insulation and releasing a trial of smoke. I quickly disconnected the battery, but the damage was superficial, and some red electrical tape sealed the wire and we were back to work.
The engine lowered back into the engine bay. The flex plate can be seen as the engine isn't yet aligned to the transmission.
Almost mated, just a bit more to go to align it.
Engine and transmission mated together.
Re-installing Engine Accessories
This has been outlined elsewhere on this site, so I'll just sum it up:
Re-install the starter and its shims.
Vacuum hose to the MAP sensor in the MegaSquirt.
Vacuum lines from the throttle body to the brake booster, transmission and climate controls. We replaced the series of adaptors with a new 90 degree reduce hose from NAPA, which should provide a more reliable seal.
Reconnect the coolant lines to the water pump, as well as the self-bleeder.
Reconnect the header core hoses.
Re-install the headers
Re-install the oil dipstick.
Fuel feed and return lines.
Re-install the spark plugs.
Re-install the coolant drain plugs with new crush washers.
Reconnect the electrical wiring.
Re-install the muffler.
Refill with oil (6.75 quarts).
Refill with coolant (2.8 gallons).
Reconnect the battery.
Alternator Mounting Issues
We hit a snag with the alternator. The old one was squeaking a bit, so I bought a replacement Monaco one. Unfortunately, the mounting hole wasn't where we needed it to be. Since I'd bought this three months ago, I no longer had a receipt or the original box to return it. Instead, Dave took the old alternator to the shop he works and and used an impact wrench to break the pulley bolt free, removed the pulley swapped the end of the new alternator case for the old one and re-assembled them, giving us a good, mountable alternator once more.
A secondary problem was that the the battery post is much shorter on the Monaco alternator, which makes it hard to fit the connectors for the two battery cables onto it. We got around this by cutting off ends of the cables and putting them both into a single connector. As with the ground wire, we filled it with a lot of solder that we melted with a a MAP torch, then wrapped the exposed areas with red electrical tape.
I pinged Josh and found that the proper alternator is from a 93-95 3.4L Camero or Firebird. A quick check of RockAuto shows that this indeed appears to have the same mounting setup as the DeLorean. I have this one working now, but if I need a new one, I'll know what to get.
The modified alternator installed on the engine.
The modified battery cables jointed with a single connector on the alternator.
Turning the Engine
We spun the starter, and the engine turned over. The oil pressure gauge moved (and went vertical -- apparently it's not compatible with the DeLorean's stock oil gauge).
Now back to actually trying to start the car.