3.0L Valve Timing
Joe Angell
The next step in my engine update is to retiming the valves. While I had tried to keep from having to do this, the timing chains came off their sprockets and made it a necessity.
As long as I was retiming, I figured I might as well replace the chains and tensioners while I was at it. I bought new chains, tensioners and a water pump from Rock Auto, and got to work.
The manuals refer to the left and right sides of the engine as installed in a front wheel drive car, which is the opposite of how it would be installed in a DeLorean. This is confusing, so I'll refer to them as the driver's side and passenger side as they are installed in the DeLorean. Thus, the driver's side is to the left of the engine when facing the crankshaft.
New tensioners, oil pump chain and timing chains.
Removing the Old Chains
The first step is to get the old chains off. The cam sprockets were already removed from the cams, so I just needed to remove the oil pump sprocket by taking out the three bolts with a 10mm socket. The sprocket popped off, and I removed all the chains from the crank.
The three marked bolts are removed with a 10mm socket to remove the oil pump sprocket and chain.
Taking off the oil pump chain.
The block with the timing chains removed.
Replacing the Tensioners
Each tensioner is held in place with a pair of bolts, and are removed with a 10mm socket. They came off quite easily. Behind each is a mesh filter, which I was able to tilt out with my fingernail. I couldn't find replacement filters at Rock Auto, so I just cleaned these off with a rag and put it back in the car.
Installing the new tensioners is quite simple: just place them and tighten the bolts, making sure that the lock screw is facing outward. I couldn't find torque numbers, so I just tightened them as much as I thought was safe. later I found a page full of torque numbers in the Monaco/Premiere Manual, showing they should be tightened to 53 in lbs. It's probably not a bad idea to use LockTite as well, which I did not.
Tensioner bolt locations.
The filter screen behind the tensioner is easily removed with a fingernail and cleaned with a shop cloth.
Newly installed tensioners.
Aligning the Cams and Crank
The cams and crank have to be pointing in the right direction before you can mount the sprockets on them.
The crank is simplest: put the main pulley nut on, and use a 35mm socket to rotate the keyway until it is pointing upwards. There is some resistance and "springiness" to this; I think it's from the open valves and the air in the system. I found turning it back and forward again usually cleared this, or simply pausing for a bit. I didn't try forcing through it.
The cams were a bit more of a pain. I was completely unable to turn them by hand, likely due to the strong springs that keep the valves closed. I finally just used the crank to turn them by mounting the timing chain and cam sprocket (ignoring any timing markings), and then rotating the crank to turn the cam to point in the direction described in the Workshop Manual. I then removed the chain and sprocket and repeated this for the other side.
Camshaft slot alignements for installation, from the Premier/Monaco Manual. Remember that "left" means "passenger side" and "right" means "driver's side".
Using a 35mm socket to turn the crank so that the keyway is pointing straight up.
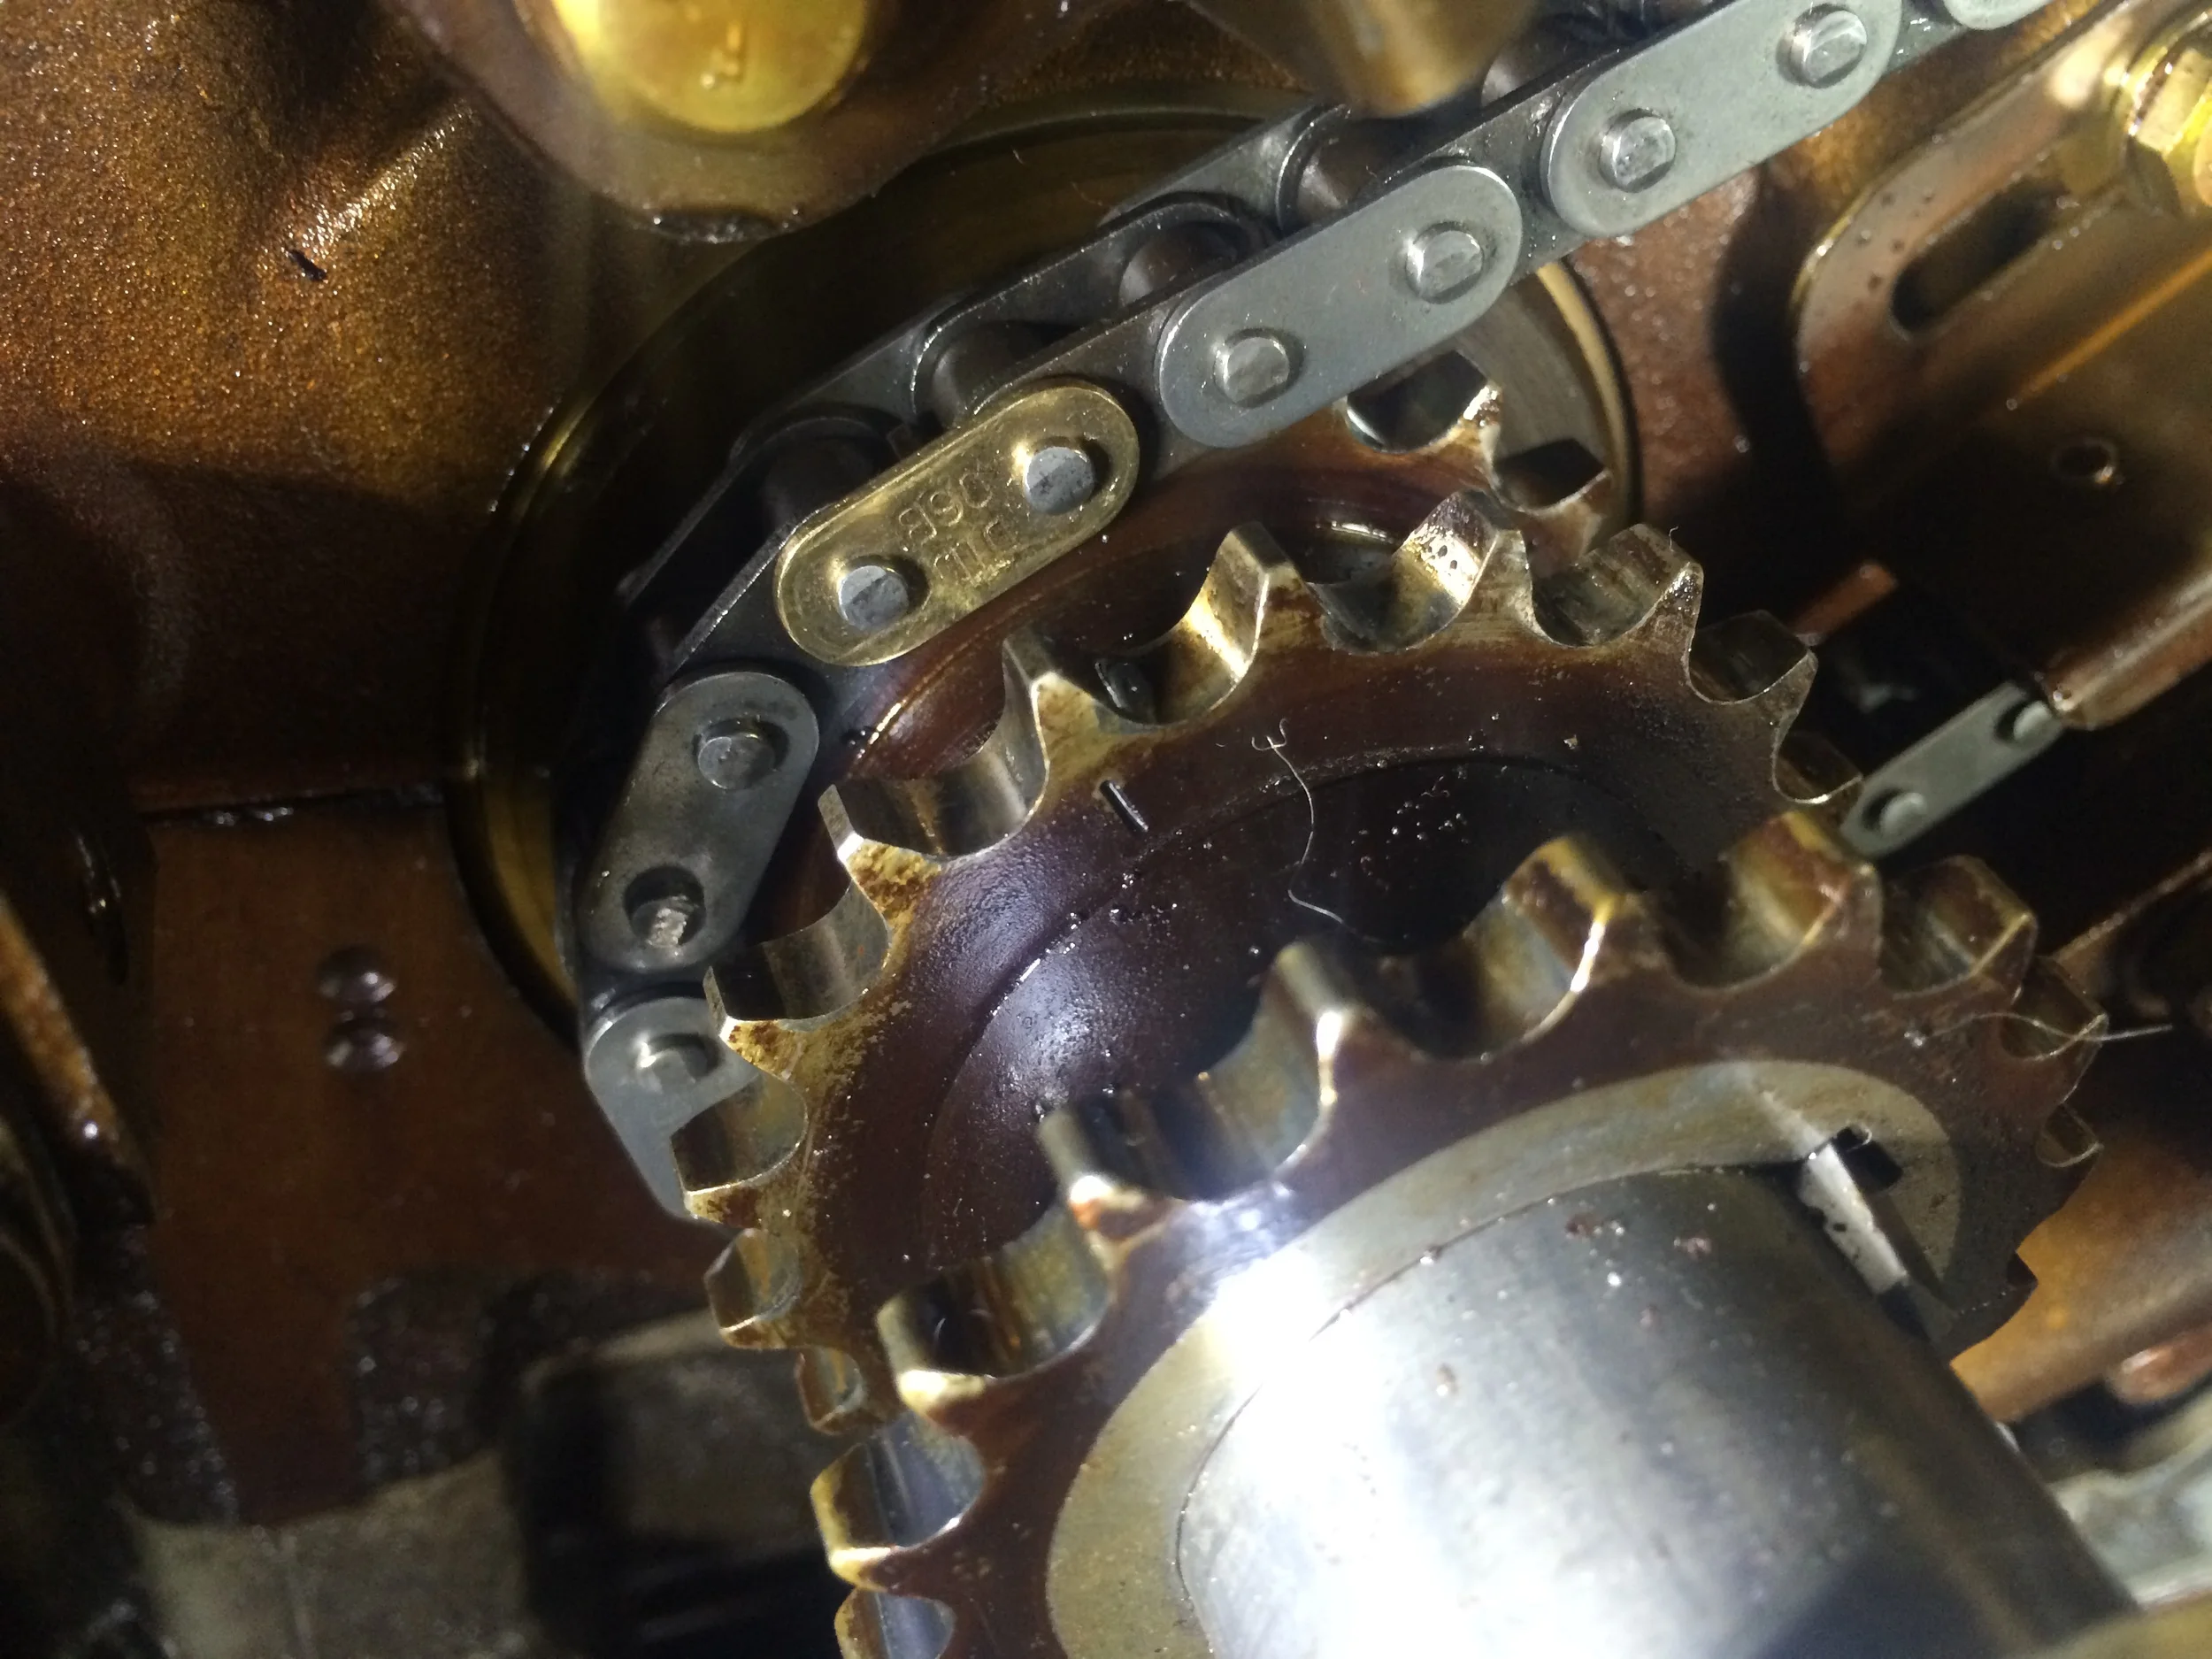
Timing Chain Markings
The timing chains have a single marking for the crank and two nearly adjacent markings (two marked links flanking an unmarked link) for the cam. Both timing chains are identical. My original chains were marked with yellow paint, but the new ones just had differently colored links. One of them had three adjacent colored links instead of an unmarked link between two marked links, but that didn't affect installation. If you're using the existing chains, you're supposed to keep track of which one goes on which side, but if they're new it doesn't matter.
There are three sprockets on the crank. The passenger side timing chain goes on first, followed by the driver's side chain and finally the oil pump chain. Since the driver's side sprocket is further out from the engine, it has a built-in spacer to ensure that the chain is aligned properly.
The driver's and passenger side sprockets are slightly different, with the driver's side one (left) having a built-in spacer.
A timing chain with the cam and crank links marked.
Installing the Passenger Timing Chain
For whatever reason, after aligning the crank keyway to point upward, the manual then tells you to rotate it to point towards the cam. Similarly, the slot in the cam should already be pointed towards the crank.
The part of the chain with the two marked links goes on the sprocket, with the unmarked link between them aligned with the stamped mark on the sprocket. The part of the chain with a single mark goes on the crank, and lines up with the stamped mark on the second crank sprocket.
This all sounds pretty easy. The trick is that the chains are just barely long enough to get the sprocket onto the end of the cam. I found that after I had the marked link aligned on the crank, I would have to turn the tensioner lock and hold in the tensioner while I pulled as hard as I could to get the sprocket on the cam. I found that tapping the sprocket towards the cam with a rubber mallet helped as well.
Once the end of the sprocket was partial on the cam, I could refine the alignment of the sprocket's peg with the slot on the cam. It was off by a slight amount, so I turned the crank until the peg was aligned, and then tapped the sprocket in with a rubber mallet until it was flush. I hand-tightened the sprocket bolt for the time being.
The marked link lines up with the stamped mark on the second crank sprocket.
The unmarked link between the two marked links lines up with the stamped mark on the sprocket.
The installed passenger side timing chain.
Alternate Passenger Sprocket Bolt
The bolt on the passenger side sprocket was meant to drive the distributor mounted to the timing cover, with a spacer providing the extra length between the sprocket and the front of the timing cover. I wasn't going to use a distributor, and I couldn't have the bolt poking out of the cover. Luckily, the 2.8L engine's shorter sprocket bolts worked perfectly here.
I think the two 2.8L sprocket bolts are slightly different with regards to how far they're threaded. The first one I tried wouldn't thread in far enough, but the second one had no problems. The peg sticking out of the sprocket for aligning the stock spacer is far enough away from the bolt hop that the 2.8L bolt has no clearance problems.
A 2.8L bolt installed on the 3.0L sprocket. I'm holding the spacer that the 3.0L engine originally used (along with a longer bolt, not shown) that would have been used to attach to the distributor.
Installing the Driver's Side Chain
For the other chain, the crank is rotated so that the timing mark points at the bottommost bolt on the oil pump. As with the passenger side, the single marked link not the chain fits on the stamped mark on the crank sprocket, while the unmarked link between the two marked links aligns with the stamped mark on the cam sprocket.
As before, I had to hold the tensioner down while I pulled on the cam sprocket and tapped it with a rubber mallet to get it onto the end of the cam. My cam alignment wound up begin off again, so I had to rotate the crank until the sprocket's peg was aligned with the cam's slot, at which point I could tap it into place.
Crank timing mark aligned with the lowest bolt on the oil pump.
The installed timing chain. Note that the engine has been rotted, so the marked links on the cam sprocket aren't quite where they would be immediately after reinstallation, but it is installed correctly.
Checking the Valve Timing
Now to make sure that I actually did everything corruptly. The engine manual describes how to test the alignment with the marks on the sprockets. The marks on the chains are not useful for this test due to how they move around the engine.
To test the passenger side alignment, you rotate the crank clockwise until the timing mark on the crank points towards the cam. The timing mark on the cam should be aligned to point at the one on the crank.
For the driver's side, continue rotating the crank clockwise until the crank's timing mark points at the cam. The timing mark on the cam should be aligned to point at the one on the crank.
If either of these are off, you messed up somewhere and have to redo it. I happened to get mine right on the first try.
Driver's side alignment test, from the Monaco/Premiere Manual.
Passenger side alignment test, from the Monaco/Premiere Manual
Oil Pump Chain
This one's pretty easy, since there are no alignment marks -- you simply put the chain on the oil pump sprocket, loop it around the crank sprocket, and bolt the sprocket to the pump.
The Eagle/Premiere Manual suggests using LockTite 271 and tightening the bolts to 53 in lbs of torque, while the Engine Overhaul Student Manual suggests Locktite 262 and 48 in lbs of torque.. Unfortunately for me, I read some other page that said 33 ft lbs, and promptly snapped off the bolt. I removed the pump (four bolts with an 11mm socket), clamped it in a vice and tried to drill it out, but I just ruined a couple of small drill bits.
I got tired of breaking bits dug out my old 2.8L oil pump, which it turns out is identical to the 3.0L one save for the coloration, so I just mounted that on instead. The oil pump is torqued to 9 ft lbs, and while it doesn't call for LockTite, I applied 262 (the blue one that doesn't require heat to remove) anyway. I used the two remaining 3.0L bolts and one from the 2.8L engine to mount the chain and sprocket, adding the same Locktite and tightened to 53 in lbs, and I was all set. I consider the Locktite to be an important step, as this is a high-vibration environment combined with a quickly moving chain that could throw the bolts out if they're not tight they could come loose and wreck havoc.
IMPORTANT NOTE: It turns out the 2.8L pump is NOT compatible with the 3.0L engine -- the gears are too short. I discovered this the hard way -- after the engine was re-isntalled in the car and cranked over. I heard a loud screeching sound, pulled the engine, removed the lower crankcase and found that the oil never made it out of the pan. I had to replace the main bearings, the connecting rod bearings, and get a new gear from dn010 on DMCTalk to convert the pump for the 3.0L engine (lucky he had one -- I had no luck finding one to buy anywhere else).
A broken bolt on the oil pump from over-tighteneing, after attempting to drill it out.

Save for some slight differences in coloration, the 2.8L and 3.0L oil pumps are identical.
Torquing down the oil pump. The tube of blue LockTite can be seen resting on the chain guide,
Inserting a sprocket bolt after applying blue LockTite.
The oil pump, chain and sprocket reinstalled in the engine