Mounting the Cylinder Heads
Joe Angell
With the coolant jacket cleaned out, I could remount the cylinder heads.
Removing the Old Gaskets
The bulk of the gaskets came off fairly easily, but they left a lot of residue behind. It is important that the head mating surfaces, the piston liner edges and the block mating surfaces are all as clean as possible.
In my previous post I detailed how I removed most of the residue with with plastic scrappers, bristle discs, acetone, and finally just scratching with sand paper and razor blades (for the valve covers I tried Permatex gasket remover, which worked better than I'd hoped; I'll detail that in a future post). I didn't quite get it to completely bare metal all the way around, but it's as good as it's going to get without milling them. I'm not worried about the seal being compromised, as the residue at this point is more like the aluminum is stained than anything that will interfere with the gasket.
Cleaning the Pistons
The top of my pistons were black. Some google suggests this happens when the engine runs too lean, causing carbon deposits. It may or may not have much of an effect on performance, but since I had the engine was already apart I figured i might as well clean them anyway.
It was easy to clean much of the raised pistons with a razor blade, but difficult to get to any recessed ones without rotating the engine To do that, I needed to make sure the liners didn't shift.
I went to Home Depot and bought a box of 5/8" washers, and I'd previously purchased some shorter M12 x 1.5 bolts. These washers were wide enough to cover the edges of the liners so that the engine could be rotated without any risk of lifting them.
I first tried brake cleaner. This worked pretty well, but not as well as I'd have liked. I tried Permatex gasket remover next, letting it sit for a bit before wiping it off with a paper towel. That worked pretty well, but scrubbing it with a green Brillo-style scrubbing pad is what really got them nice and shiny. I also used the pad to clean the insides surfaces of the liners.
Dirty pistons. I had cleaned the leftmost one with a razor blade while it was raised, but the other two I wasn't really able to do much with as they were recessed at the time.
The cleaned-up center piston, and two dirty pistons, along with the Permatex Gasket Remover and a scrubbing pad.
The cleaned pistons and liners. The red visible around the block is spray-on high-tack sealant; I had already assembled the heads when I'd realized I should clean then, and had to remove them. The sealant is optional, and easily cleans up with brake cleaner.
Cleaning the Head Bolt Threads
It is strongly advised that the threads for the head bolts are cleaned. The reason is that you need to torque the head down to specific values to make sure that the seal is good. Any dirt on the threads will increase resistance when torquing, making it appear that you've torqued the bolt to a greater degree than you actually have. This in turn can result in a leak. The holes themselves are open underneath, so they tend to collect a lot of dirt.
Josh from DPI provide me with information on how to clean the threads. You need an M12 x 1.50 tap. I had a little trouble finding one of these; my local stores didn't seem to carry them, and Amazon had some rather expensive ones, or cheaper ones that would take a month to get here. I wound up ordering one from AGTStores.com for about $6 including shipping.
When running the tap, be sure it's aligned properly, as you don't want to cut cross-threads into the otherwise good holes. I forgot my T handle, so I used a pair of vice grips to turn the tap.
- Run an M12 x 1.50 tap through each hole, coated with WD-40, Tap Magic, or similar. This cuts new threads and cleans out some of the debris from the holes.
- Clean the tap with brake cleaner.
- Coat the tap with WD-40 and run it through each hole again. This cleans the hole.
The M12 x 1.50 tap being used to re-tap and clean the head bolt threads. The tap/bolt extends through the open-ended hole.
The tap is used with WD-40 and cleaned with brake cleaner. I forgot my T handle, so I used vice grips to run the tap.
Gaskets and Cylinder Heads
The same gaskets are used for both heads. They will only go on properly in one direction, so if it doesn't seem to work flip it around, and if that doesn't work flip it over. You can spray high-tack gasket sealant on if you like. Do not use any RTV or anything like that. The gaskets have their own bead of sealant that will activate when the engine heats up. Until that happens, you can easily remove heads to correct a mistake without ruining the gasket (say, you forgot to clean the carbon scoring off the pitons, or didn't notice one of the tappets wasn't mounted in the end of the arm).
Each cylinder head only goes on one way. It should be obvious enough which one goes on which side, with the exhaust ports pointed down and the open end of the head pointing towards the timing cover.
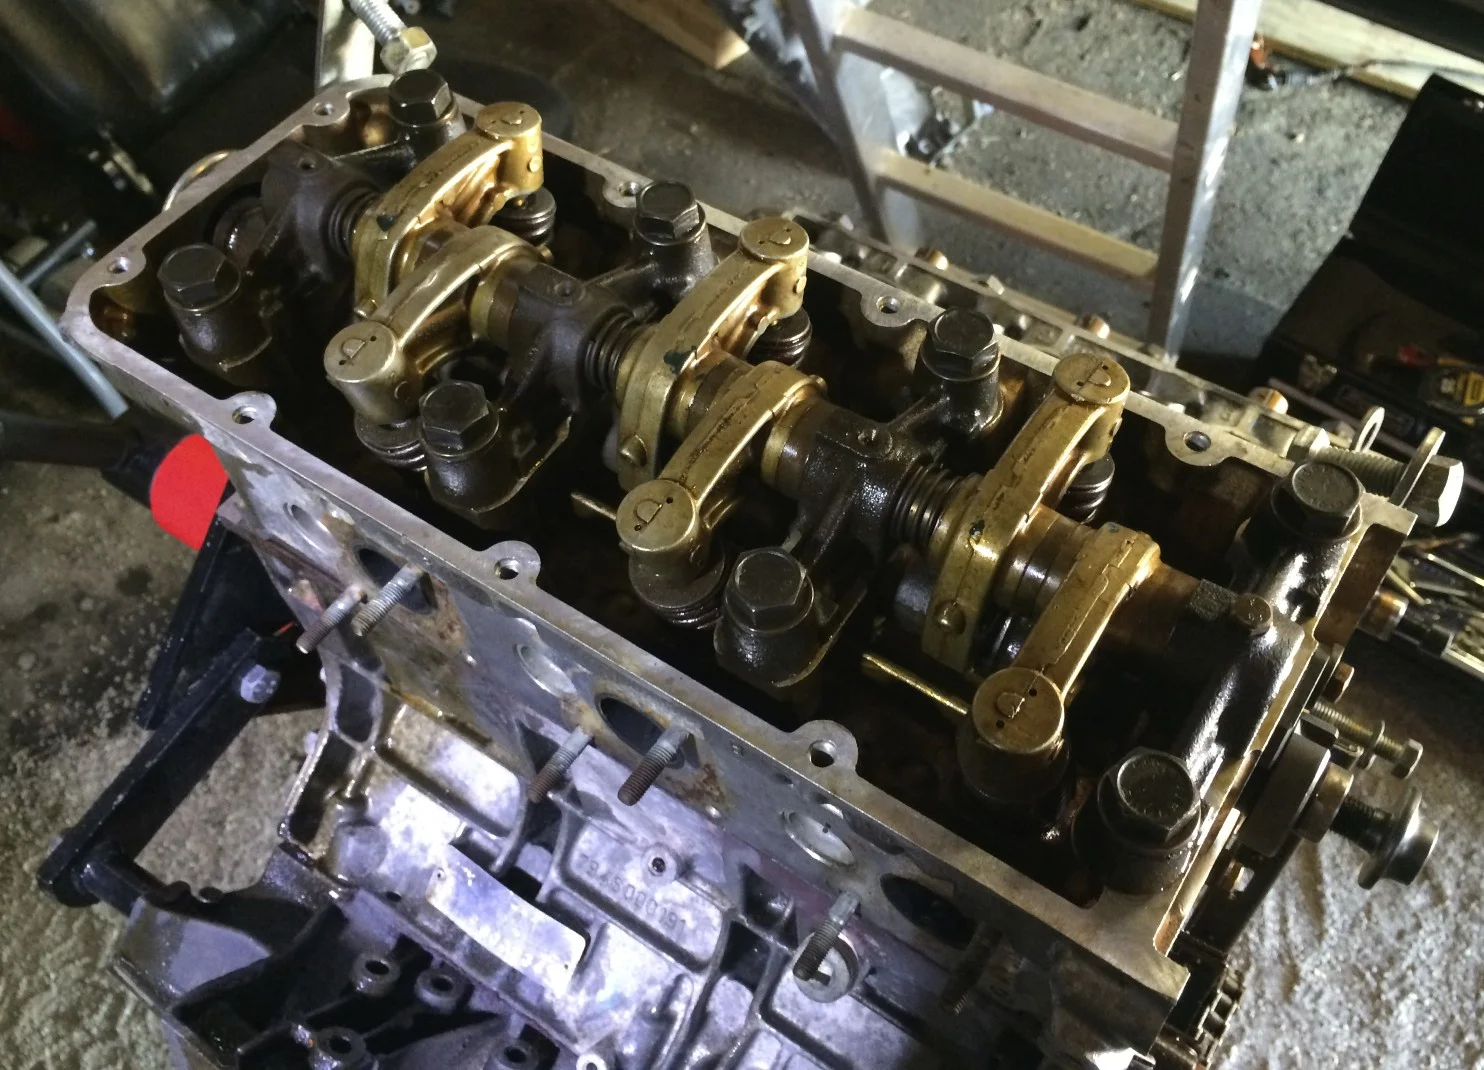
Rocker Arms and Tappets
The rocker arms sit on top of the heads. They are interchangeable, so it doesn't matter which head you use them on, although the manual says that if you're taking apart an existing engine you should try to keep the heads and rockers together.
Mechanical Lifters vs. Hydraulic Tappets
The 2.8L engine used solid valve lifters, where the tips of the fingers at the ends of the arms are adjusted by turning a nut. This lash adjustment changes the finger and valve clearance to account for thermal expansion while the engine warms up. Without this clearance, the valves would only be closed when the engine is cool; as it warmed up, the expanding metal would cause the valves to open slightly, letting fuel leak in and exhaust leak out at the wrong times. Mechanical lifters are cheap, but they wear more quickly, are noisier until the engine warms up, and require adjustment every 30k miles or so.
The 3.0L does away with that adjustment through the use of hydraulic tappets (also allied hydraulic lifters or hydraulic lash adjusters, but they're called tappets in the manuals), in which small cylinders sit in the end of each arm. These tappets stay in constant contact with the valve stems, and eliminates issues with thermal expansion that solid valve lifters. Hydraulic pressure (from oil filling the tappets through holes in the arm fingers) keeps the seemingly loose tappets from clattering while you drive, with the incompressible oil making the tappets effectively solid as the arm rocks so that it can push the valves open as needed.
The tappets are very loose in the arms, and this is by design. This can make it tricky to install the arm on the the head, since the tappets may fall out as you tip the arm into place. In my case, three of them did just that. The manual suggests using tape to hold them in, and removing it once the arm is in position. I was able to carefully lift the arm enough to slide the tappets back in.
Arm Alignment and Installation
The rocker arms themselves are aligned with pins that match ones on the ends of the block. The arms have springs in them, and after you get the first pin aligned you may need to to push the arm together a little to get the second pin locked in.
Annoyingly enough, I tightened the head bolts down, flipped the engine, and saw a tappet fall to the floor; apparently I didn't notice it fall out of the finger. I had to loosen the bolts to put it back in.
The gap between the leftmost finger and the valve stem shows where I didn't notice one of the tappets slip out. You can see the tappet sticking out from under the other two fingers.
Tightening the Head Bolts
I choose to reuse my old head bolts. Some people say not to do this, and while you can replace them if you like, it seems a lot of people just use them as is. I cleaned the bolts with brake cleaner, although two of them were dirty enough that I replaced them with the old bolts form my 2.8L engine.
There is a complicated tightening procedure in the Workshop Manual, which involves things like tightening the bolts, angle torquing them, running the engine for a while, loosening the bolts and torquing them again.
Head bolt tightening order, as per the workshop manual.
Luckily, I had a much simpler procedure from Josh at DPI that I followed instead. I'd successfully used this on my 2.8L engine in the past:
- Dip each bolt's threads into oil before tightening them into their holes. I simply opened a fresh oil bottle and dunked the bolt into it until the threads were covered..
- Place a bit of oil on top of the rocker arms, just under where the bolt heads will sit. The purpose of all this oil is to ensure that all friction comes from the torquing procedure, and not from the head of the bolt or its threads meeting unexpected resistance.
- Tighten all head bolts in a spiral pattern as outlined in the Workshop Manual to 25 ft lbs. The pattern its he same for the 2.8L and 3.0L engines.
- Tighten all bolts in the same pattern to 50 ft lbs.
- Tighten all bolts in the same pattern to 80 ft lbs.
That's it. The heads are now securely mounted to the engine block.
Both heads reinstalled on the block.