Garage Battery Power
Joe Angell
2013
Update (June 2015): I finally got a second 12v power supply to augment the first. Now the lights run all the time without triggering a thermal trip. I still keep the batteries charged, just because they're there.
Added a second power supply (far left black box) to augment the first (left, larger black box)
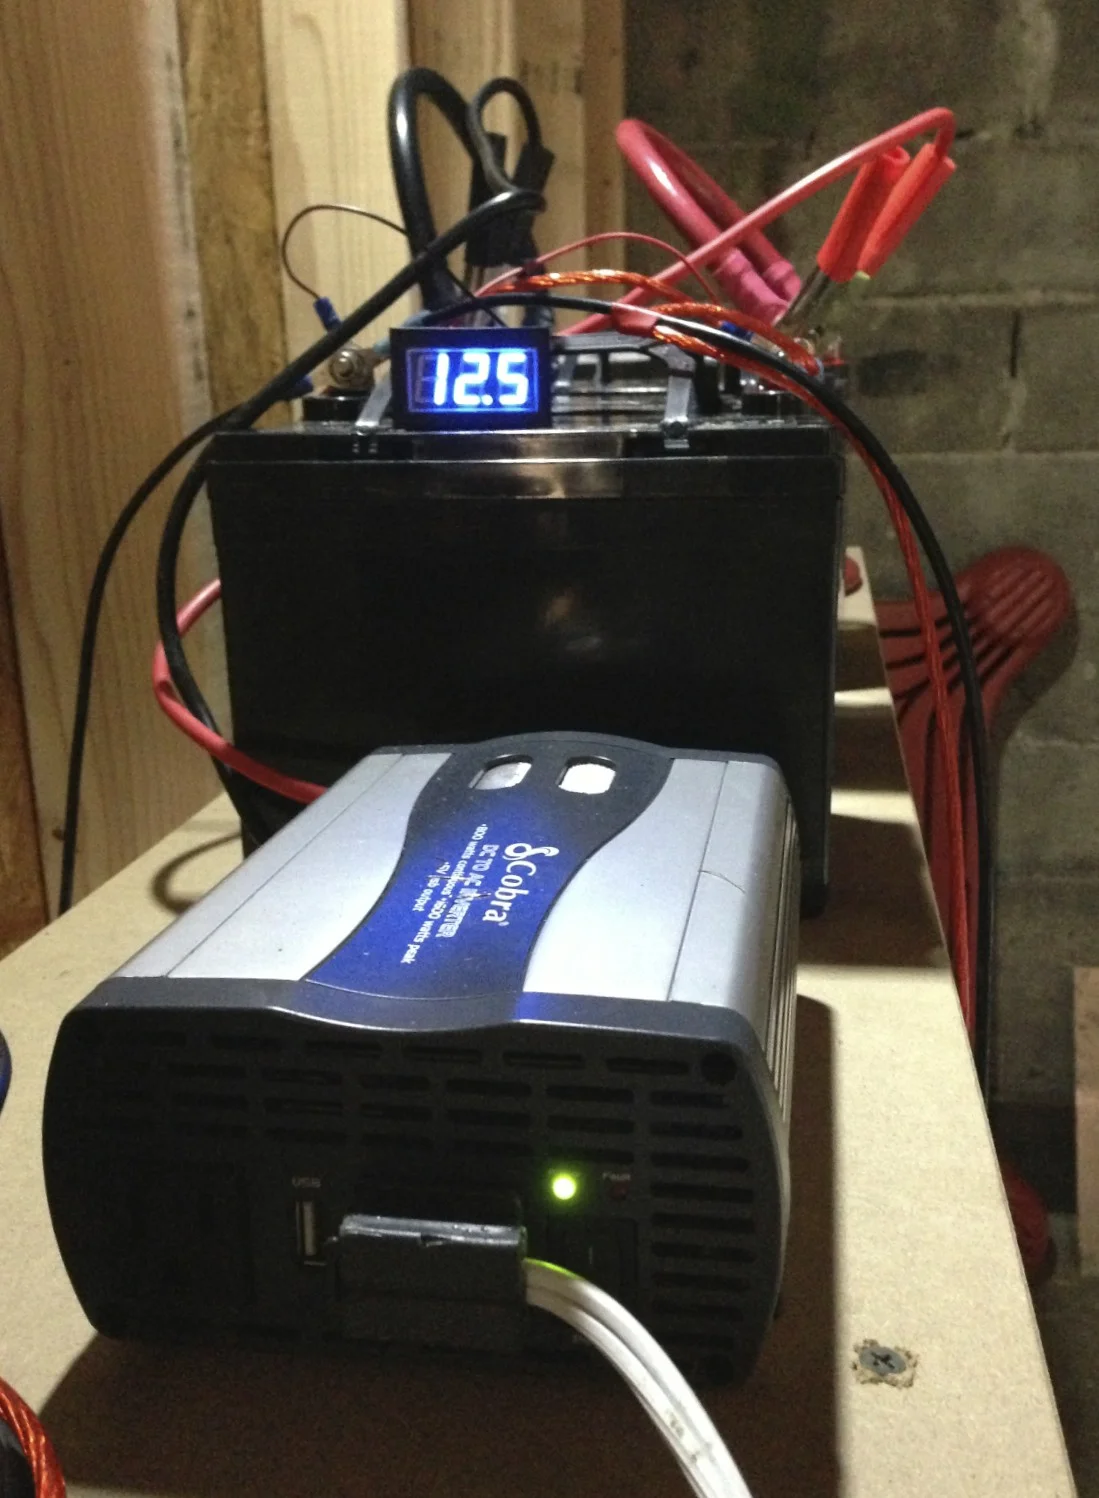
Update (January 2015): The batteries still work, but they're starting to hold a bit less of a charge. I purchased a 10 amp DC power invert from Amazon so that I could run them off AC power, and a five port USB charger to keep my phone and headphones charged while I was there. The power supply is slightly underpowered for the task, and after an hour or so I'd trip the built-in protection circuit and the lights would go out. It would auto-reset a few minutes later and the lights would continue to work fine for another hour or so. I might try chaining the power supply with the batteries, using the batteries as a kind of buffer to keep everything running smoothly, but I'm concerned that if I do this wrong that I could damage the batteries by overcharging them. At the moment the batteries are still hooked up to the charger in case I should need them again.
With the lights, electric heater, battery charger, USB hub and an angle grinder running, I'm using just shy of 18 amps of my presumably 20 amp circuit . I make sure to turn off the heater before I use the grinder, though, since the breaker panel is not accessible to me and I'd have to call the landlord to reset it if I ever tripped it. So far so good, though.
The power inverter (bottom) powers the lights instead of the batteries. The batteries are constantly being charged by the battery charger (behind the inverter), and a five port USB power supply (white box) keeps my phone and headset charged up.
Update (October 2013): As of this month, the garage has hard-wired power with four outlets and a light socket. I'm still using the batteries to power the LED lights, mostly because I already have that set up. The dual charger charges two of the batteries from one lead and the last one on another. I had been considering replacing the wingnut-and-wingbolt method of connecting the cables to the batteries with some jumper cable like alligator clamps, but since I now have a reduced dependency on them, I don't see a need to do so.
Eventually, the batteries will die. The high-amperage DC work lights work very well, but they can't just be plugged into AC, so I'll likely get a 10 amp DC power inverter to handle that. They'll have severed me well until that day comes.
I rent an inexpensive two-car garage so that I can work on my DeLorean. It is a hundred-something year old building about a twenty minute drive from my condo, and is conveniently located near three auto-parts stores, a drug store, a couple fast food restaurants, a grocery store, a transmission shop, a fire station and a train track. This basically gives me free reign to make noise and provides easy access to common car parts, supplies and food. It's really only a one-car garage and a workshop area, as the front of the second stall is is walled off to house a dumpster for the associated apartment building next door (you can't even smell it from the main part of the garage).
The garage isn't fitted for plumbing or heat, but I can deal with those, and the nearby stores provide access to bathrooms. For heat, I may get a propane heater this winter to keep the garage warm, and place a transparent tarp or strips over the open garage door to let light in while keeping the cold out. A 3" lip between the garage and the sidewalk can make it tough to get a low car like the DeLorean in, but a couple of boards on the ground work around that easily enough. Overall this place has been very handy, even with these minor issues, and I can't beat the price.
The real problem is power. The building has hundred year old wiring -- the knob and tube style that has long since been replaced with modern standards in more recent construction. When I got there, the electricity was no longer running. Luckily this wasn't much of problem for most of what I was doing. After a year of bugging the landlord every few months, though, I got to the point where I both needed power and got tired of waiting, so I decided to provide my own power.
BATTERIES FOR POWER
I figured that I could rig up something akin to a solar power solution, but without the solar panels. The goal was to have enough power for one day's worth of work on the car.
To this end, I got three sealed lead acid 12v 35Ah batteries from Amazon. It's easy enough to add more batteries if need be, but three seemed like a good starting point. While the batteries can be drained pretty far, it's seems to be best to keep them above 11v if you want to use keep using them for years to come. I plan to keep them above 11.2 at all times, so I also picked up a DC panel voltmeter so that I could keep track of the discharge state. I also wanted to get an amp meter, but I couldn't find one that would really do what I wanted at a reasonable price.
To link the batteries together in parallel (thus creating a 12v 105Ah bank) I purchased twelve inch 2/0 gauge battery interconnect wires. This is probably overkill, but might come in handy if I eventually do add solar to charge the batteries, or run heavier loads.
The batteries hooked up to each other, a power inverter (grey box on the left) and a some worklights.
AC LOADS
Now that I had these batteries, I needed some way to actually use them.
I wanted to run some AC appliances, primarily a soldering iron, and an electric fan to help keep things cool in the summer, and be able to charge some USB devices like my phone. There are many such inverters on the market, and I found quickly found an inexpensive 800 watt power inverter with a USB port with two power outlets. The 1600 watt peak power is nice for the initial draw from the fan motor, although I really don't know just how much it draws in practice. I'm not sure if it could run an air compressor, though; I'll have to try that. If I need more outlets in the future, I can always add a second inverter.
The inverter I got was a stepped (also known as "modified") sine wave inverter. These emulate a sine wave as a series of square waves. These are much cheaper than true sine wave inverters, but may have trouble with certain loads like TVs and game consoles. For the kind of equipment I'm running, the modified wave isn't an issue.
It is recommended to buy an inverter that can handle double the load you want. My inverter can handle 800 watts for one hour before it has to be turned off so it can cool down. I heard the fan go on for a few seconds a couple of times (mostly while both charging my phone and running my fan), but I had no problem running it all day like that.
The power inverter connected to the batteries.
LIGHTS
For lighting, I was originally thinking of using car headlights, but I soon found some 27 watt LED worklights that are designed to be mounted on trucks and off-road vehicles. I mounted one on the wall to illuminate my work table, with a standard home light switch to turn it on and off. A second is used to better light the work table, and is mounted to the side on the other wall of the garage. These lights are very bright, and I've only hooked up three of the four I bought so far.
I attached the third light to long wires and mounted it a point-and-shoot camera clamp with a 1/4" nut. This allows me to clamp it to the car's hood or door or whatnot so that I can aim the light at whatever I'm working on.
To wire the lights, I used two one hundred foot spools of stranded 10 AWG wire (one back and one red); I still have around half of each spool left. 10 AWG was probably overkill; 14 or 16 AWG probably would have been fine, and is closer to the size of the leads from the lights themselves.
I used cable clips to keep the wires organized on the walls. They're the U-shapped kind with a nail that you place over the wire and hammer into the wall. They worked just fine and keep the wires out of the way.
One of the work lights hooked up to the batteries.
A light mounted on a clip so that it can be used easily in a variety of locations while working on the car.
CONNECTING EVERYTHING
The batteries themselves are connected with the interconnect cables in parallel (positive to positive and negative to negative), thus giving me 105Ah of power. I put ring terminals on the ends of the light and voltmeter wires to attach them to the last battery in the chain. The power inverter uses simple alligator clips, although it is possible to use a cable with ring terminals on both ends. The clips work fine for now, but I may get cables with a similar gauge wire at some point in the future.
To make it as easy as possible to hook up and disconnect the batteries, I bought 1/4" wing nuts and wing screws from Home Depot. I slide the light and voltmeter terminals onto the wing screw and then put a 1/4" nut on to keep them in place. This allows me to easily attach just the wing screw and wing nut to the battery without worrying about all the wires for the loads.
The batteries wired together.
Batteries and power inverter connected to the each other.
Simple butt joints to connect the batteries to the lights.
A wingscrew and nuts holding the lighting wires in place.
CHARGING
At the moment, I'm taking the batteries home to charge them. I bought a two-battery charger to supplement my single charger so that I could recharge all three at once. While these are lighter than a car battery, they are still a bit heavy to lug around all the time.
Now that the garage has electricity, I keep the batteries and the dual charger in the garage itself, with two of the batteries charging at all times. I use one or two of the batteries at any given time to drive the work lights, while the third remains on the charger. I could replace the batteries with a DC power adaptor, or replace the batteries and lights with AC lighting, but I already have this setup and it's working well, so I see no reason not to use it.
Charging the batteries (bottom) at home with a dual charger (top left) and a single charger (top right).
EXPERIENCE SO FAR
So far I've used it for a few weekends and it' worked great. The power inverter easily powered my large floor fan and charged my phone. The LED work lights are very bright, and light up the garage quite well. After about six hours the batteries had dropped from 12.6v (the reading with everything turned on; it's about 12.9v with everything off) to about 12v with two lights hooked up. Since my imposed maximum drain is 11.2v, I think I can easily go fro an entire day with these three running all three lights before I need to disconnect them. If I need more, it's easy to get another battery and add it to the chain.
The only problem with my setup is that if I have to go home when it's dark, I have to use a flashlight so that I can see well enough to disconnect the batteries to bring them home, since obviously I can't use the batteries to power the lights anymore. Even during daylight the wall I mounted the batteries on limits the amount of available light, but it's not too bad. Now that the garage has proper electricity, even this isn't an issue anymore.
The light I attached to a clamp has been very handy, and provides a lot of light where I need it without also giving off a lot of heat. Very useful in the summer, although in the winter I won't be able to stand in front of it for warmth. The heat sink on the back does get warm, though, so I can always warm up my hands on that.
FUTURE UPDATES
I may add a solar panel to the roof, probably a roll-out laminate panel with adhesive backing, along with a regulator to ensure that I don't damage the batteries or the panel. They'd be in the shade, but it's the best I can do. I usually only go to the garage once a week, so they should be charged when I get there.
I still have one LED work light to mount. I'm not quite sure where I want it yet. The lights are much brighter than any handheld work light I've used, but the heat sink on the back can get hot to the touch. Being LEDs, the front of the light gives off no real heat, and the glass is cool to the touch.
I may get some interconnect cables for the power inverter instead of using the alligator clips at some point, just to make things a bit cleaner.
I'm considering adding a second "master power" light switch. This would sit between the batteries and the lights and power inverter, and would make it easier to switch off everything if I have to run to the auto-parts store. This voltmeter would stay connected to directly to the batteries. I mostly have to figure out how I'd want to set up the connection for the inverter's alligator clips and the ring terminals for the other wires. It could probably be as simple as running two bolts through a piece of wood.
PARTS AND TOOLS
- Three (3) 12v 35 Ah sealed lead acid scooter batteries: $65 each.
- Dual battery tender: $80. There is also a quad battery tender. If I'd done more research, I likely would have found that I could buy three single chargers for less.
- Single battery charger: $20-$50. I already had one with jump-start capabilities.
- Six (6) 12" battery interconnect cables: $13 each, three black and three red. I used 2/0 gauge, but 4/0 gauge is probably fine for small loads like this.
- Camera clamp mount, similar to the Sunpak ClampPod Pro: $24. I removed the flexible shaft and mounted the light directly to clamp. It seems to be fairly a strong with padded jaws to avoid damaging the car's finish.
- Four (4) 27 watt truck work lights: $108 for a four-pack.
- Panel Voltmeter: $15
- 800 watt power inverter with USB port: $50. These cheaper ones have stepped or modified sine waves, which is fine for shop tools but not useful if you need to run more precise electronics like a TV, game console or other system with finicky power supplies.
- Two (2) 100 foot spools of 10 AWG wire: $25 each, one red and one black. Thinner wire (higher AWG) is probably fine for most tasks, included my use here.
- Ring terminals: $4 for a pack
- Crimp tool to attach the ring terminals to the wires: $10-$50
- Two (2) 1/4" wing screws, 1 1/2" long: $2
- Four (4) 1/4" wing screws, 3/4" long: $4
- Six (6) 1/4" wing nuts: $4
- 3 (3) 1/4" nuts: $1; two securing the ring terminal wires to the wing screws, and to mount a work light on the clamp.
- New work box for mounting a light switch: $1
- Light switch: $1
- Power drill and screws to mount the lights on the wall.
- Socket set for the nuts and bolts on the lights.