Reassembling the 2.8L Lower Crankcase to the 3.0L Block
Joe Angell
My 3.0L gasket kit and oil pan gasket arrived from DeLorean Performance Industries the other day, and I was finally able to reassemble the bottom of the new engine. I don't need ever single gasket just now -- I'm not pulling the cylinder heads, for example -- and I"m not even entirely sure what some of them are fore.
The DPI 3.0L gasket set. The large blue one is DPI's oil pan gasket.
Installing the Lower Crankcase
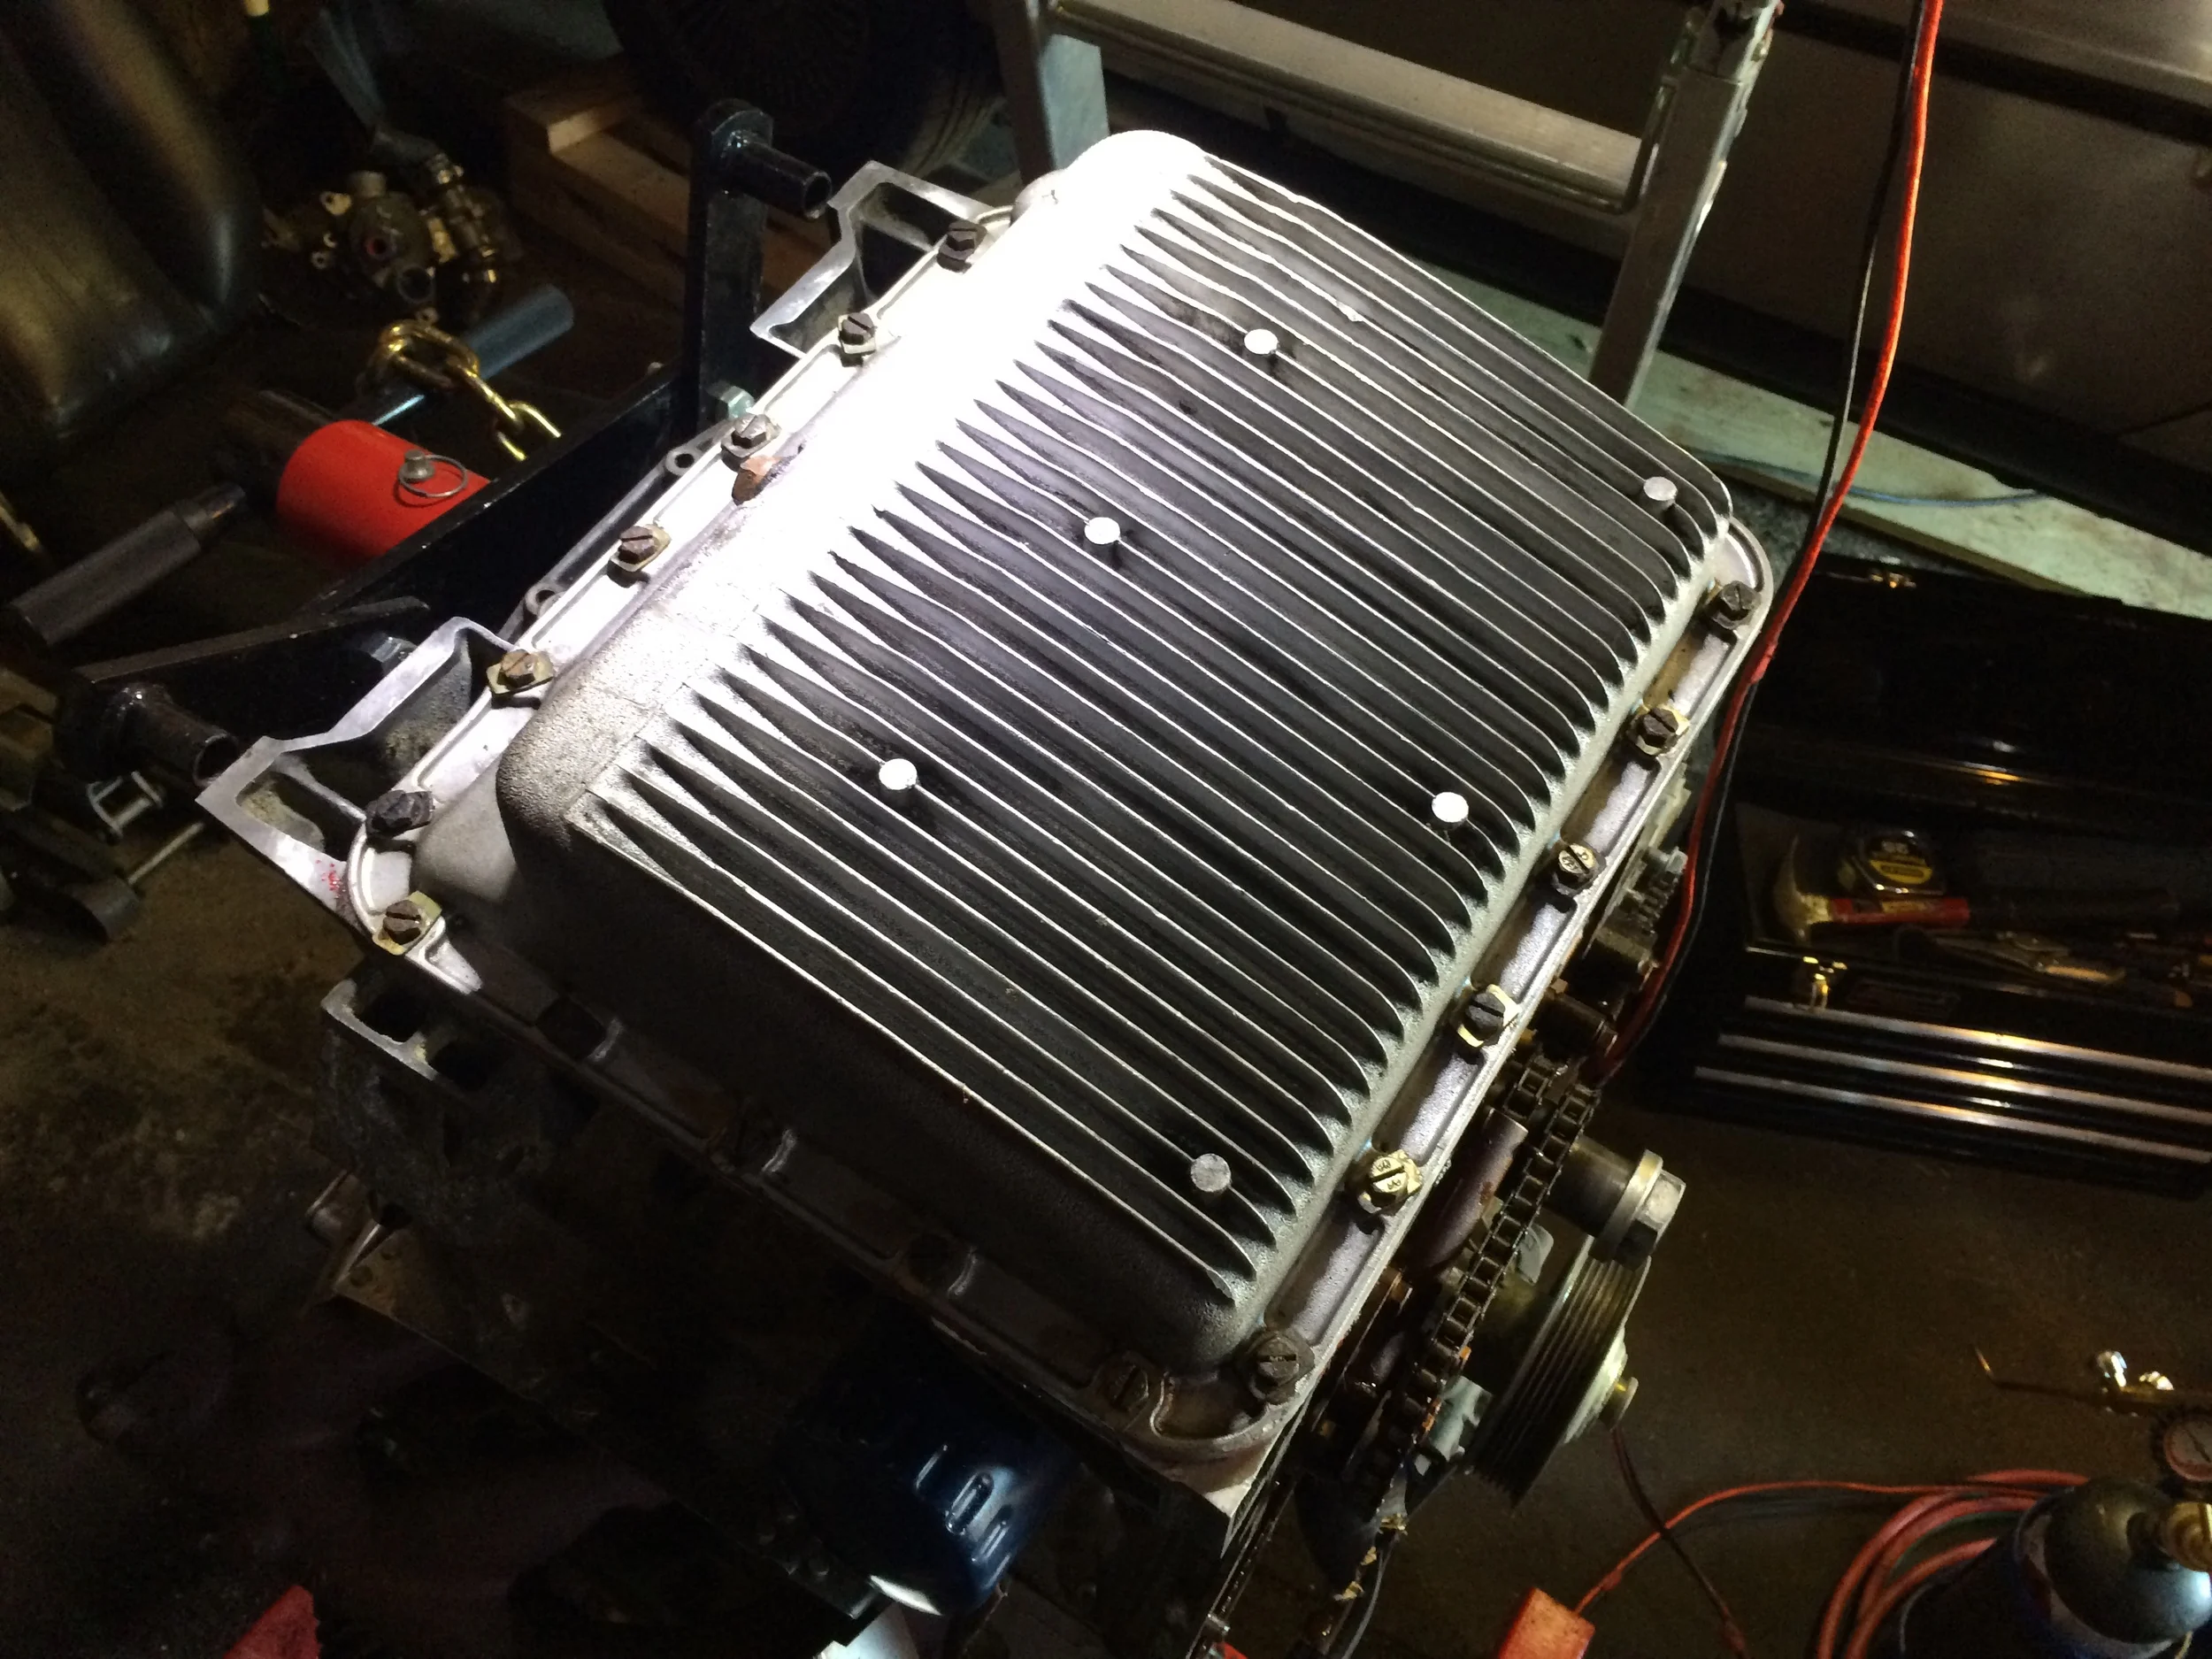
The lower crankcase mates to the block without a gasket. The first thing I did was test fit it to make sure it sat properly. I quickly noticed that something was sticking out and preventing it from seating. It turns out I had it backwards -- spinning the lower crankcase around so that the engine mounts were closest to the flywheel allowed it to seat properly.
The lower crankcase resting on the block backwards, unable to seat properly due to the oil pump tube.
The silver tube from the oil pump protrudes slightly from the block, making it impossible to install the lower crankcase backwards.
Surface Prep
For reassembly I followed this guide from DMCTalk. The first step is to spray both mating surfaces with Permatex Surface Prep (24163). This doesn't appear to do much visually -- it just leaves a very faint green film on the parts. I wasn't sure about how this would do inside the engine, so I covered it with shop rags first.
Shop cloths covering the engine before spraying on the Surface Prep, just in case.
The Surface Prep leaves a faint green film on the parts.
Applying the Anaerobic Gasket Maker
After leaving it to set up for a few minutes, I continued following the guide and ran a continuous bead of Permatex Anaerobic Gasket Maker (51813) around the entire mating surface. I actually overdid it a bit; there's no need to put any on the side of the engine with the timing chains, since that is open to oil and is sealed by the timing cover. I wiped that away after I had placed the lower crankcase and could see where the excess was clearly.
A bead of gasket maker run all around the mating surface on the block.
Permatex Surface Prep (24163) and Anerobic Gasket Maker (51813)
Alignment
Before you tighten any of the bolts, you first need to make sure the lower crankcase is properly aligned with the block. The manual references an alignment plate, but I didn't have one of those. Instead I just looked at the front of the engine to see how well the two lined up. If the alignment is off by too much, the timing cover won't sit properly and you'll have an oil leak.
Mine wasn't quite aligned on one side, so I placed a block of wood against it and whacked it with a hammer a few times until it flush.
Tightening Procedure
Once aligned, the tightening of the eight (8) main bearing nuts that hold the lower crankcase to the block must be done in a specific order. You really just start with any one of the inner nuts, then tighten the other three inner nuts in a spiral pattern, and then the outer ones (starting with the one nearest the inner one you started with) again in a spiral pattern. The nuts require a 19 mm socket and 20 ft lbs with a torque wrench.
The lower crankcase resting on top of the of the block, ready to be tightened down.
The order in which to tighten the main bearing nuts, as described in the Premiere/Monaco 3.0L Engine Manual, page 52, figure 124.
Next you tighten each nut an additional 75 degrees, going around in the same order as before. To tighten them properly you need an angle torquer. I bought mine from Amazon for under $30. This is the first time I'd used one, but it's pretty simple. The angle torquer sits between the socket wrench and the socket. It has a freely spinning dial attached to a flexible arm, a pointer so you know what angle you're at, and a thumb screw that locks the dial to keep it form rotating.
To use it, you attach the socket and the wrench to the angle torquer, and place the assembly onto the nut to be tightened. You then clamp the flexible arm from the dial to something solid that won't move (like another part of the engine). Next you loosen the thumb screw, rotate the dial until the pointer is at zero degrees, and then tighten it again. You can now turn the wrench clockwise until the pointer reaches 75 degrees, being careful not to move the flexible arm (since that will rotate the dial). Repeat this for each nut in the spiraling sequence. I used a cheater bar (a long iron pipe) on the end of my wrench to make it easier to turn while motoring the dial, as it requires quite a lot of force.

Angle torquer with a 19mm socket on one end and a socket wrench on the other. I was using a 3/8" to 1/2" adaptor on my wrench as I didn't have the right size available.
Oil Baffle
At this point I had set up the oil pan and its gasket, loosely placed each of the oil pan bolts on the pan, and was about to tighten them down when I realized I had completely forgotten to install the oil baffle and pickup. I quickly took off the oil pan and got back to that missing step.
The oil baffle is held on with four (4) long bolts plus one (1) smaller bolt. There are also six (6) similar long bolts that go into cutouts around the edges of baffle. These six are the bearing mounting bolts, but hey all get installed at the same time.
I used the baffle from the 3.0L engine. The bolts are very similar in the 3.0L and 2.8L, with the 3.0L being threaded completely instead of only at the ends. I decided to use the 3.0L bolts.
All ten of the longer bolts are tightened to 13 ft lbs with a 13 mm socket. The smaller oil baffle bolt goes into the center of the edge of the baffle nearest the timing chains, and is tightened to 9 ft lbs with an 11 mm socket. I thought my washers were warped, but Kris Bahnsen pointed out that these are spring washers and are supposed to be like that, where the "warp" prevents the washers from loosening under vibration. If you do replace the washers, make sure to use new spring washers and not flat washers.
The oil baffle and bearing mounting bolts bolts from the 2.8L engine (left) and the 3.0L engine (right).
The oil baffle re-installed in the 3.0L engine.
Oil Pickup Assembly
The oil pickup installs on top of the baffle. There are three bolts and two spacers. The spacer with two bolt holes requires two O-rings, one above and one below. The manual clearly states that these must always be replaced. I ran down to Advance Auto and picked up a small pack of O-rings, which conveniently contained two of the correct size. The bolts are tightened to 13 ft lbs with a 13 mm socket.
The O-rings on the assembly must be replaced before reinstalling them in the engine.
The installed oil pickup assembly.
Oil Pan
The 2.8L and 3.0L oil pans are very similar, and it's pretty much up to you which one you use, as I think both will fit. The 3.0L is made of noticeably thinner metal and is much lighter than the 2.8L one, but the 2.8L pan has fins to improve cooling performance. The 3.0L pan's drain plug is located on the bottom, and makes less of a mess as compared to the end-mounted 2.8L drain plug. However, I didn't check to see if the engine cradle interferes with the plug; I don't think it does, but it didn't matter to me -- I went with the 2.8L oil pan.
The oil pan is installed with a gasket. The one from DeLorean Performance Industries is recommended as being the best (at least according to those on DMCTalk), with the cork ones provided by other DeLorean vendors being less able to provide a good seal.
Continuing to follow the instructions in the guide, I sprayed down the mating surface of the oil pan with Permatex High-Tack Sealant (80064). After letting it set for a few minutes, I placed the gasket on top and pressed it down to make it stick. The gasket is left/right symmetrical, so you can't put it on upside down, but you do need to make sure it's rotated the right way.
With the gasket in place, I sprayed a coat of high-tack sealant onto its other surface to prepare it for mating with the lower crankcase.
High-tack sealant applied to the mating surface on the oil pan.
The gasket applied to the pan.
A coat of sealant sprayed onto the gasket.
After a few more minutes of set up, I flipped the pan and carefully placed it on the lower crankcase, aligning the holes between them. There are twenty two (22) bolts that hold the pan to the lower crankcase. The threads on the 2.8L bolts are different from those on the 3.0L, so you need to be sure to use the right ones or you won't be able to get them in. These bolts pass all the way through the lower crankcase and into the block, so you need to use the 3.0L bolts. They're shorter than the 2.8L bolts and featured rectangular washers. It's probably better to use them with the thinner 3.0L oil pan, but I had no problem with them on the 2.8L pan. The bolts are tightened with an 11 mm socket to 9 ft lbs.
The 3.0L oil pan bolts are shorter, have coarser threads, and use rectangular washers as compared to the longer, finer-threaded 2.8L bolts and their square washers.
The 2.8L oil pan installed on the 3.0L engine.
Rotating the Engine
With the bottom of the engine back together, I could flip it over again. This wound up being much more complicated than I had anticipated. The engine was only held onto the stand with two of the four requisite bolts, since the other two attach to the recently-installed lower crankcase. Combined with the fact that the bolts that were installed weren't fully tightened, the downward force made it impossible to remove the pin that kept the stand from rotating.
After experimenting with a floor jack and some wood to lift the end of the engine and relieve some pressure from the pin, I finally hooked up the engine hoist and used that to lift it enough to get the pin out. However, i still couldn't turn the engine over -- the torque from only being held up quite poorly by two bolts was too much.
In the end, I flipped the engine with the hoist. I did this by attaching it to one side of the engine and raising it, thereby rotating the engine on the stand. About half way around I had to prop the engine with a block of wood and anchor the hoist further down the block to continue turning it. Oil that was still in the engine poured out of one of the heads through an exhaust manifold, making a mess of the floor, but I finally got it right side up again.
The large gap (marked by the yellow arrows) between the stand's fingers and the engine resulted in a large amount of downward force that made it extremely difficult to rotate the engine.
Using the engine hoist to rotate the engine.
The engine back in its upright position
Removing the Exhaust Manifolds
My last job for the day was to remove the exhaust manifolds. These came off the 3.0L engine quite easily. Nothing was rusted in place at all (although the manifolds themselves were browned with rust), and an 11 mm socket was all that was needed. Each manifold is held on with six (6) nuts, but there were a few other bits that needed to come off as well.
One side of the engine featured a heat shied under the manifold. This is attached to the lower studs with an additional three (3) nuts, sandwiching it between the nuts holding the manifold on and the nuts holding the shield on. I had to use a pry bar to bend part of the shield to get access to one of the nuts.
On the other side, there is a pipe that goes from the exhaust to the air intake. It's not clear to me how this works or what it's used for, but I removed the two (2) bolts from the manifold side with a 13 mm socket without any trouble.
The heat shield under one of the manifolds is held on with an additional three nuts.